DFG

DFG Agents Only

Enter your access code to view this page.

Incorrect PIN — try again.
Duse Financial Group · Agents Only
← All carriers
Corebridge (AIG)
Corebridge (AIG)

Corebridge (AIG) e-App Guide

SimpliNow Legacy SIWL · GIWL · 40 steps · 2 e-sign scripts
Where to startCorebridge dashboard → E-Apply (iPipeline iGO)
How the client signsTwo emailed signature ceremonies (HIPAA, then final)
ScreenshotsTap any screenshot to enlarge it. Yellow numbers in the shot match the numbered sub-steps.
Agent

E-App Guide

1
Step 1 screenshot

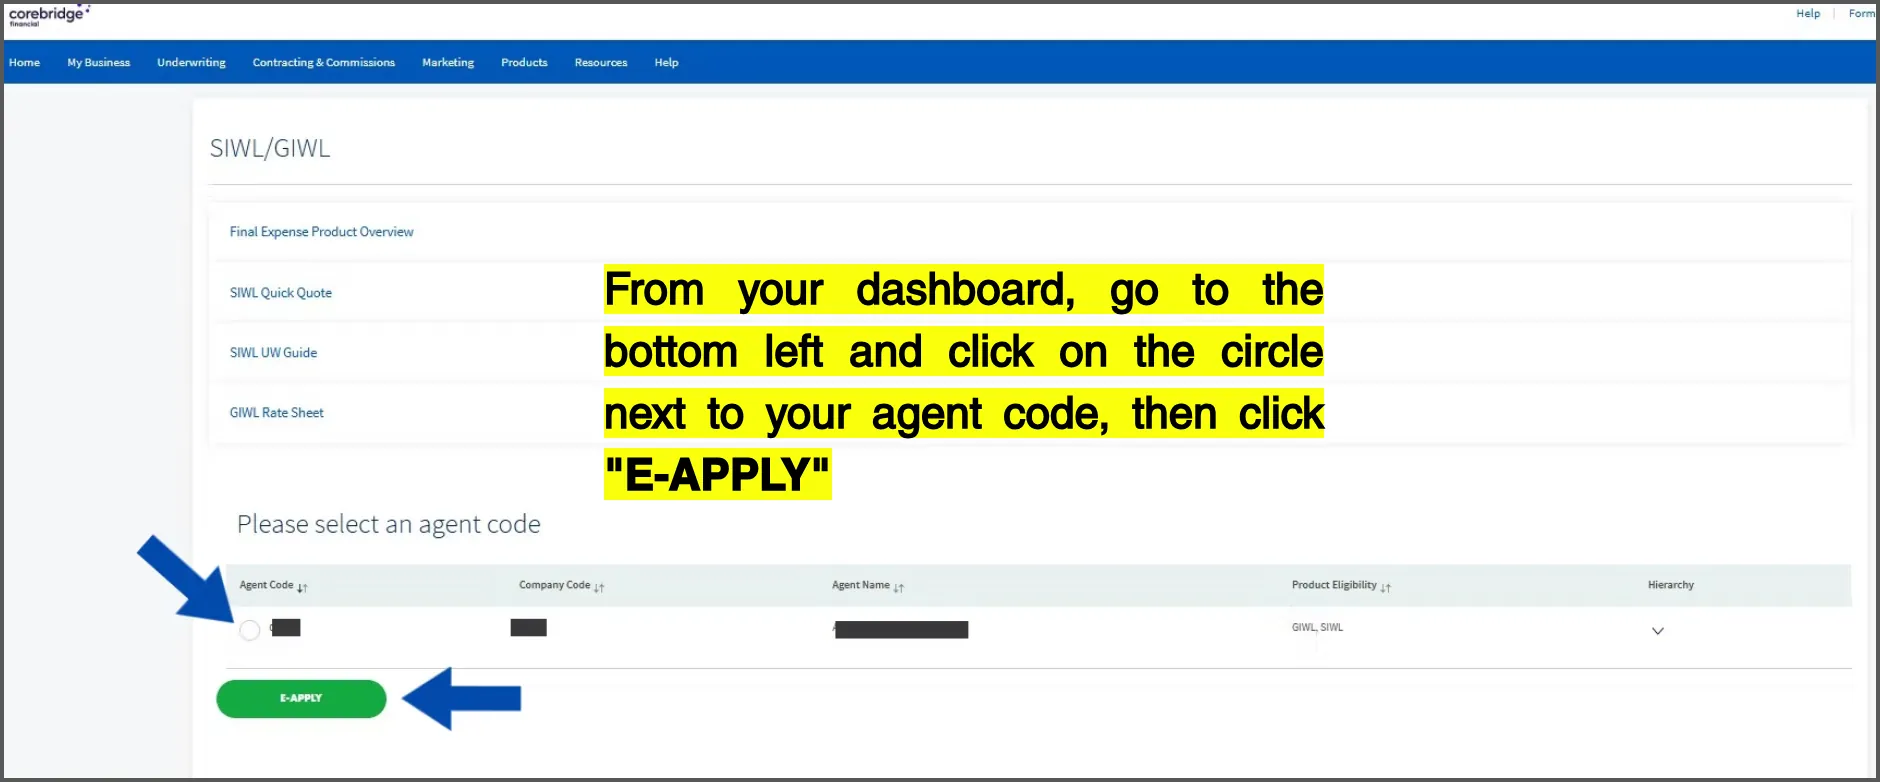
From your dashboard, go to the bottom left and click on the circle next to your agent code, then click E-APPLY
2
Step 2 screenshot

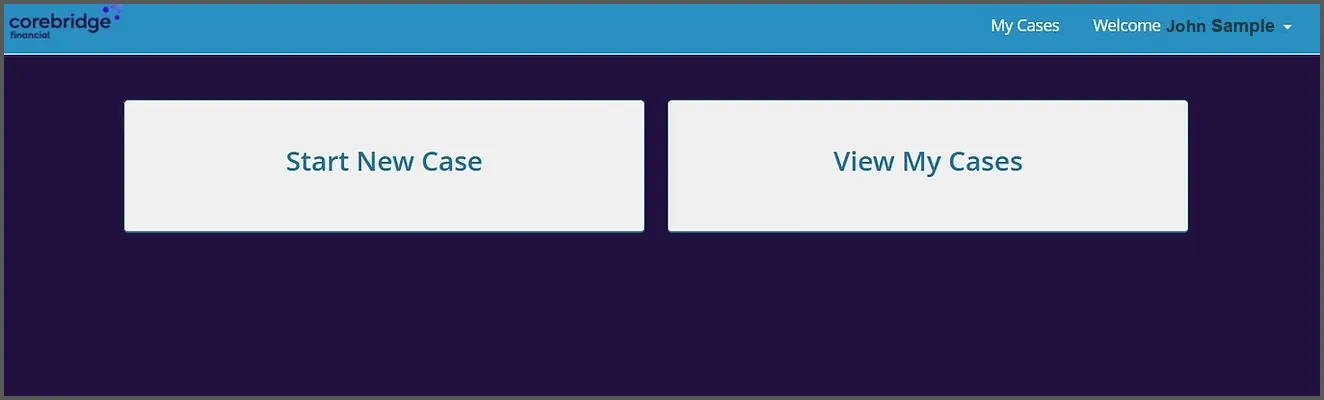
Select START NEW CASE to start a new app.

To review unfinished or finished apps, click VIEW MY CASES
3
Step 3 screenshot
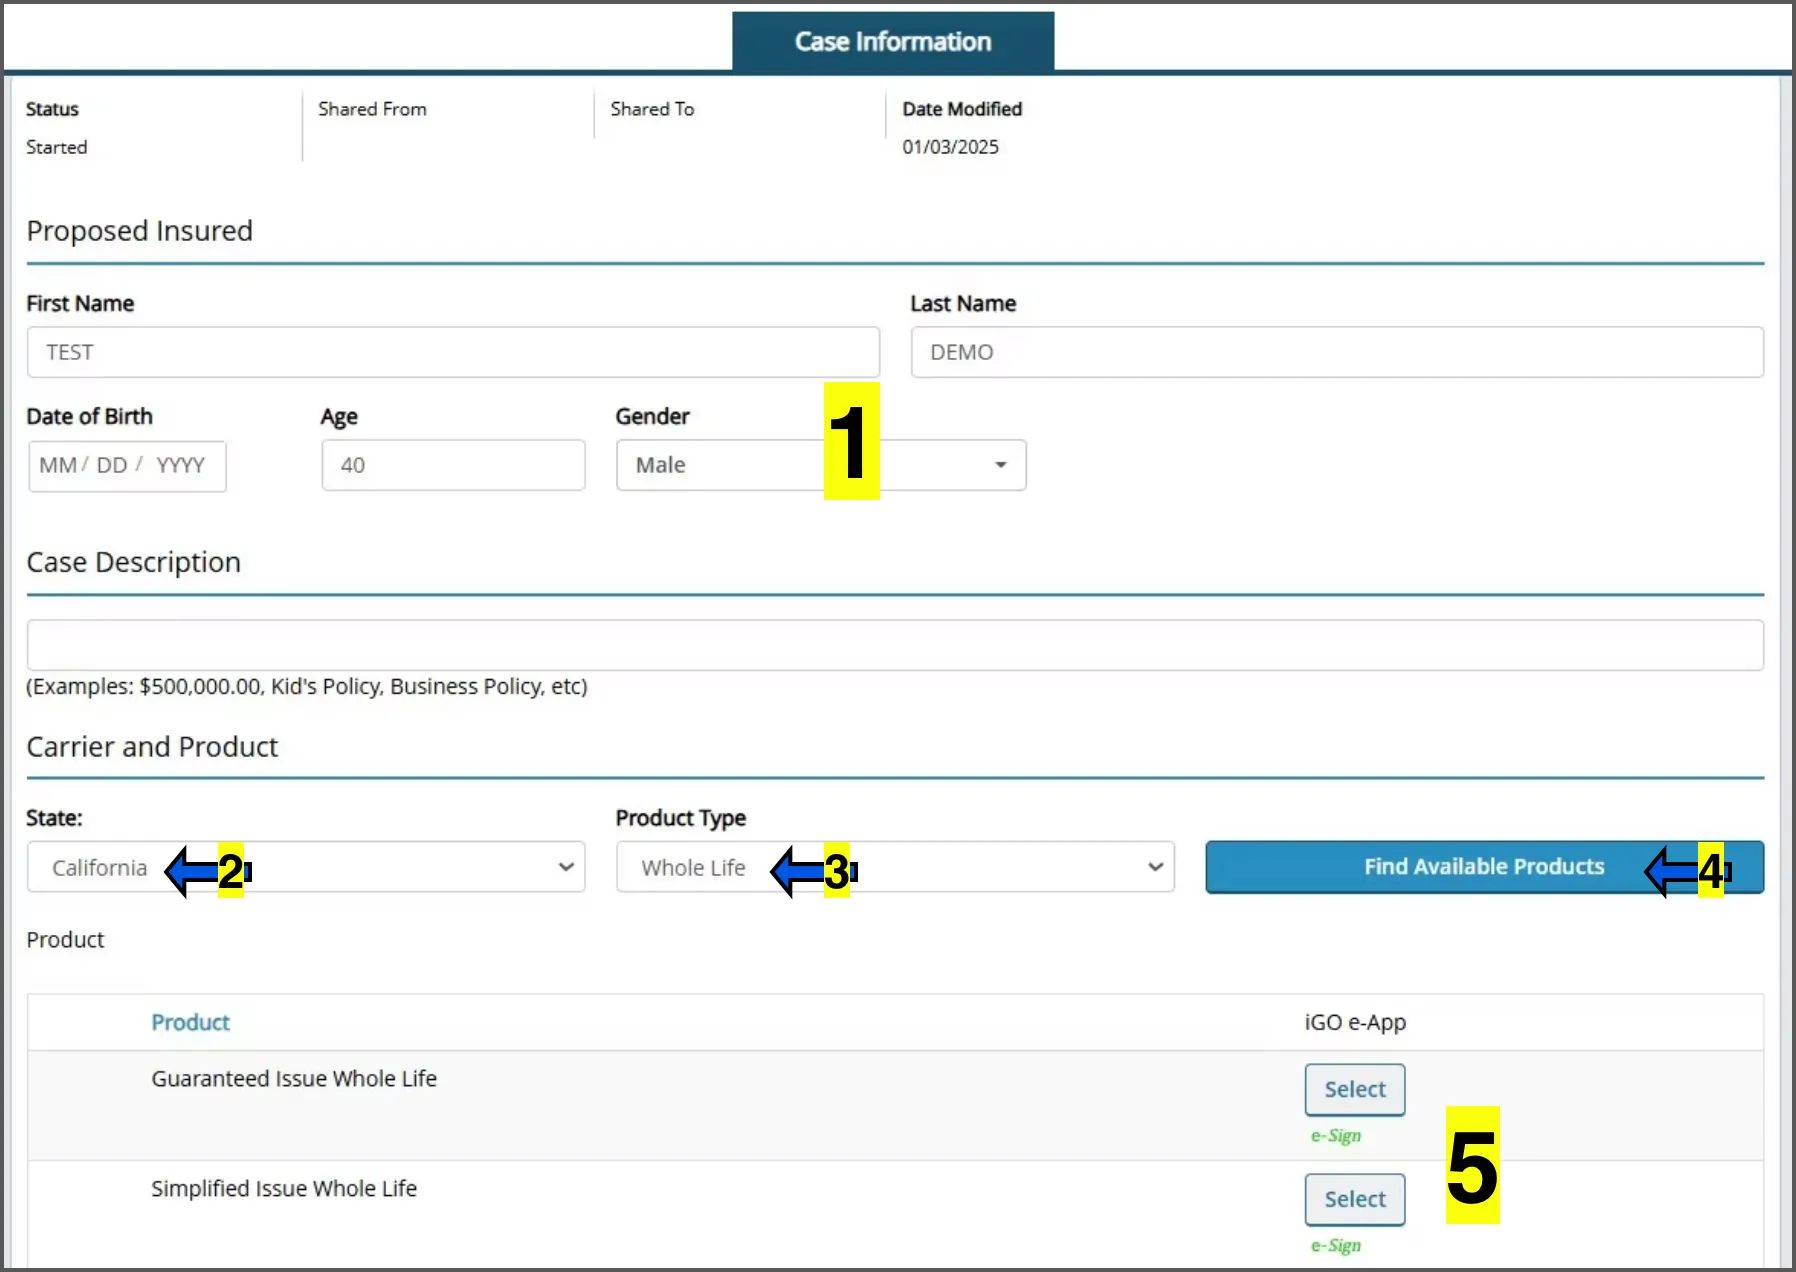
  1. 1
    fill in the applicant's general information. "Case description" can be left blank.
  2. 2
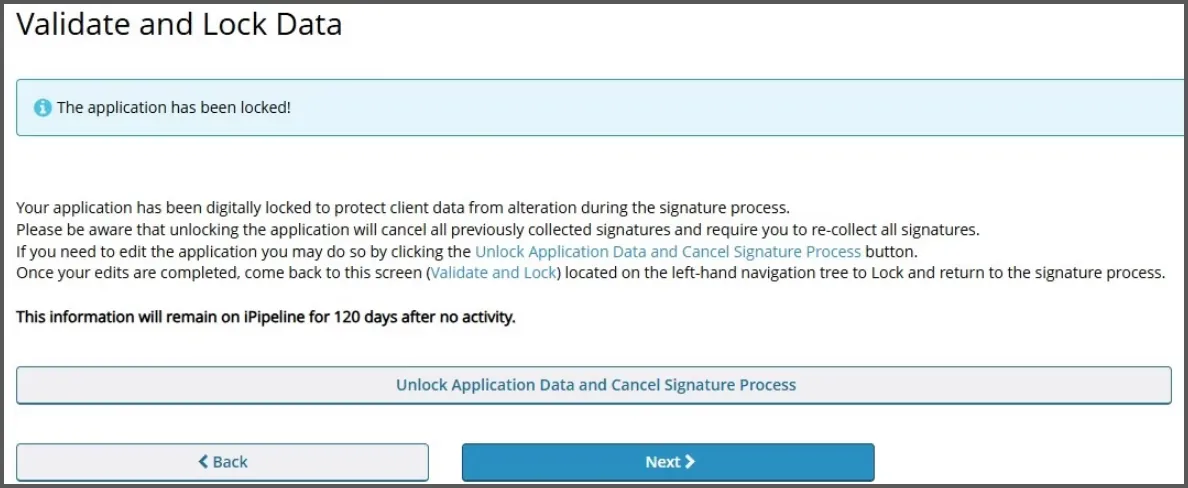
    choose the State from the drop down.
  3. 3
    choose WHOLE LIFE on the PRODUCT TYPE dropdown
  4. 4
    click the FIND AVAILABLE PRODUCTS button.
  5. 5
    choose if you are going for the SIMPLIFIED ISSUE or the GUARANTEED ISSUE by clicking the SELECT button to the right side of it. NOTE: The Guaranteed Issue does not ask any health questions and is a graded product.
4
Step 4 screenshot

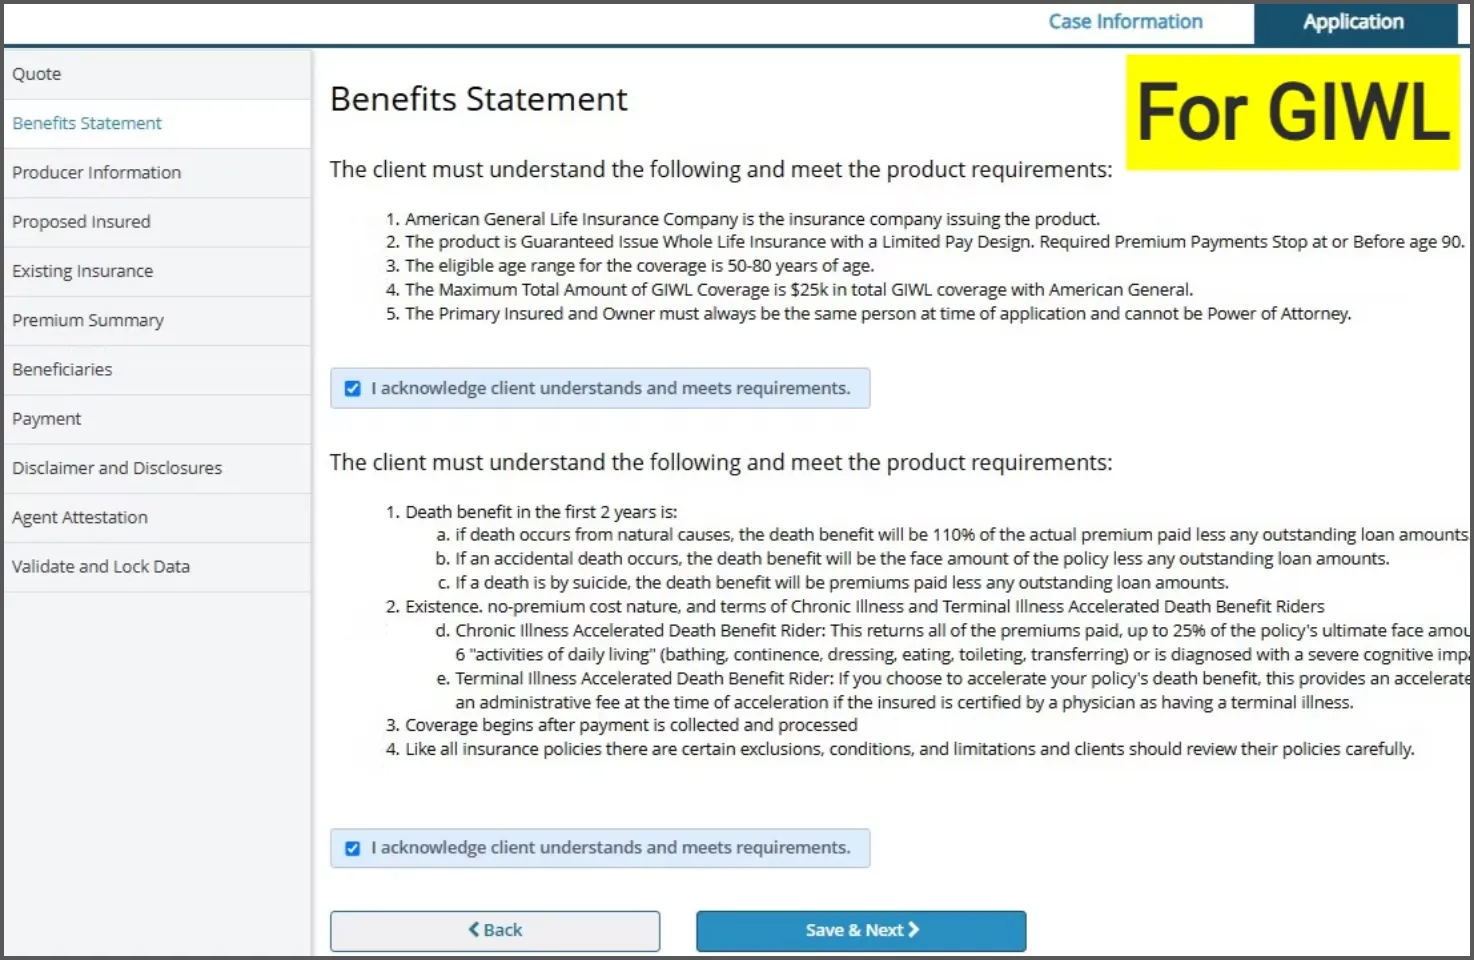
IF you are placing the client with the GUARANTEED ISSUE (GIWL), you will see this on the next screen.

If SIWL, scroll to next step as this does not apply.

If this was not disclosed to the client already, make sure they understand these details. Click on both boxes that say I ACKNOWLEDGE and then click SAVE & NEXT.
5
Step 5 screenshot
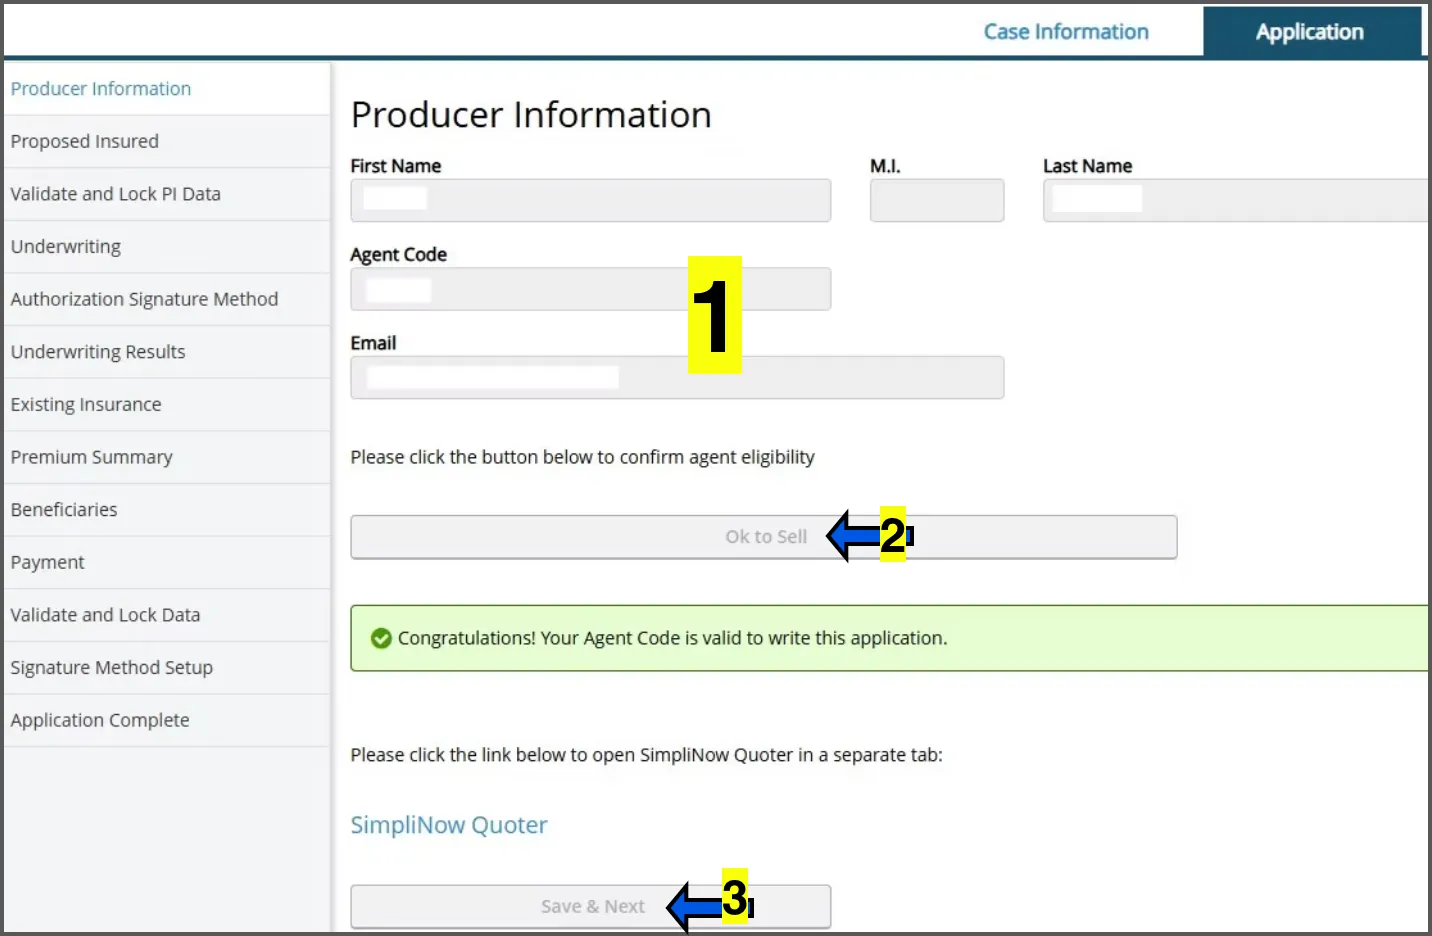
  1. 1
    confirm YOUR details as the agent.
  2. 2
    click the OK TO SELL button.
  3. 3
    click SAVE & NEXT.
Note You may click "SimpliNow Quoter" if you have not already generated quotes.
6
Step 6 screenshot
Step 6 screenshot
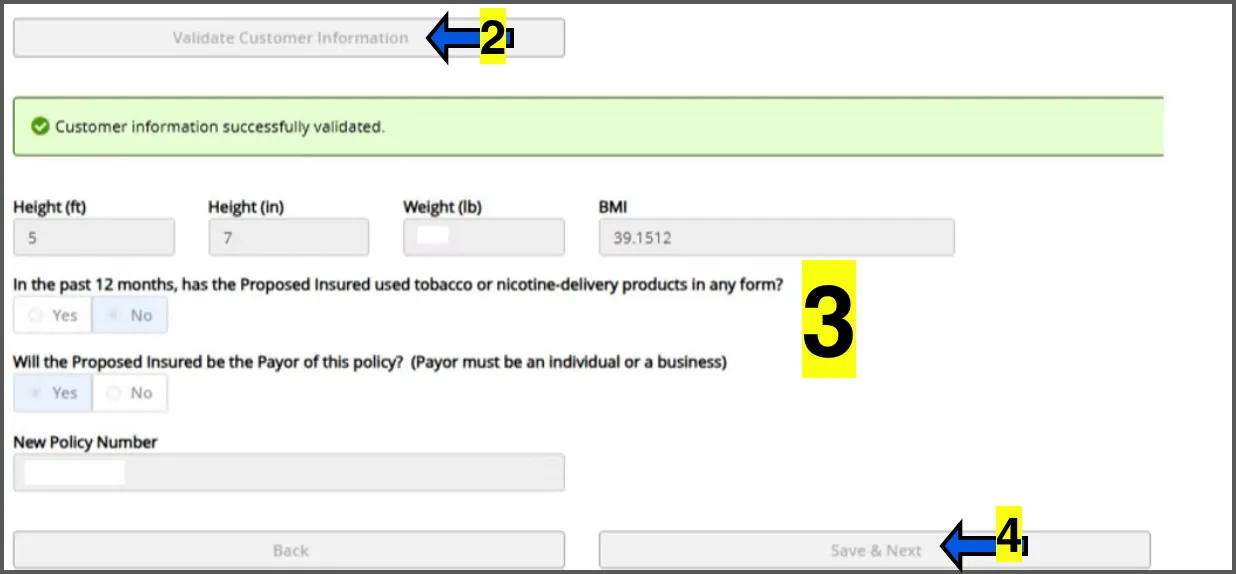
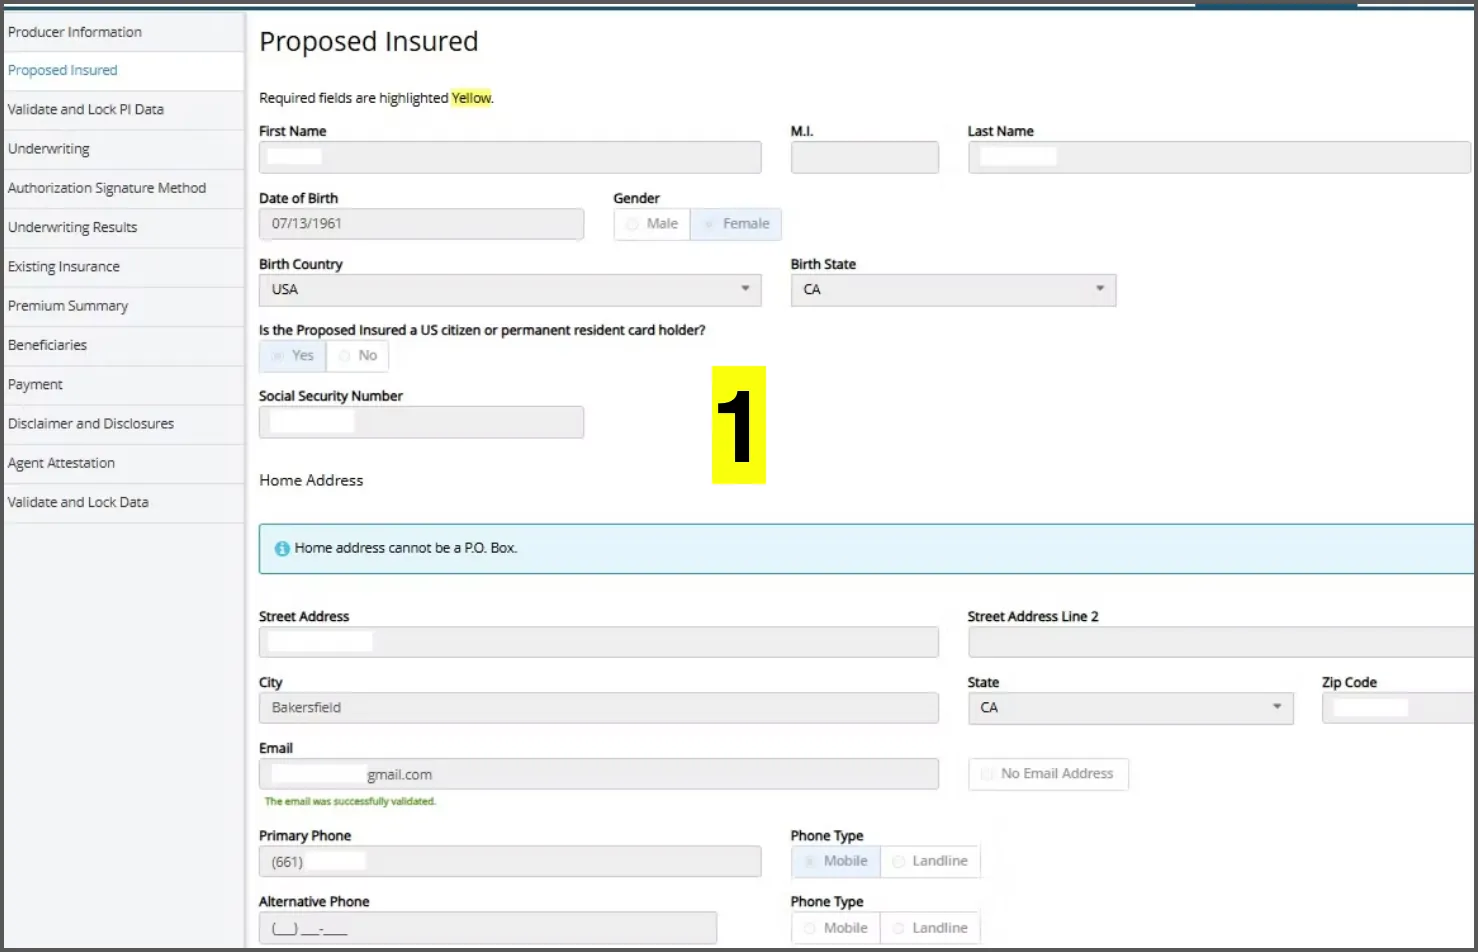
  1. 1
    fill in the applicant's general information.
  2. 2
    click the VALIDATE CUSTOMER INFORMATION button.
  3. 3
    continue filling in the rest of the applicant's general information. A policy number should be generated on the bottom.
  4. 4
    click SAVE & NEXT.
Note You may click "SimpliNow Quoter" if you have not already generated quotes.
7
Step 7 screenshot
Step 7 screenshot
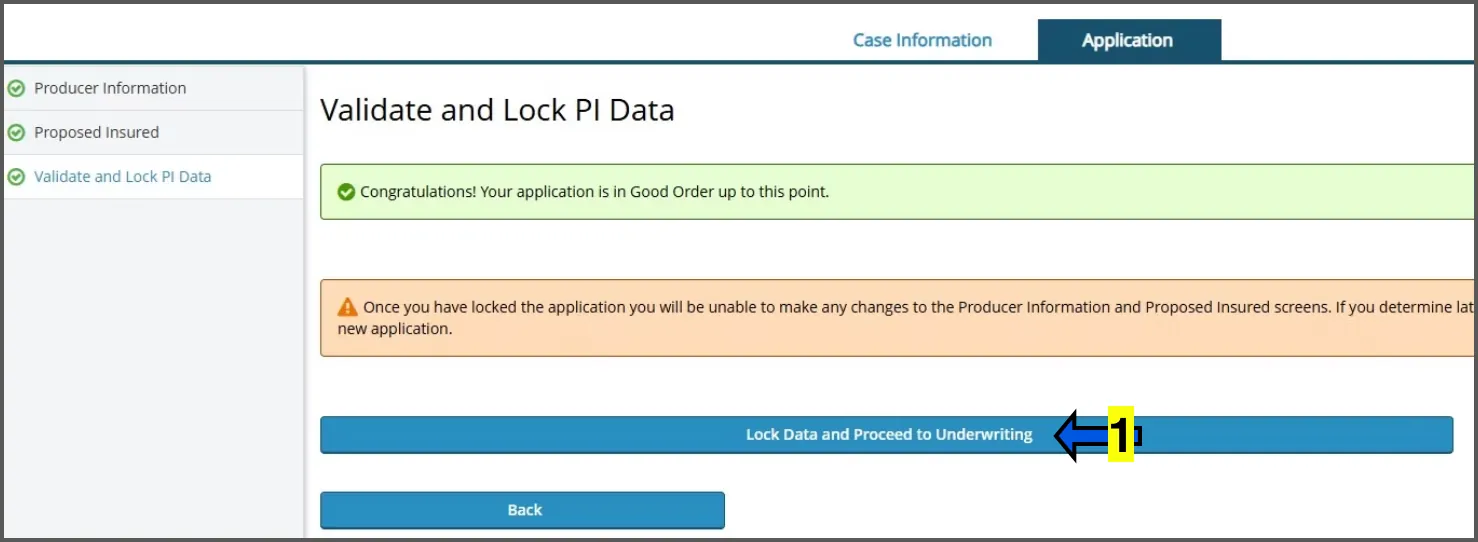
  1. 1
    click the LOCK DATA AND PROCEED TO UNDERWRITING button.
  2. 2
    click the SAVE & NEXT button once it populates.
8
Step 8 screenshot

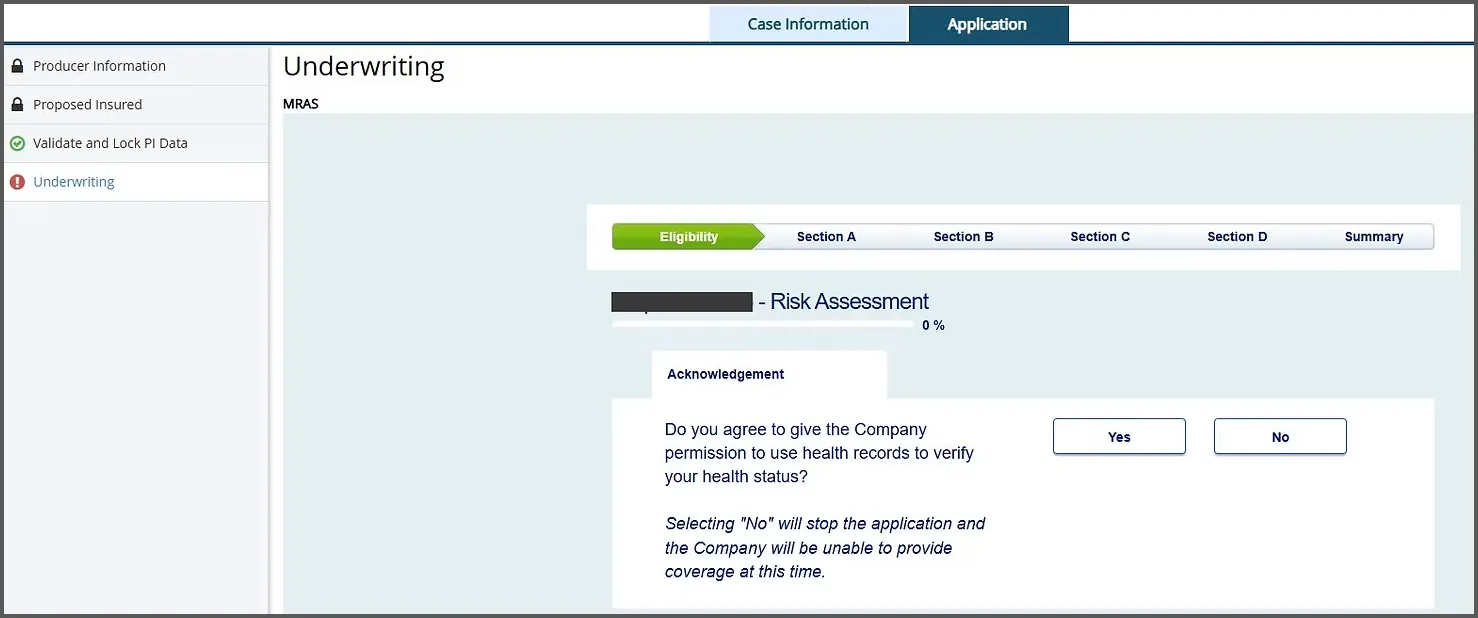
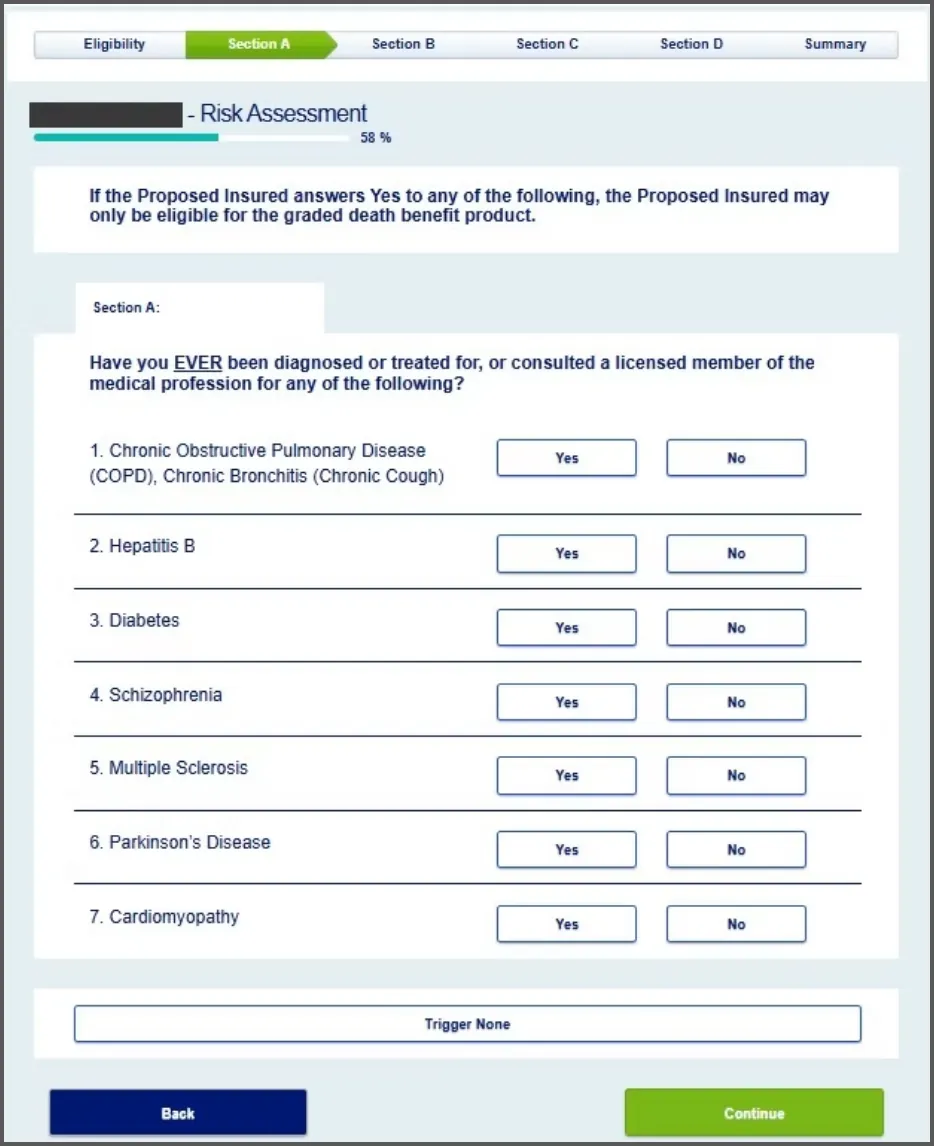
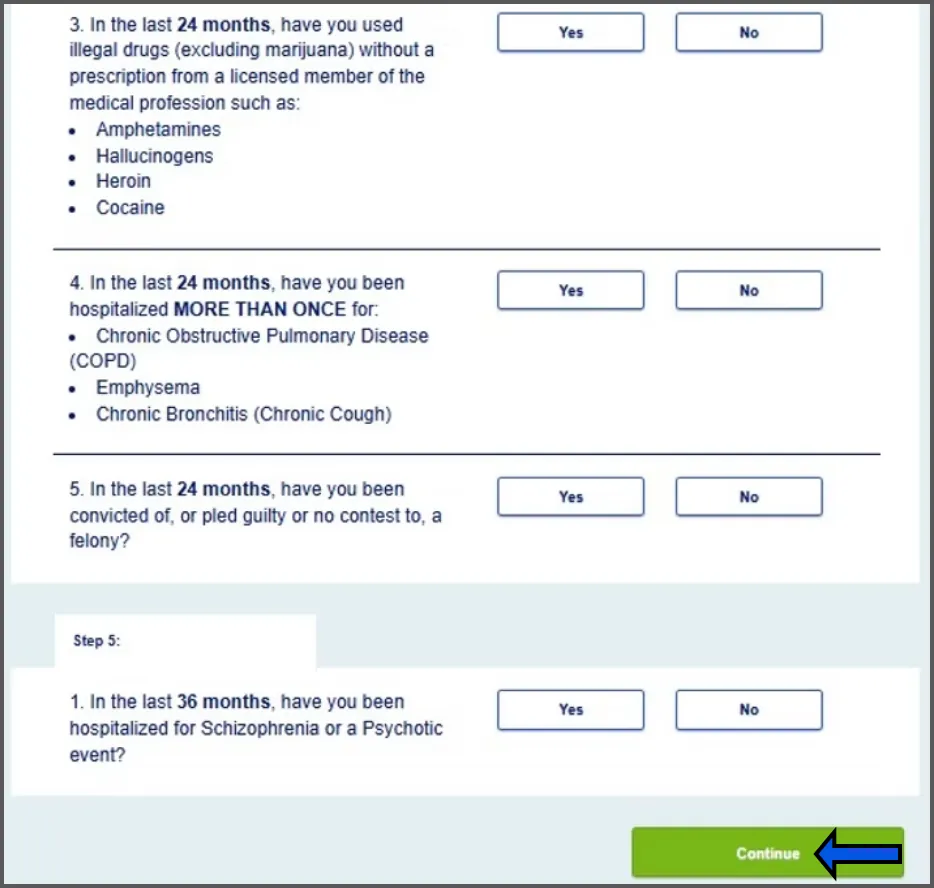
Answer the health questions according to your medical intake.
9
Step 9 screenshot
Step 9 screenshot
Note TRIGGER NONE can be clicked if all answers on that certain section are a NO. It will automatically answer all questions with NO.

Continue to answer health questions clicking the green CONTINUE button to move through each section.
10
Step 10 screenshot
Step 10 screenshot

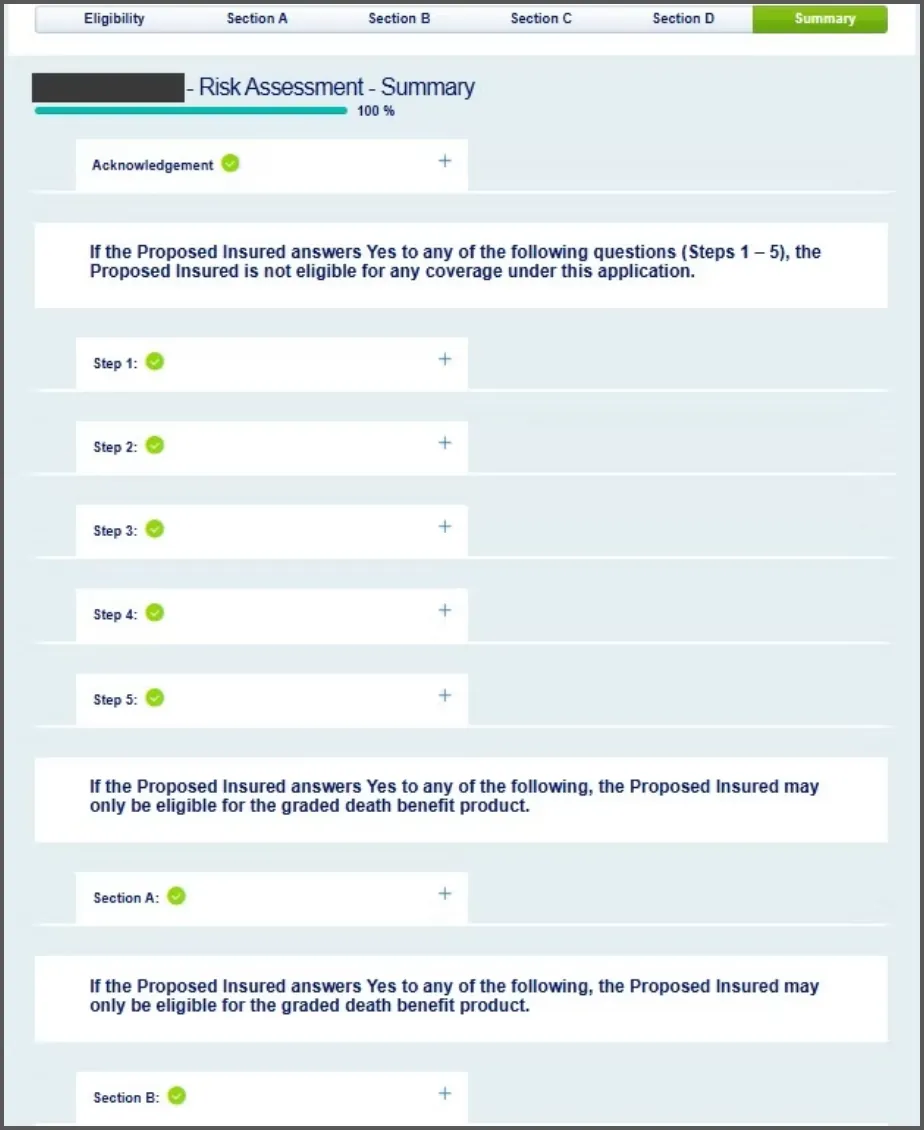
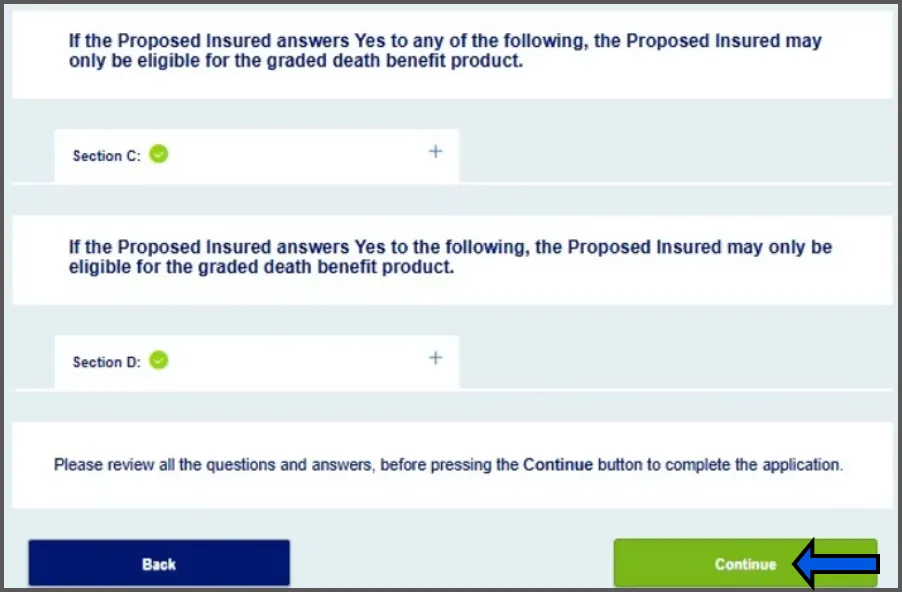
Once you have entered all health information, you will now see a summary of all answered questions. After verifying answers are correct, click CONTINUE.
11
Step 11 screenshot
Step 11 screenshot

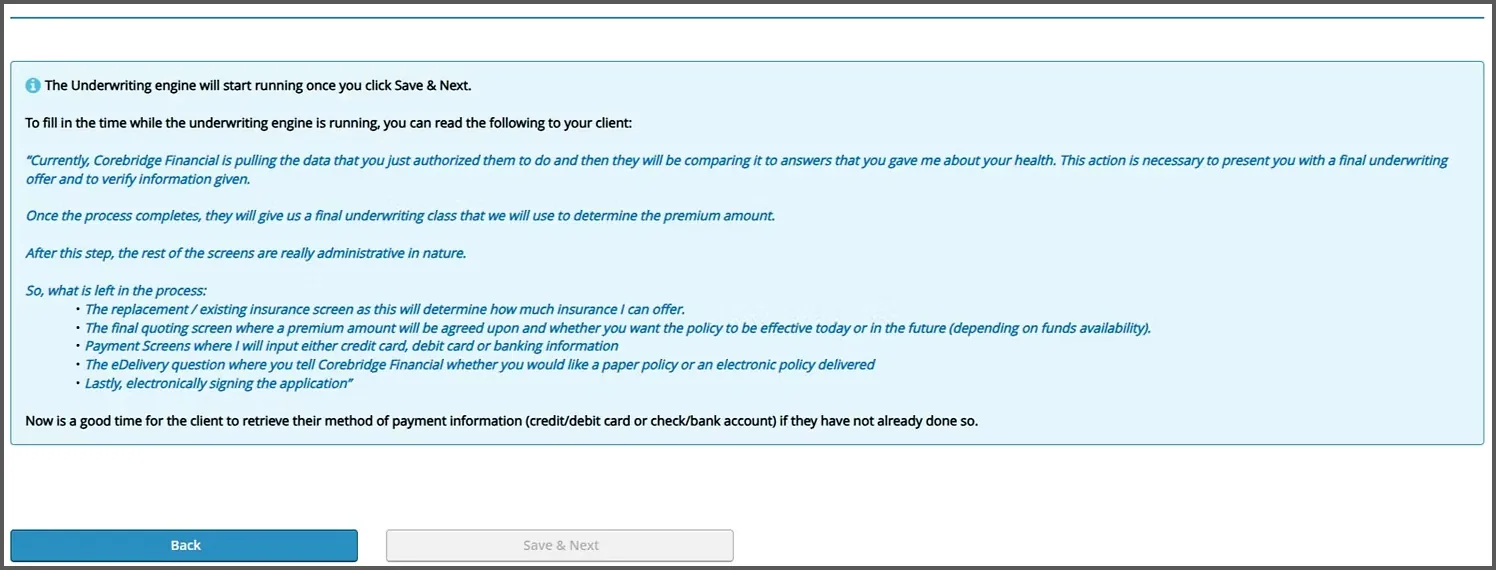
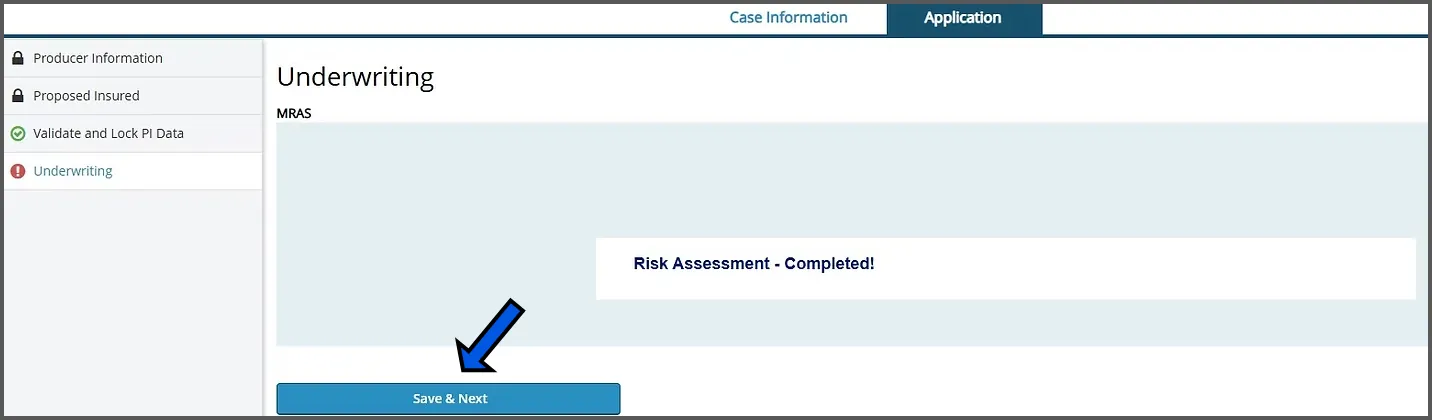
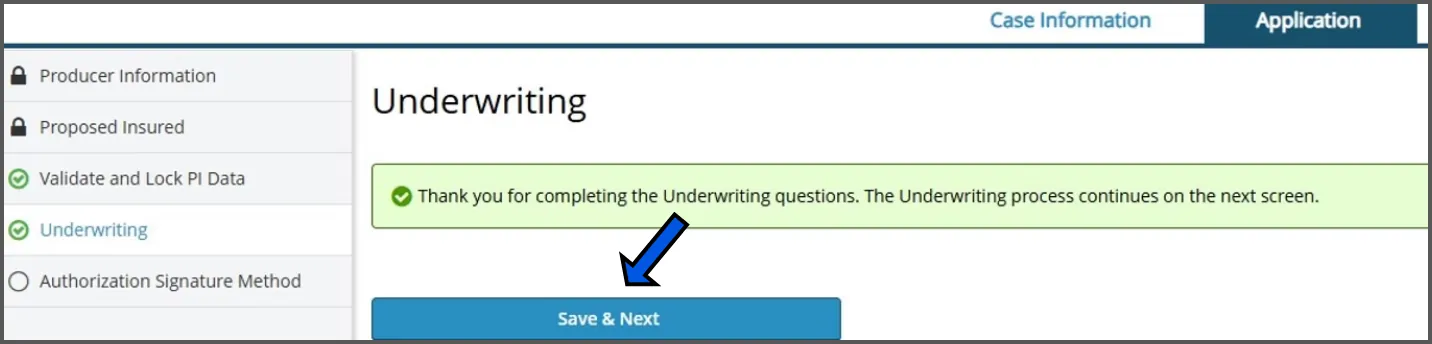
Click SAVE & NEXT

On the next screen, click SAVE & NEXT again to move to the signature process.
12
Step 12 screenshot
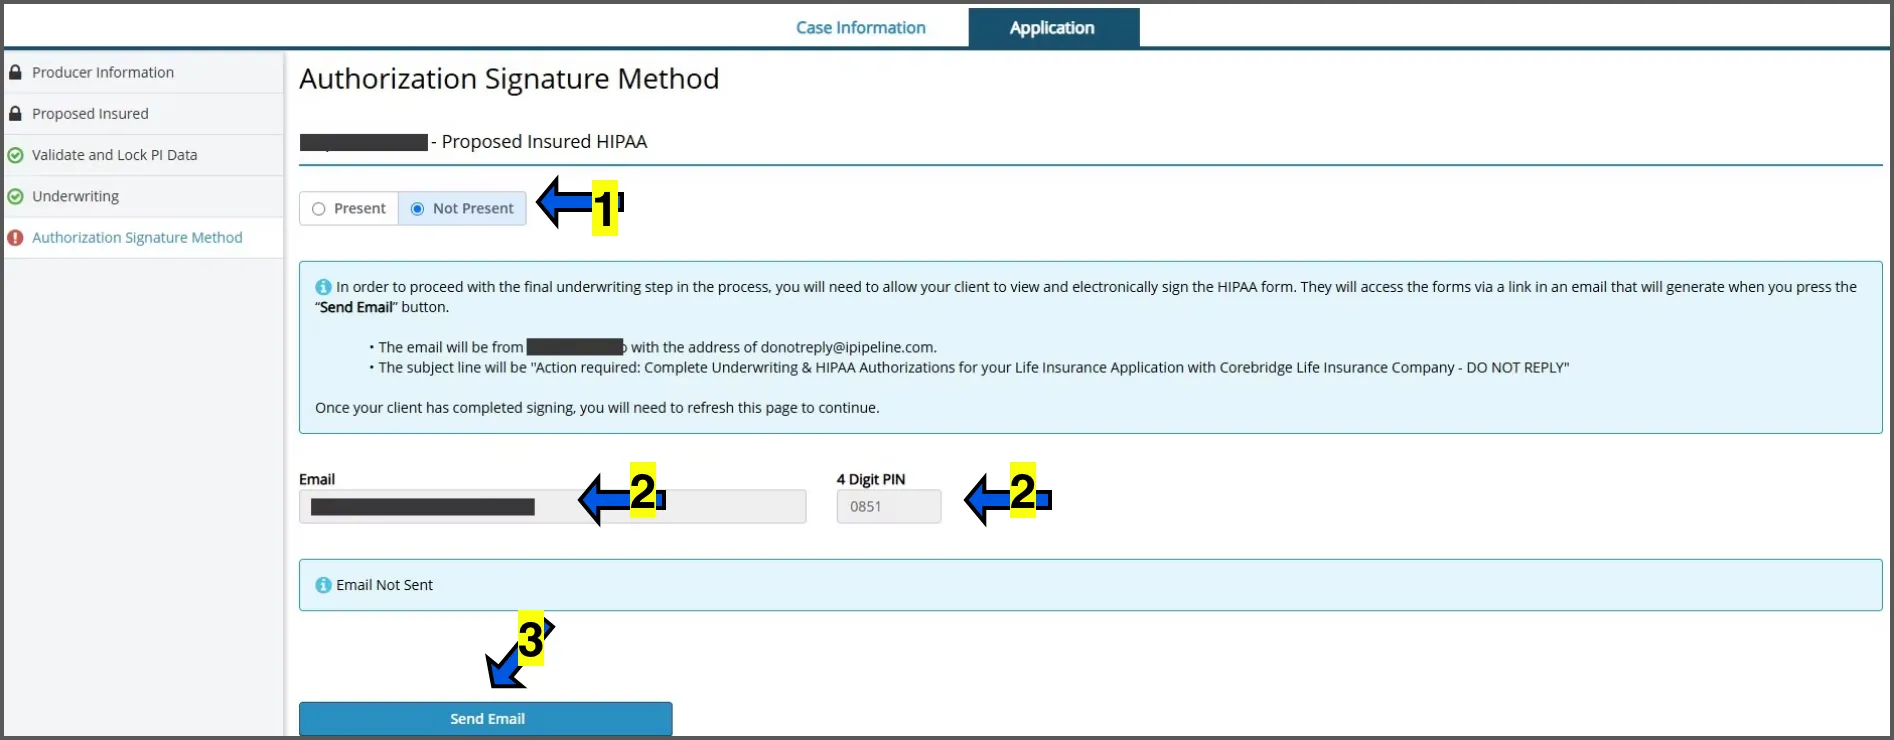
  1. 1
    click NOT PRESENT if application is being done with the applicant over the phone or PRESENT if physically with the client. For this tutorial, we will use NOT PRESENT
  2. 2
    confirm their email and 4 digit pin are filled in. Their 4 digit pin should be the last four of their social security number.
  3. 3
    click the SEND EMAIL button and use the E-Signature guide below to guide the client through the signature process.
13
Step 13 screenshot
Client script

E-Signature Guide #1

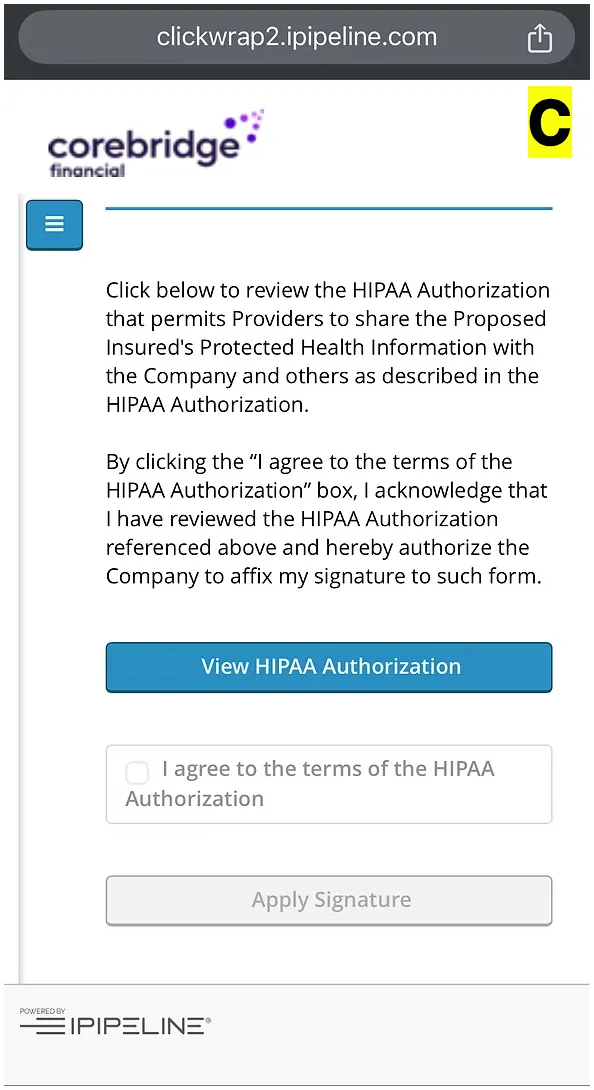
Read the blue script lines to the client word for word. The screenshots are what the client sees on their phone.
14
Step 14 screenshot
Step 14 screenshot
Step 14 screenshot
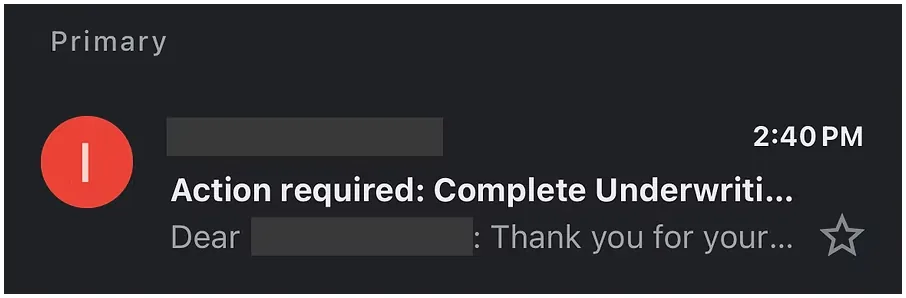
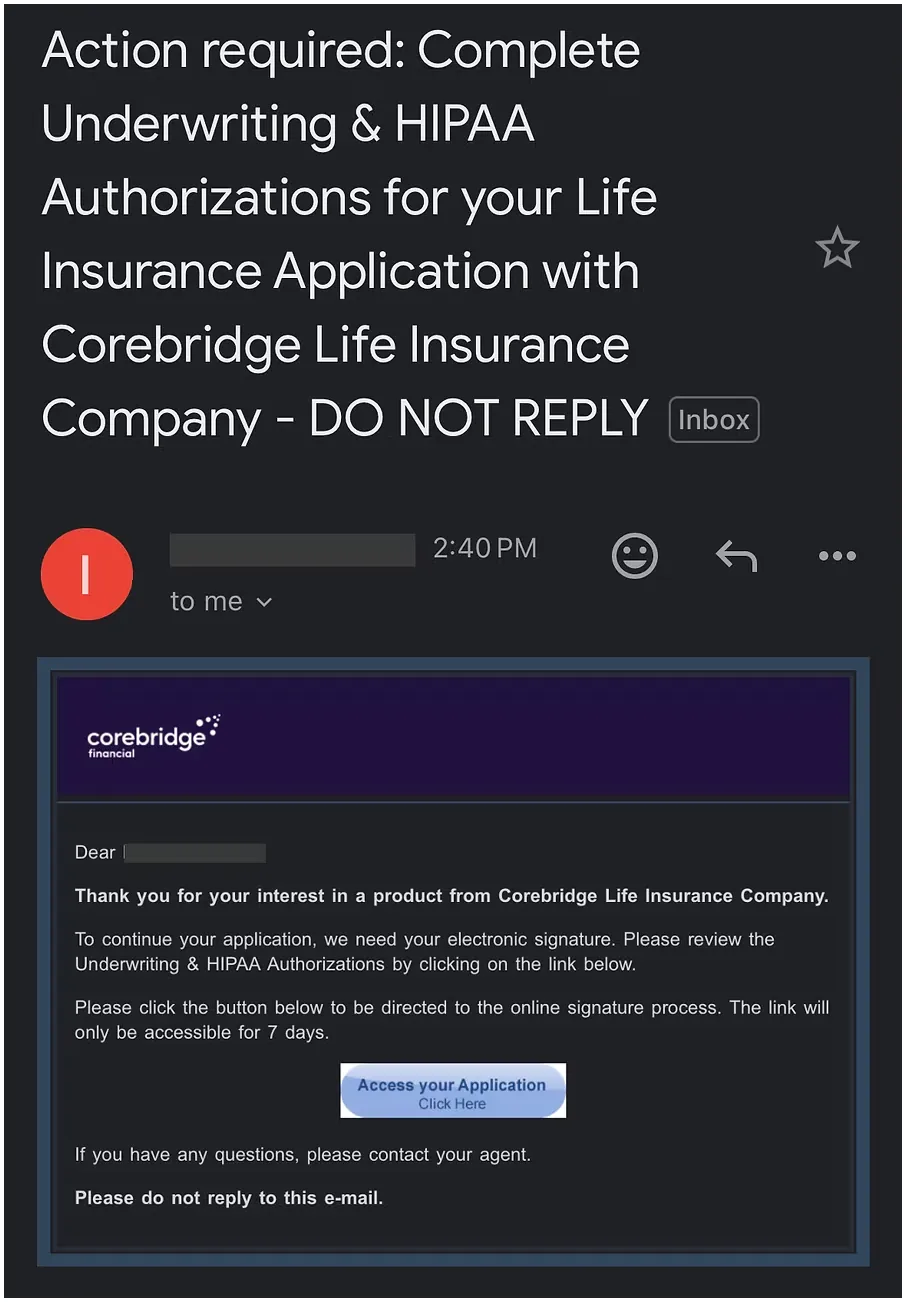
“Now [Applicant's Name], I'm sending you an email for signature right now to begin the initial medical check. It's going to say "ACTION REQUIRED, COMPLETE UNDERWRITING & HIPAA AUTHORIZATIONS". Go ahead and let me know when you got it and then I'll walk you through it because it can be a little tricky.”
“Now once you're inside the email, you should see a box and inside it says "DEAR [Client's Name]. In that box you'll see a light blue button that says ACCESS YOUR APPLICATION, CLICK HERE. Go ahead and click that button.”
15
Step 15 screenshot
Step 15 screenshot
Step 15 screenshot
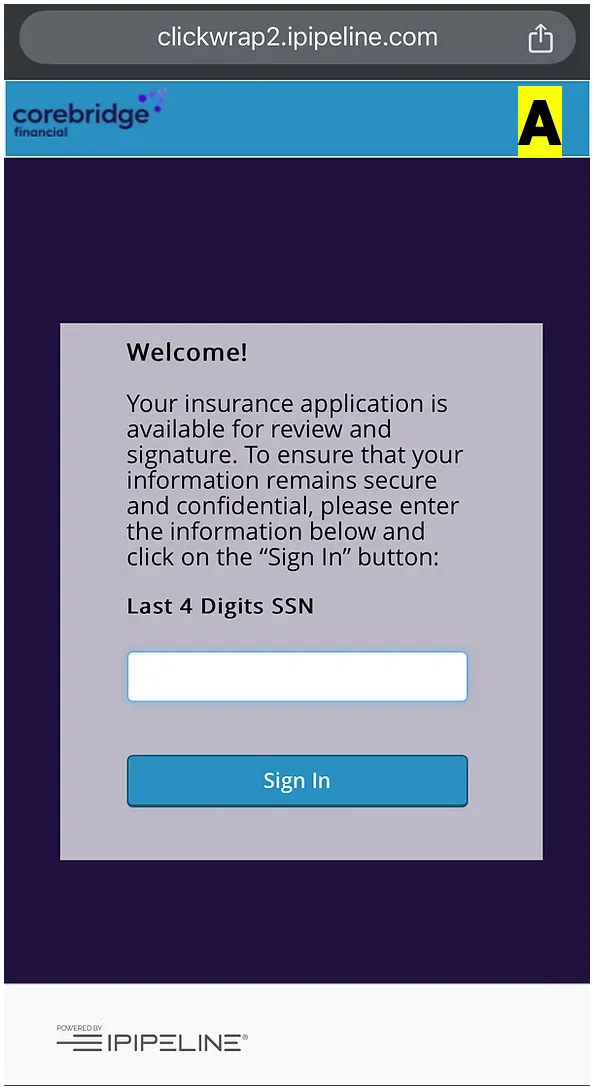
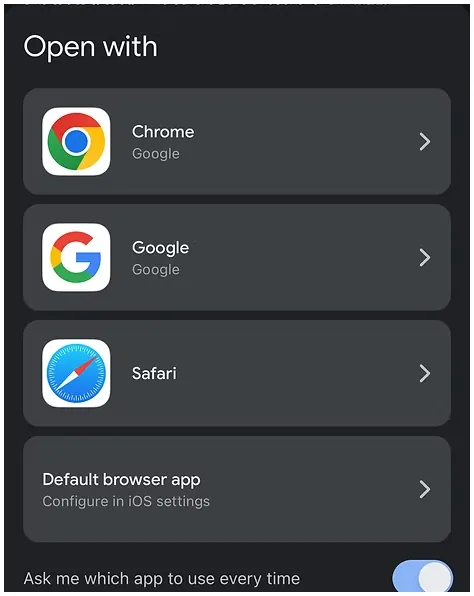
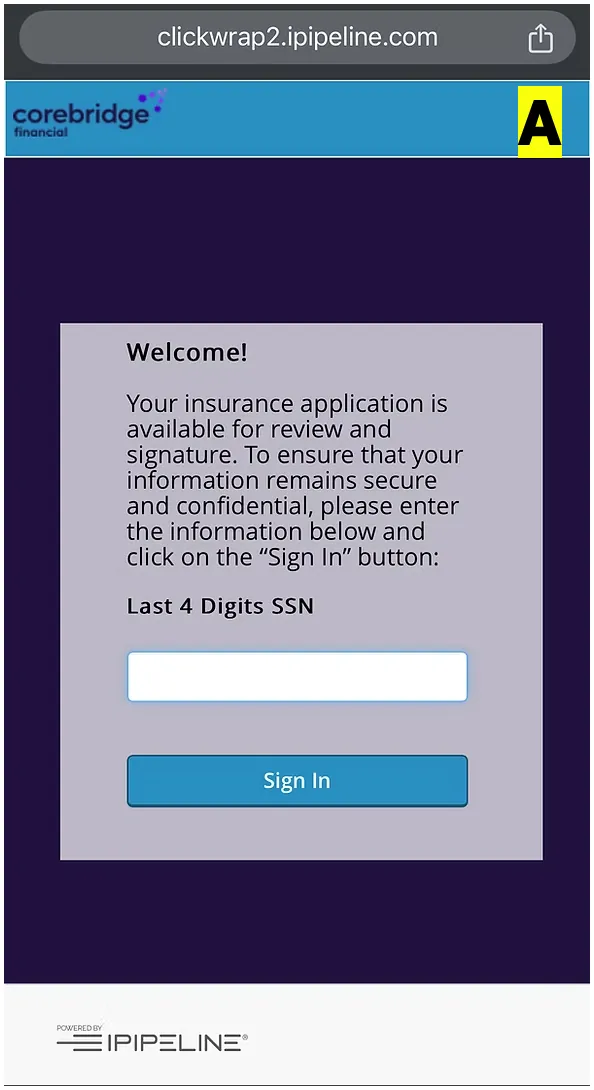
“Once you click on the button, you might get a pop up that asks you to open with "Chrome". If not, you should see on the next screen where it says COREBRIDGE in a light blue box on top. There will also be white box that says LAST 4 DIGITS SSN on top of it. Go ahead and enter your last 4 inside that box and then click on the blue button that says SIGN IN.”
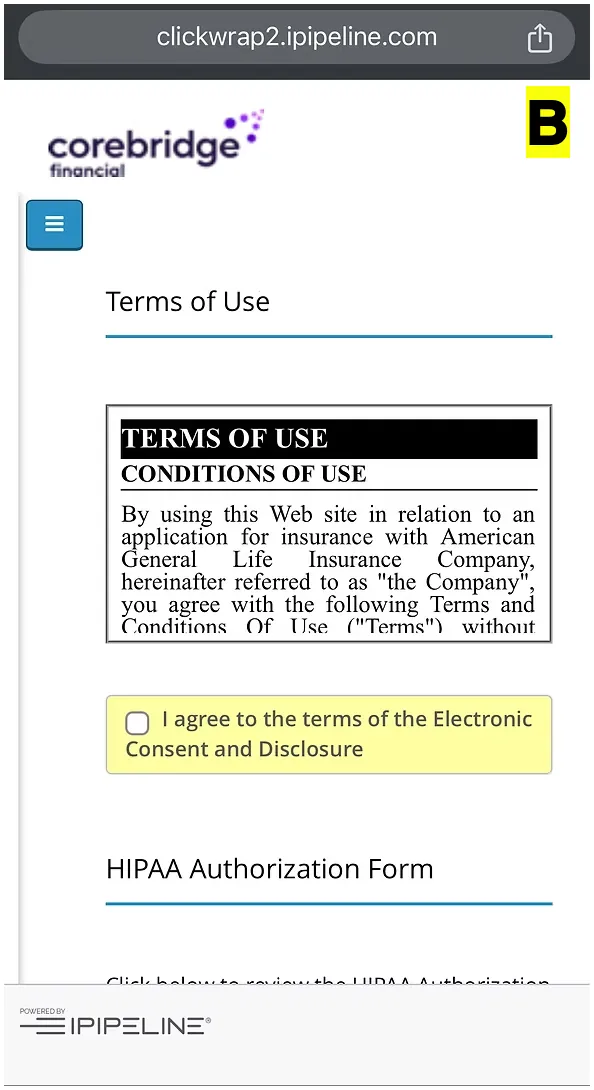
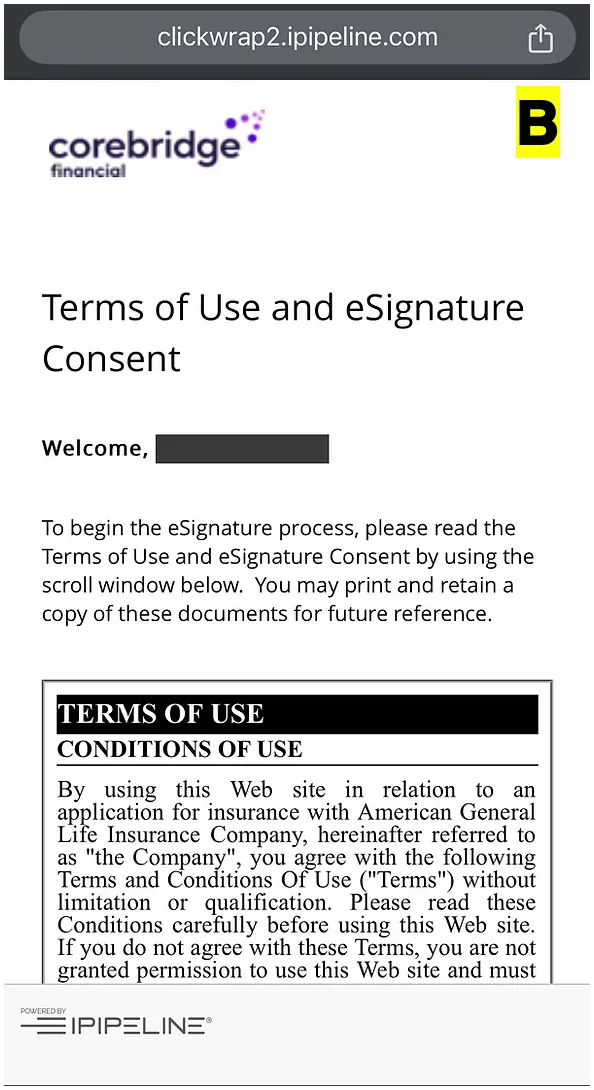
“On the next screen, you will see where it says TERMS OF USE and somewhere below that you will see a yellow box with a white checkbox that says I AGREE TO THE TERMS OF THE ELECTRONIC CONSENT. Go ahead and click on that white check box.”
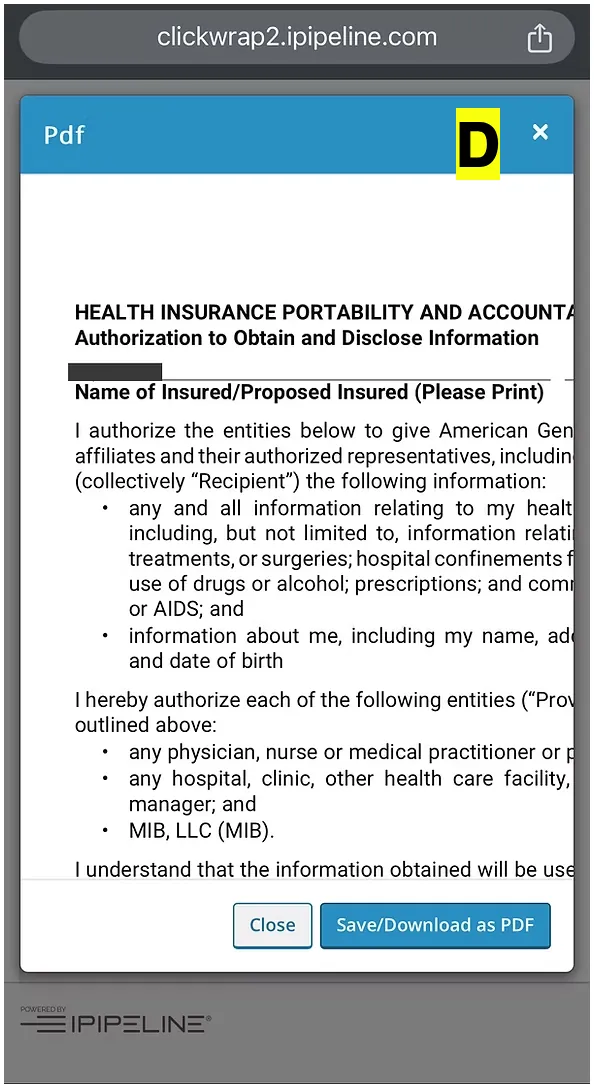
“NEXT, go ahead and scroll down to the blue button that says VIEW HIPAA AUTHORIZATION and click on that blue button.”
16
Step 16 screenshot
Step 16 screenshot
Step 16 screenshot
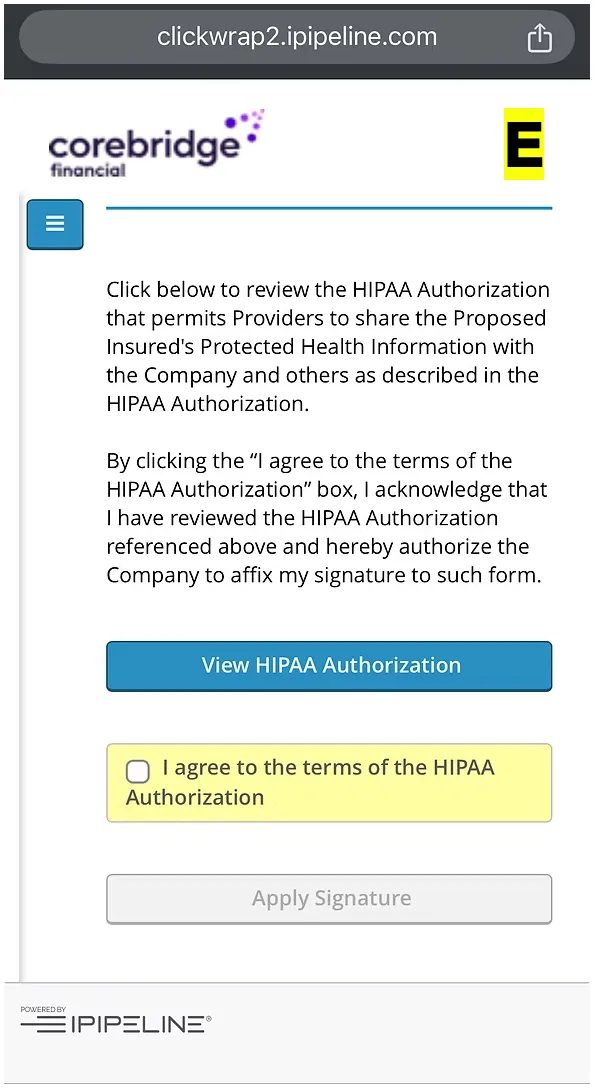
“Once you click on the blue button, you'll see a box pop up that says HEALTH INSURANCE PORTABILITY. Now you can read that whole document or you can go to the bottom of the box where there's a button that says CLOSE.”
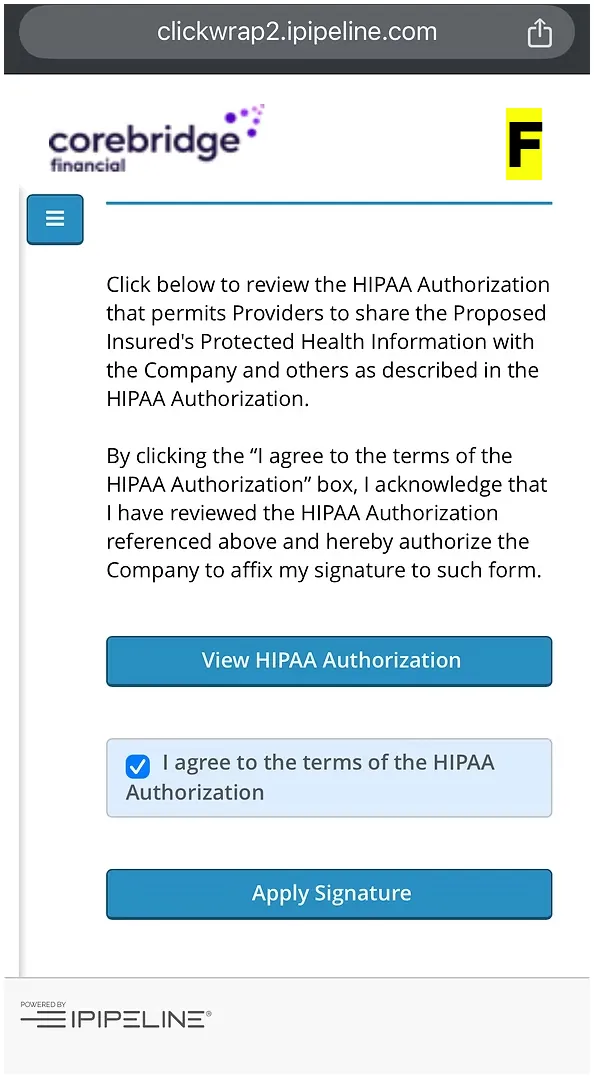
“Once you click on the close button, you'll see a yellow box with a white check box that says I AGREE TO THE TERMS OF THE HIPAA AUTHORIZATION. Go ahead and click inside that check box.”
“NEXT, click on the blue button that pops up that says APPLY SIGNATURE.”
17
Step 17 screenshot
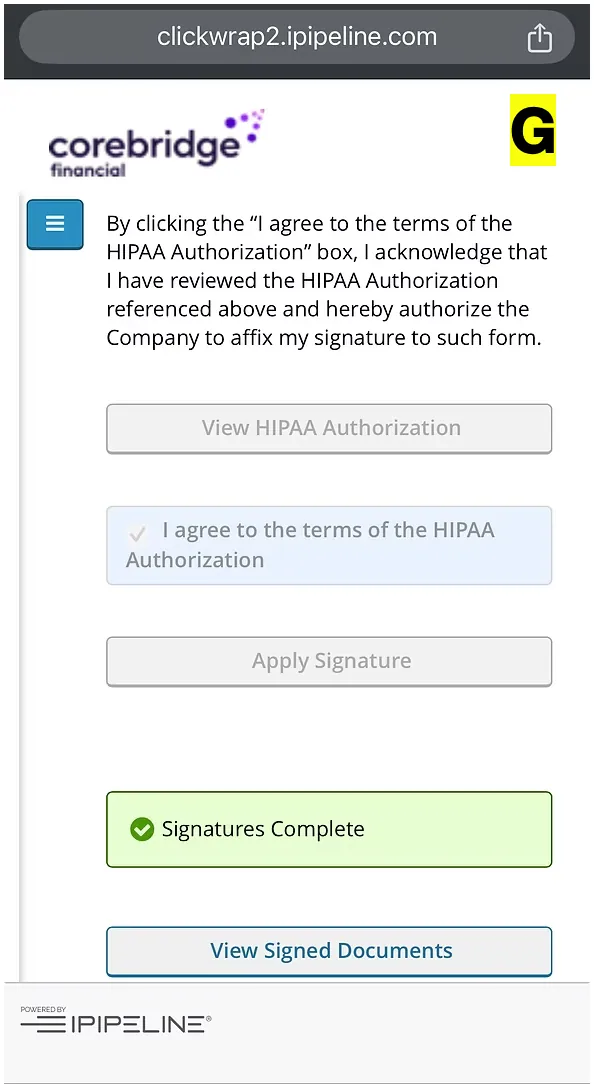
“Once you click the blue button, you should now see a green box that says SIGNATURES COMPLETE.”
↩ back in the e-app
18
Step 18 screenshot

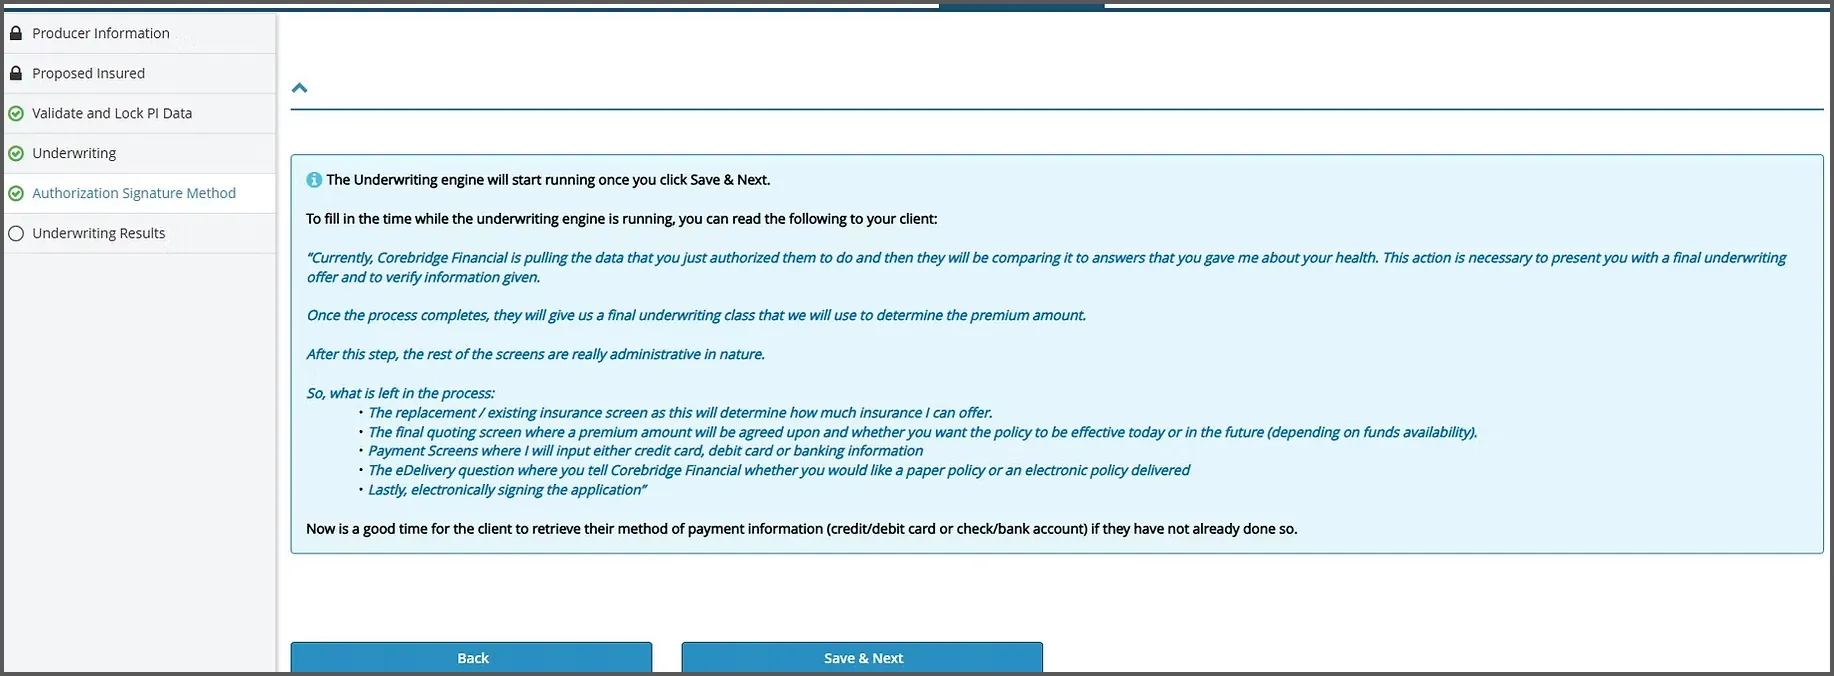
Once the client signs, click the SAVE & NEXT button. If it doesn't allow you to move forward, you may refresh the page.

19
Step 19 screenshot

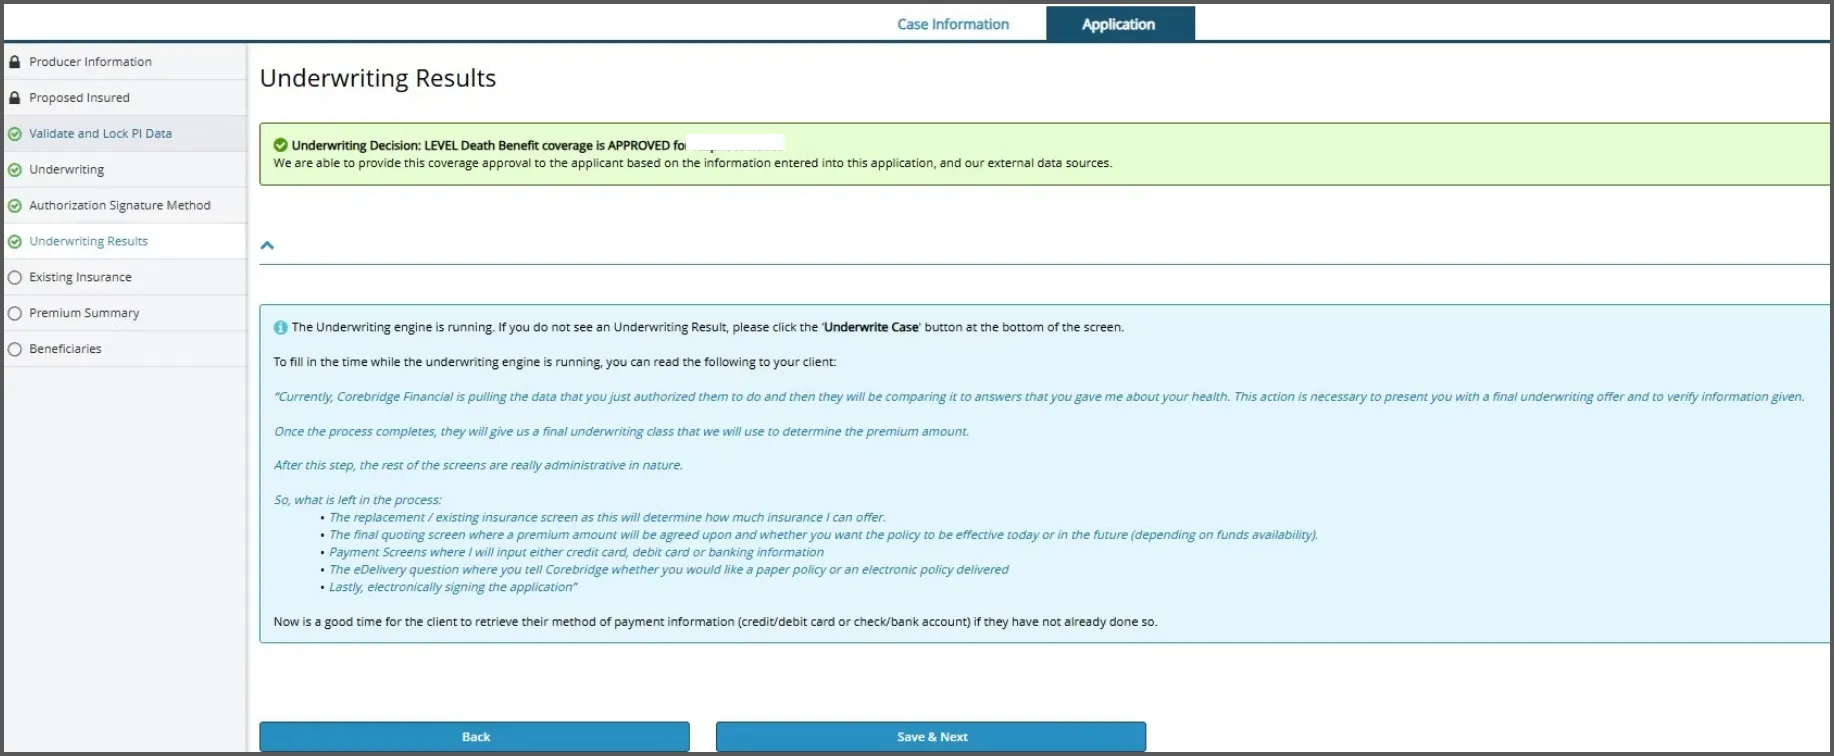
You'll receive an underwriting decision at the top of the screen. Click the SAVE & NEXT button to continue with the rest of the application.

20
Step 20 screenshot

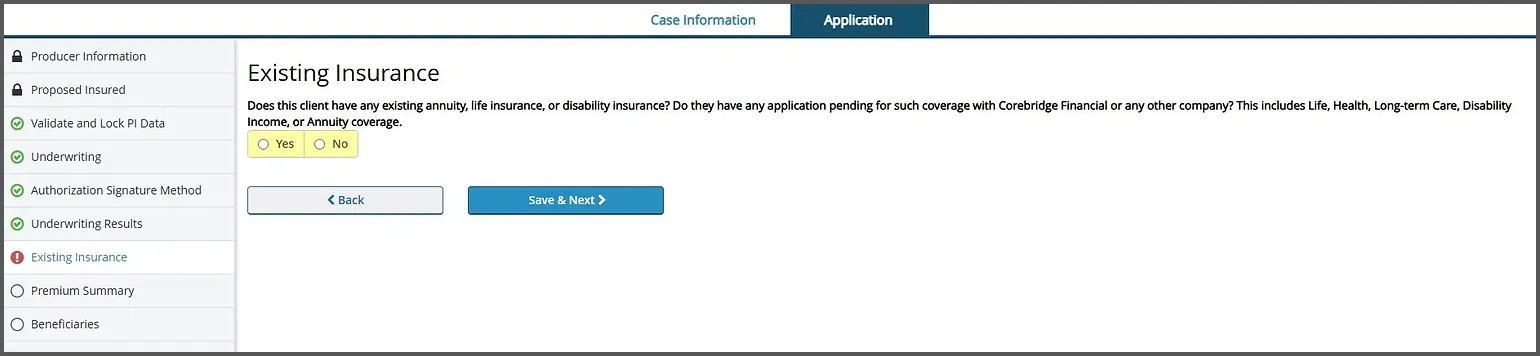
Answer question regarding existing coverage if this applies and then click the SAVE & NEXT button.

21
Step 21 screenshot

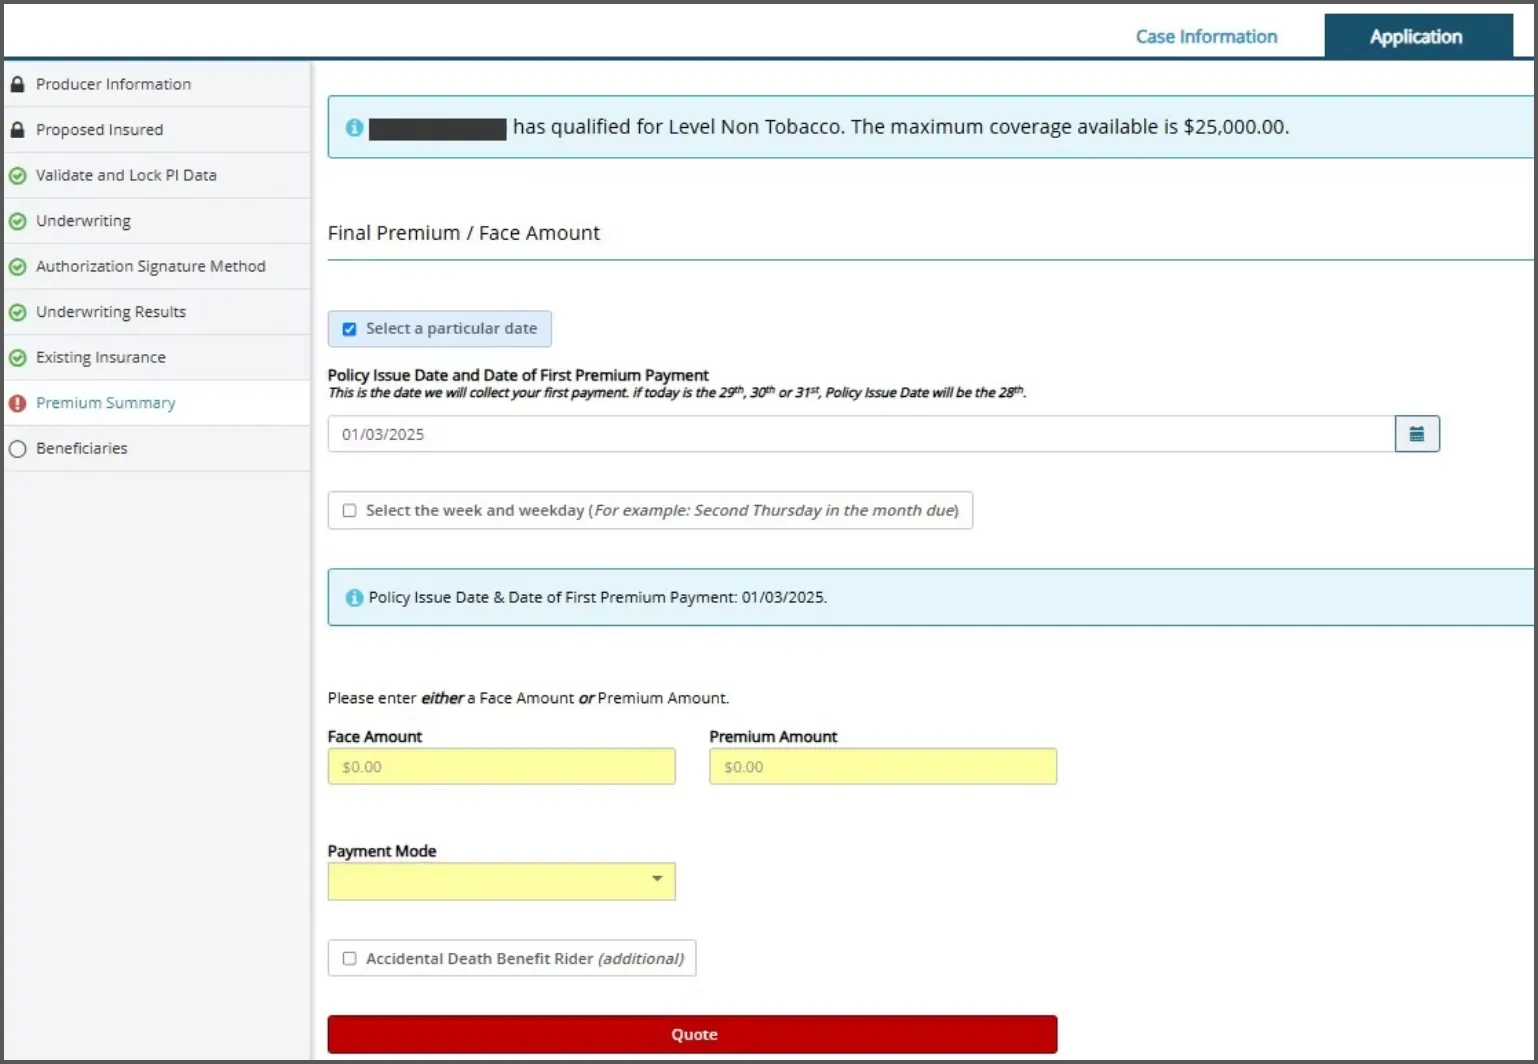
Select a start date for the applicant's policy.

On box that says SELECT THE WEEK AND WEEKDAY gives you an option to align the clients draft days with their social security deposits. For example, every second Wednesday of the month.

Under FACE AMOUNT enter the amount of coverage the client is applying for.

Under PAYMENT MODE select MONTHLY if payments are being drafted through the bank account or card.

ACCIDENTAL DEATH BENEFIT RIDER. Every policy already includes death due to an accident, however, this rider will double the coverage amount if the client passes from an accidental death. For example, if the client has $15,000 in coverage but passes away due to an accidental death, their beneficiary will receive $30,000 with this rider.

22
Step 22 screenshot

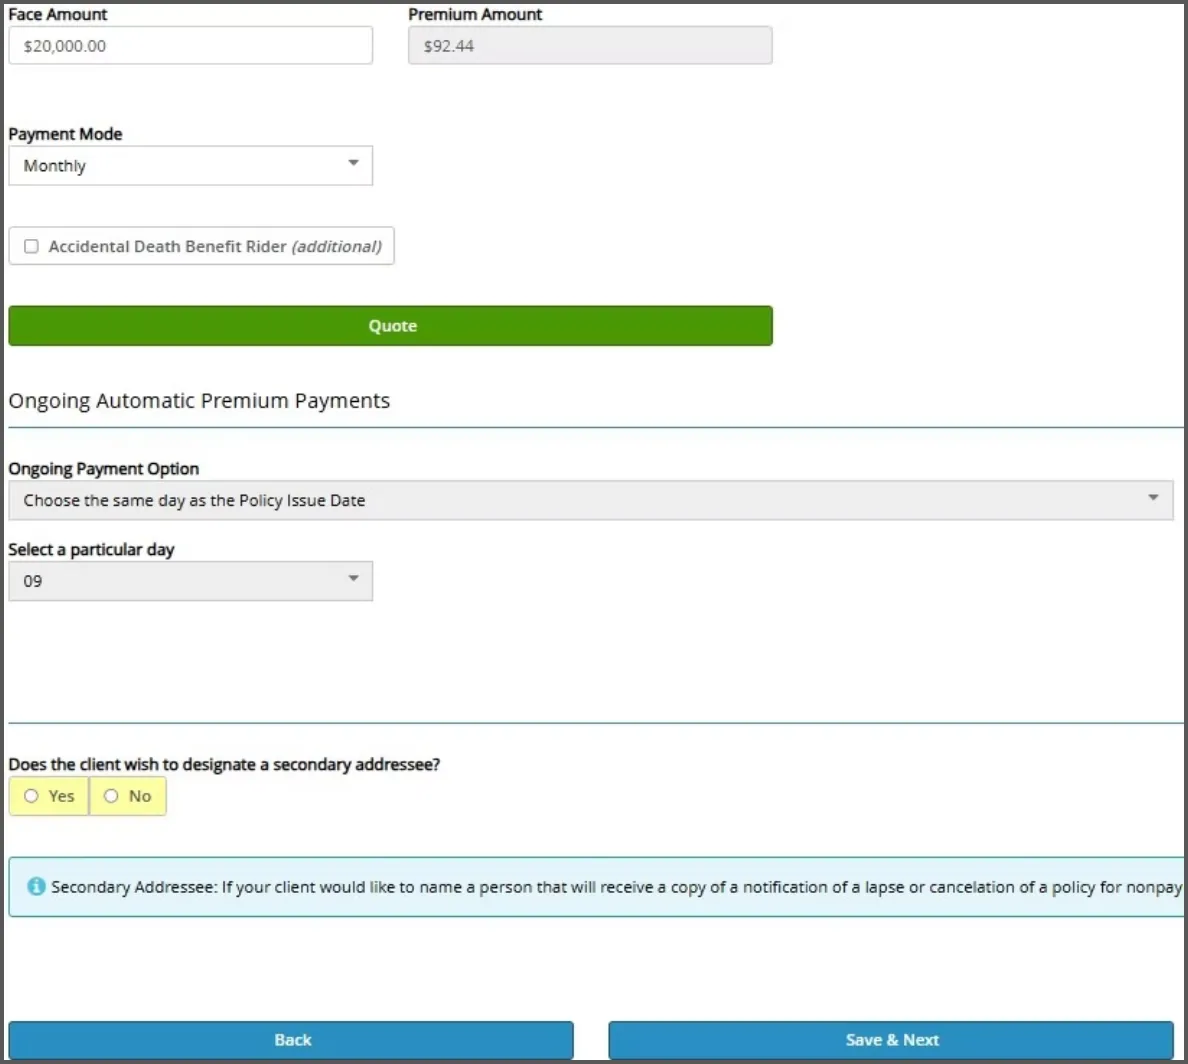
Click on the green QUOTE button.

ONGOING PAYMENT OPTION. To keep it simple, keep the ongoing payment option and day the same as the issue date.

Choose if the client would like someone else to be notified that their policy is in danger of cancelling.

Click SAVE & NEXT.

23
Step 23 screenshot
Step 23 screenshot

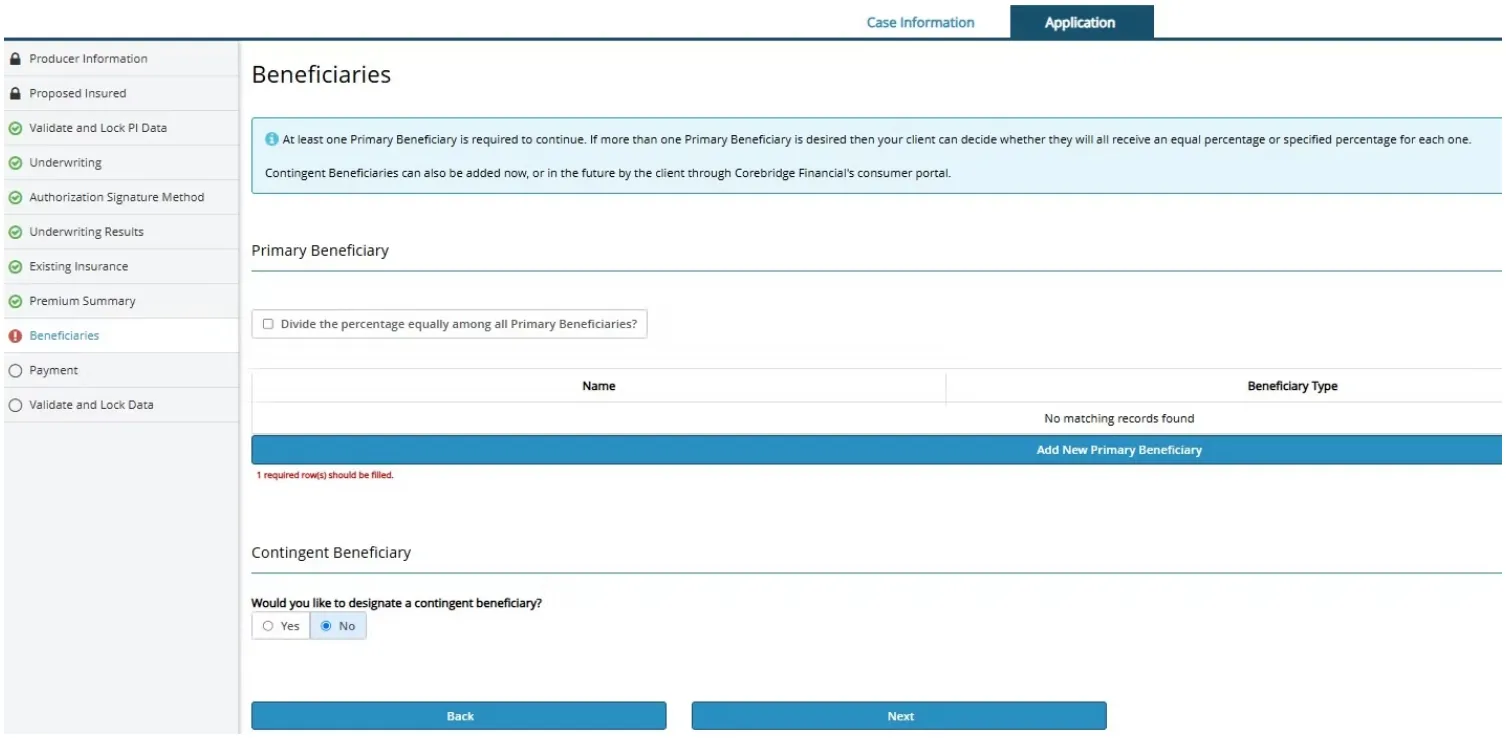
Click on the blue ADD NEW PRIMARY BENEFICIARY.

Note If there are more than one beneficiary, you may divide the percentage evenly by pressing the DIVIDE THE PERCENTAGE EQUALLY box OR you can manually input both at different percentages. All primary's will need to equal 100%. For example, 50/50, 60/40.

CONTINGENT: This is a back-up beneficiary just in case the primary cannot receive the death benefit. The same rules apply as to the primary percentage splits.

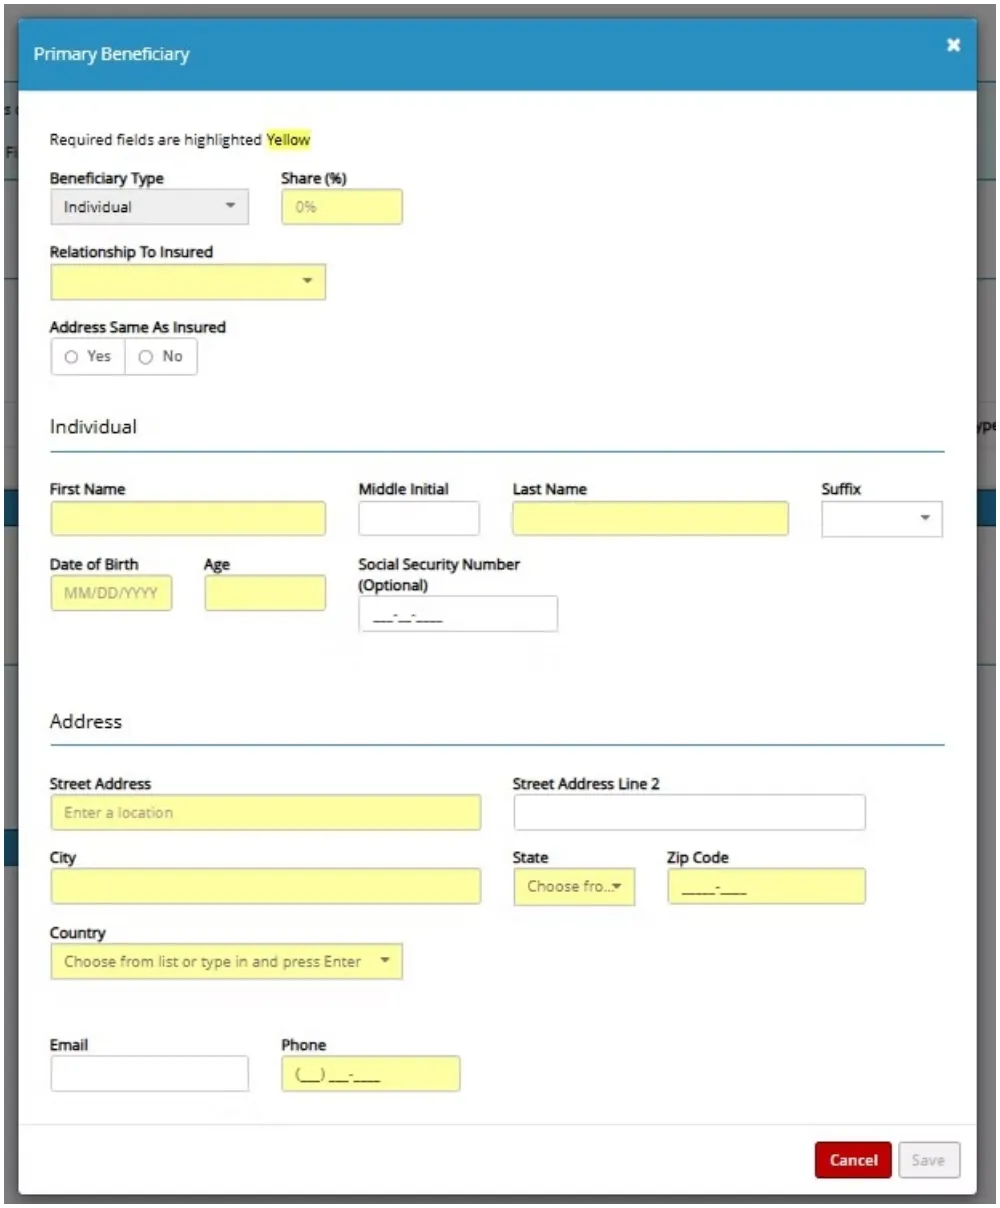
Fill in the Beneficiary's information as in INDIVIDUAL to keep it simple. Not everything is mandatory. Most of the time, only the beneficiary's name, share% and relationship to insured is required. However, if address is required, you may click YES on ADDRESS SAME AS INSURED to finish the application.

Click SAVE at the bottom right when complete.

Once all beneficiary information is complete and you are back on the main screen, click the blue NEXT button.

24
Step 24 screenshot

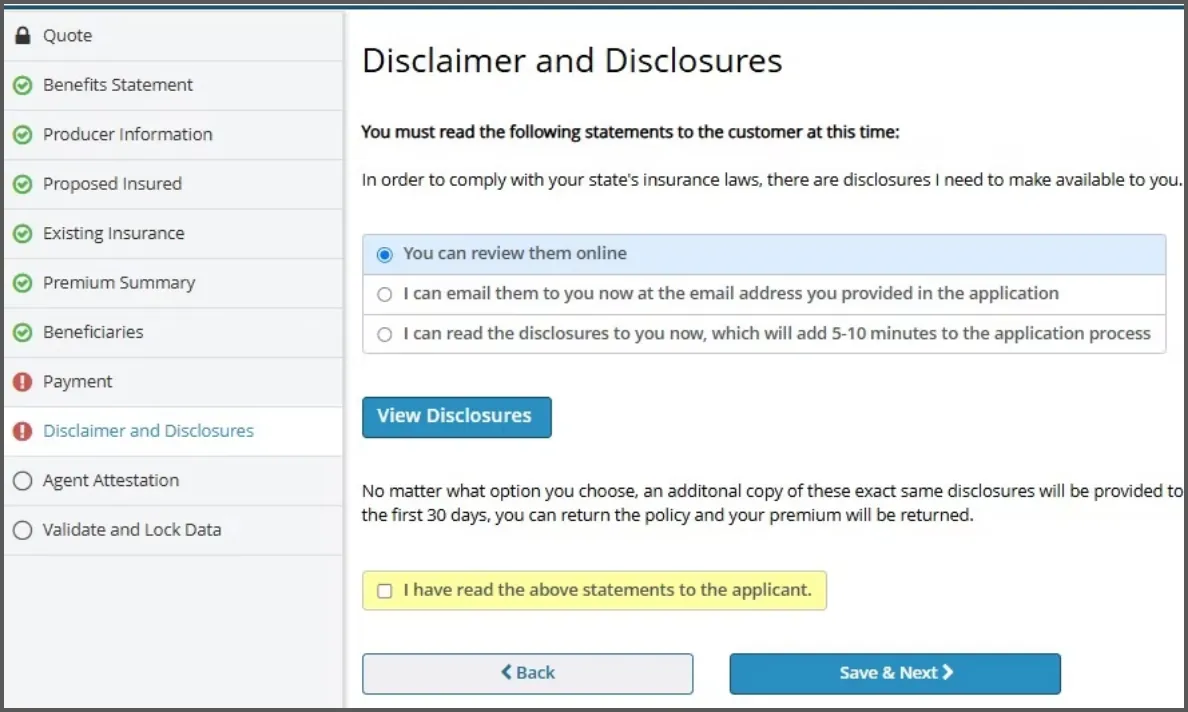
If this is a Guaranteed Issue (GIWL) application, this screen will be next. IF THIS IS A SIWL application, skip this and scroll down to the next screen instructions.

The easiest option to choose will be YOU CAN REVIEW THEM ONLINE and click the box that says I HAVE READ THE ABOVE STATEMENTS.

Click SAVE & NEXT.

25
Step 25 screenshot

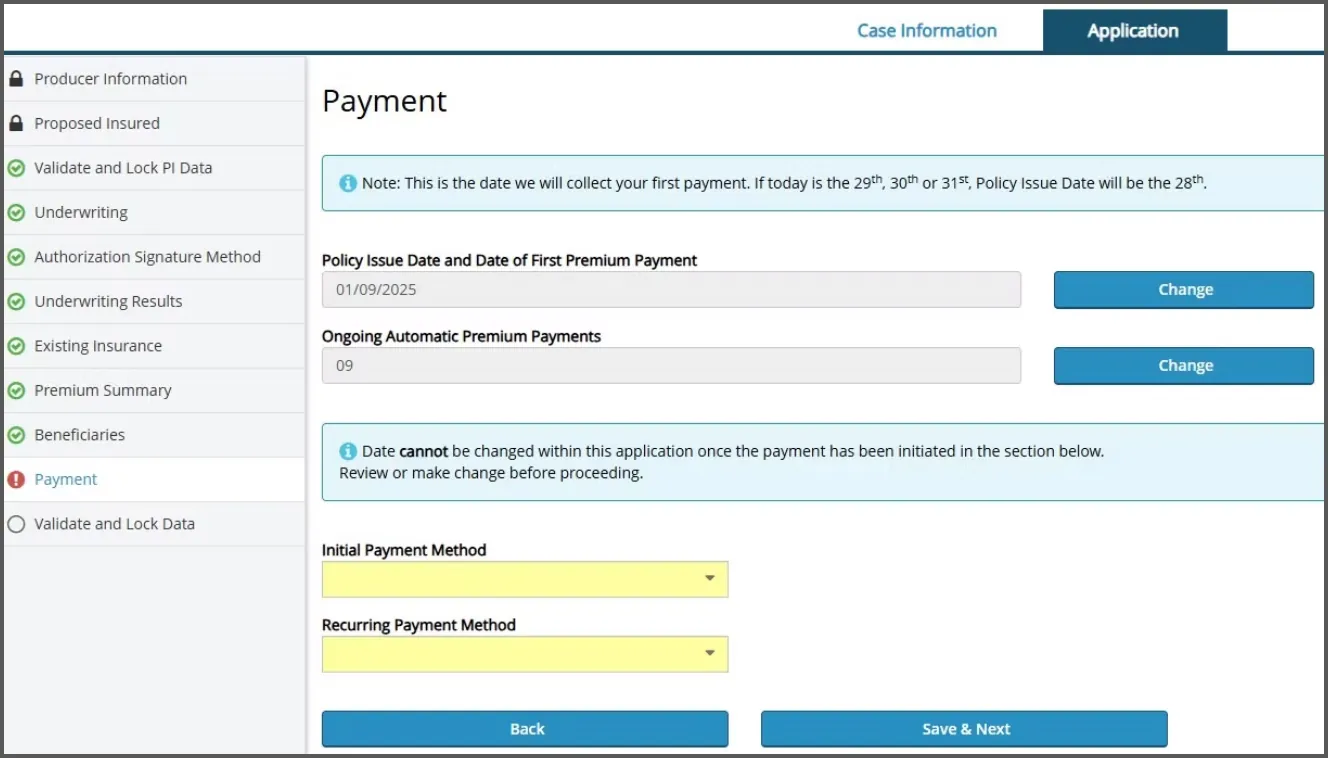
Confirm the information, keep the INITIAL PAYMENT METHOD and RECURRING PAYMENT METHOD the same.

Click SAVE & NEXT

26
Step 26 screenshot
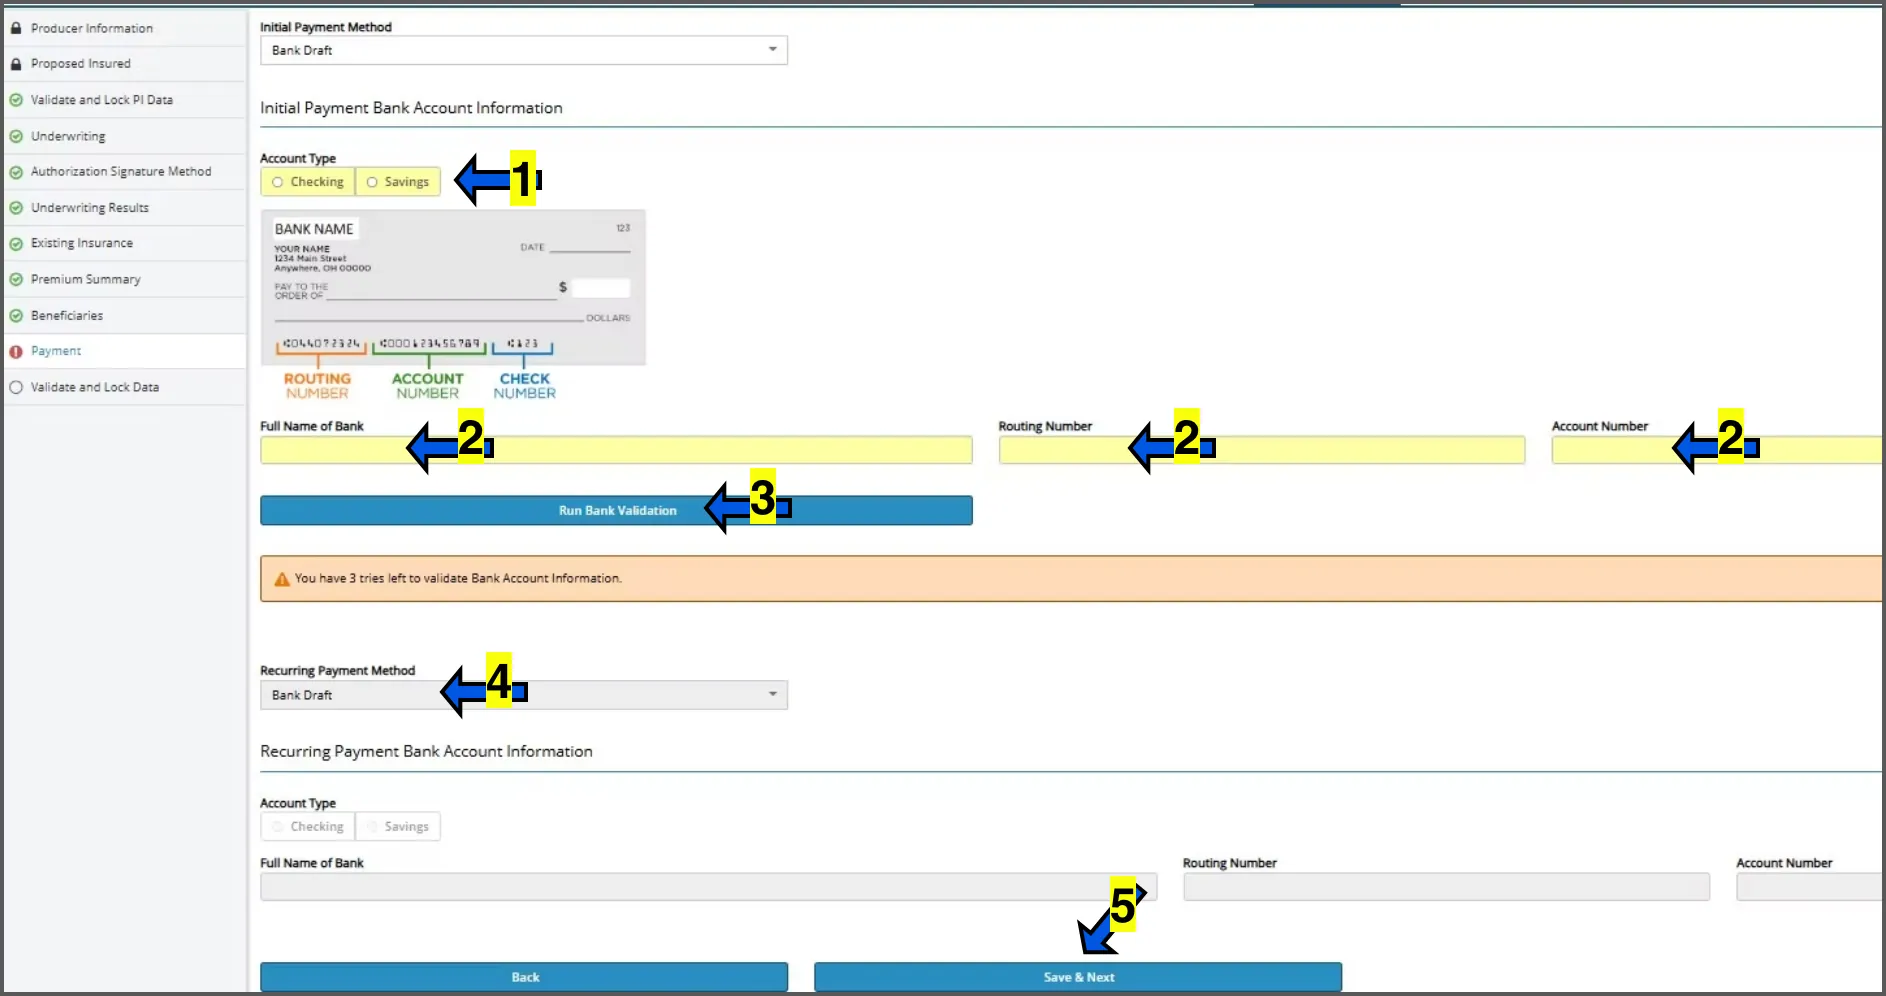
  1. 1
    on ACCOUNT TYPE, choose CHECKING or SAVINGS.
  2. 2
    enter Bank name, Routing Number and Account number. (use the money script your upline trained you on).
  3. 3
    click the RUN BANK VALIDATION button.
  4. 4
    keep the RECURRING PAYMENT BANK ACCOUNT INFORMATION the same as the initial.
  5. 5
    click the SAVE & NEXT button.
27
Step 27 screenshot
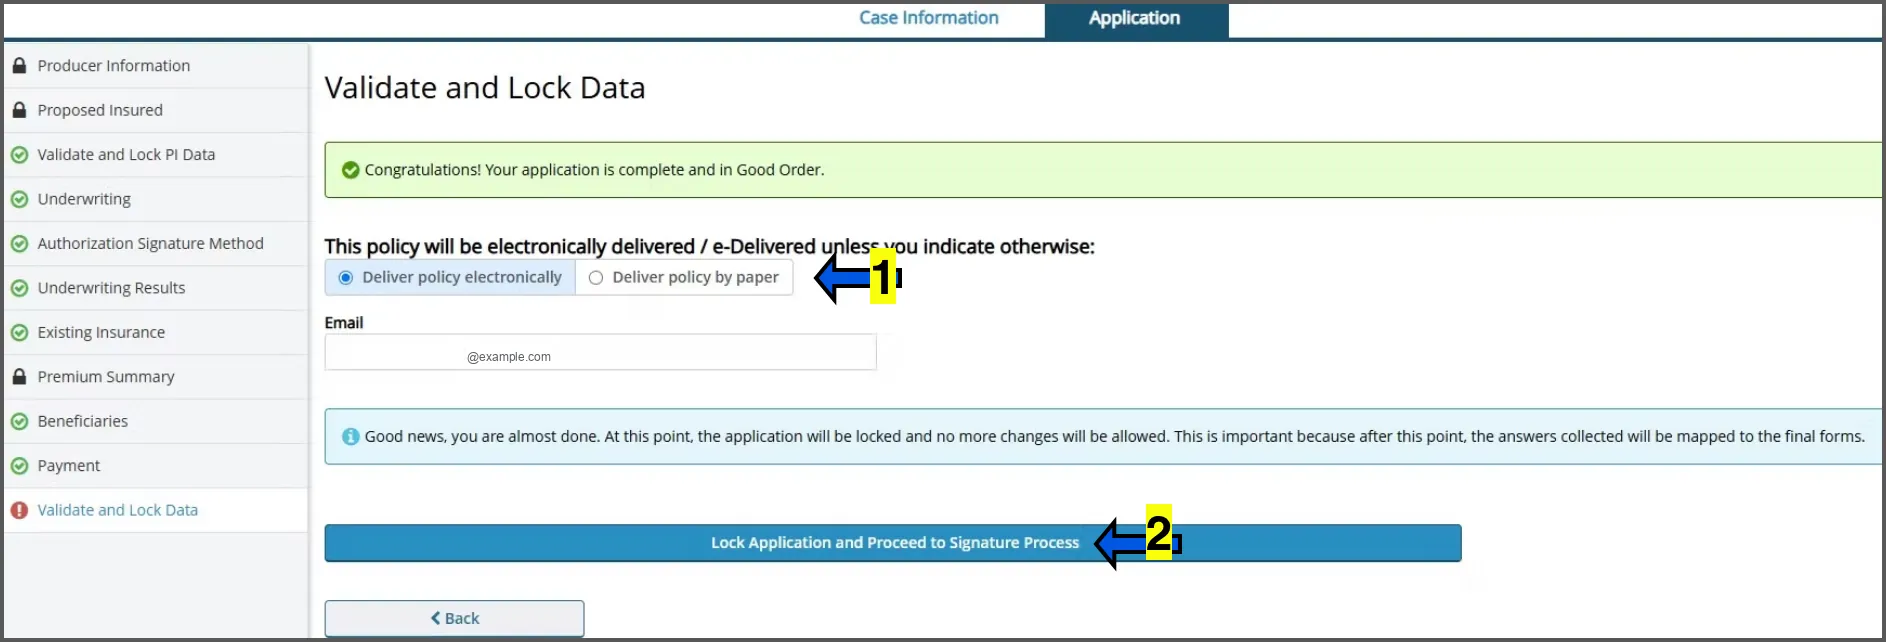
  1. 1
    choose if the client would like their policy packet emailed digitally or physically delivered in the mail.
  2. 2
    click LOCK APPLICATION AND PROCEED TO SIGNATURE PROCESS.
28
Step 28 screenshot

Click the blue NEXT button.

29
Step 29 screenshot
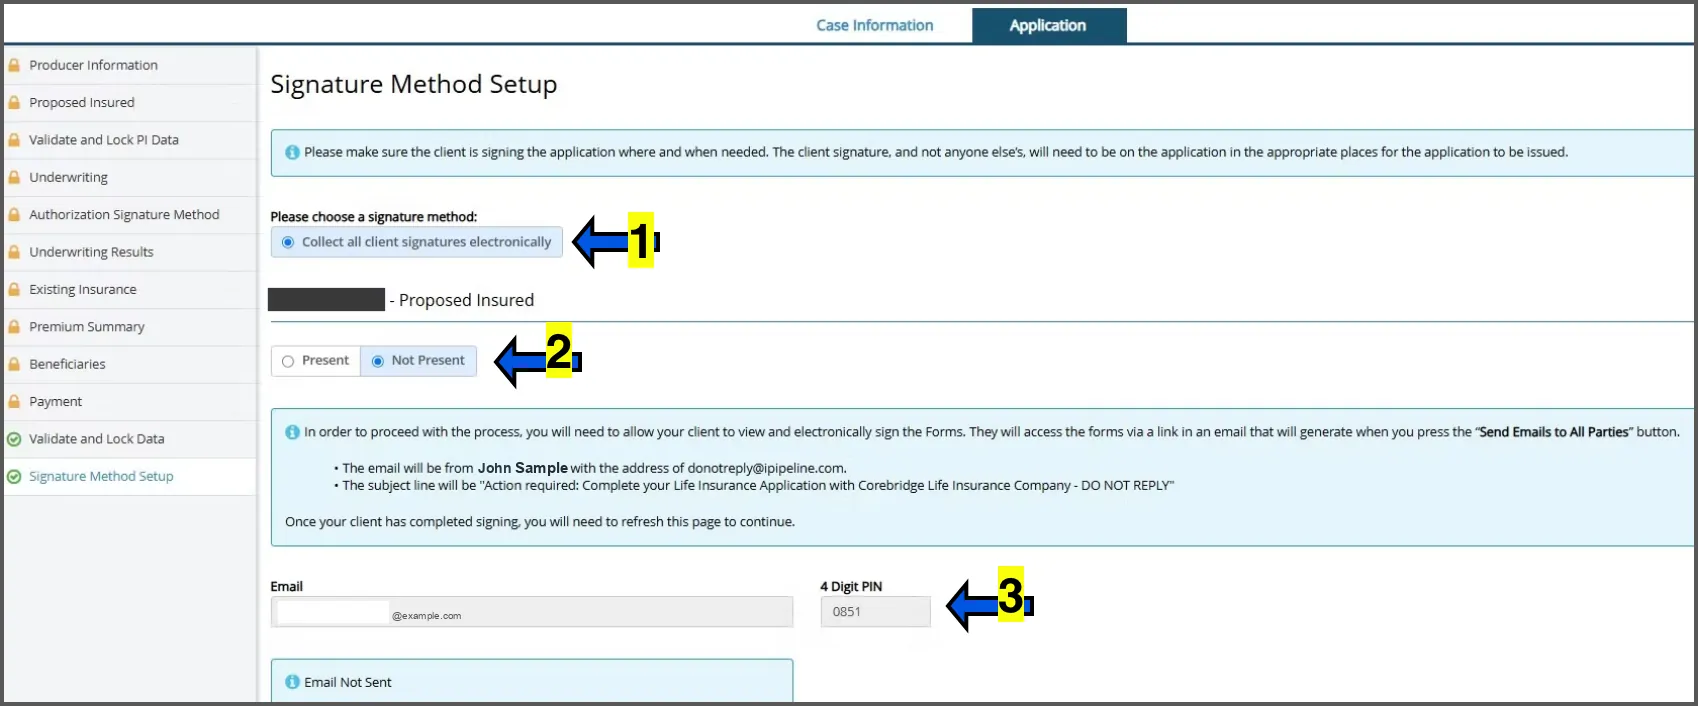
  1. 1
    click on COLLECT ALL CLIENT SIGNATURES ELECTRONICALLY
  2. 2
    click PRESENT if physically with the client or NOT PRESENT if application is being done over the phone or virtually.
  3. 3
    make sure the applicant's email is correct and the last 4 is set as the 4 digit pin.
30
Step 30 screenshot
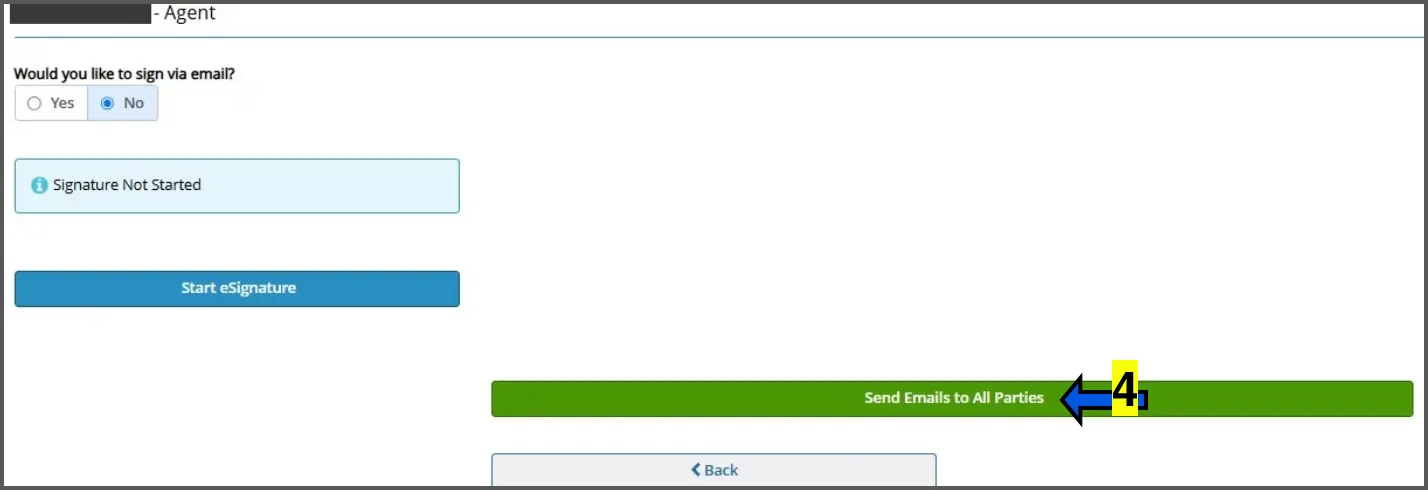
  1. 4
    click on SEND EMAIL TO ALL PARTIES and then follow the E-Signature Guide below.
Client script

E-Signature Guide #2

Read the blue script lines to the client word for word. The screenshots are what the client sees on their phone.
31
Step 31 screenshot
Step 31 screenshot
Step 31 screenshot
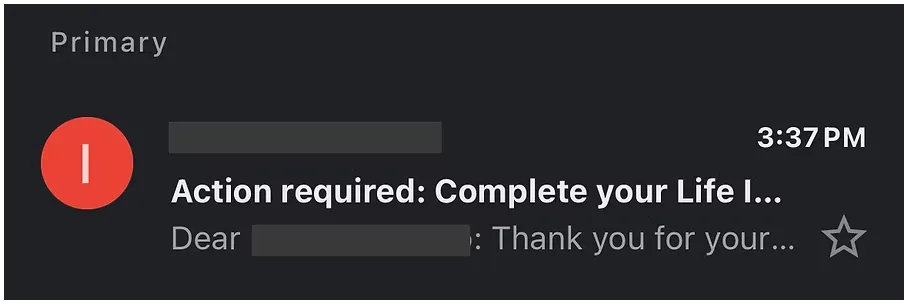
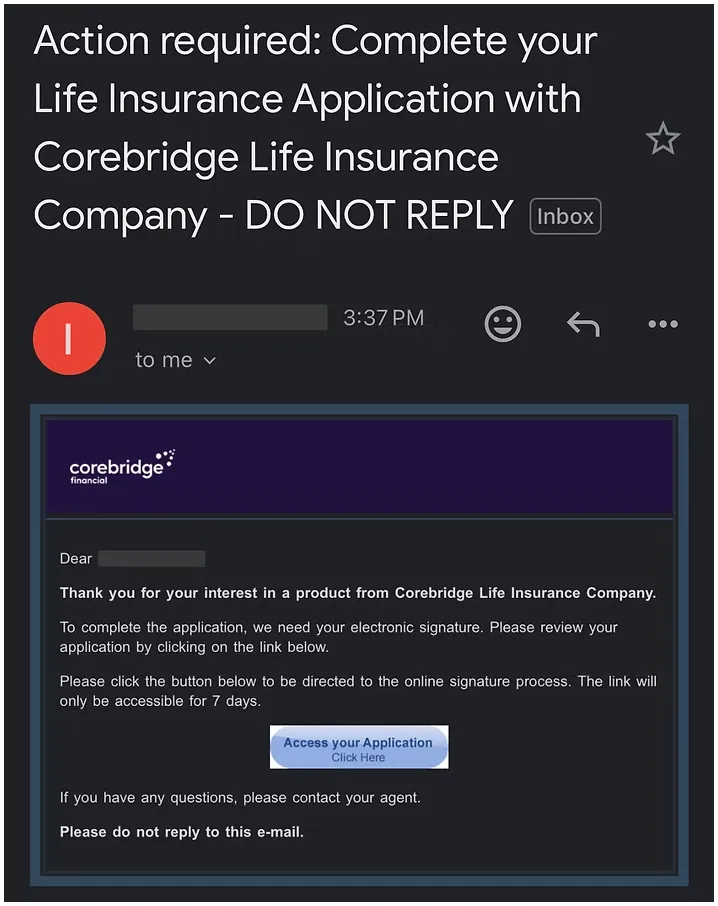
“Now [Applicant's Name], I'm sending you an email for signature right now to begin the final signature. It's going to say ACTION REQUIRED, COMPLETE YOUR LIFE INSURANCE APPLICATION. Go ahead and let me know when you got it and then I'll walk you through it because it can be a little tricky.”
“Now once you're inside the email, you should see a box and inside it says "DEAR [Client's Name]. In that box you'll see a light blue button that says ACCESS YOUR APPLICATION, CLICK HERE. Go ahead and click that button.”
32
Step 32 screenshot
Step 32 screenshot
Step 32 screenshot
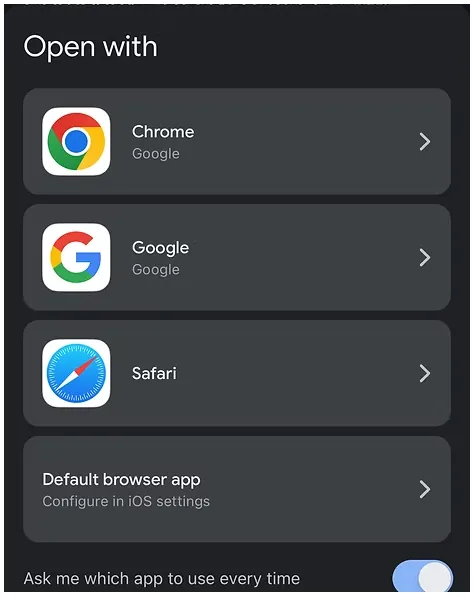
“Once you click on the button, you might get a pop up that asks you to open with "Chrome". If not, you should see on the next screen where it says COREBRIDGE in a light blue box on top. There will also be white box that says LAST 4 DIGITS SSN on top of it. Go ahead and enter your last 4 inside that box and then click on the blue button that says SIGN IN.”
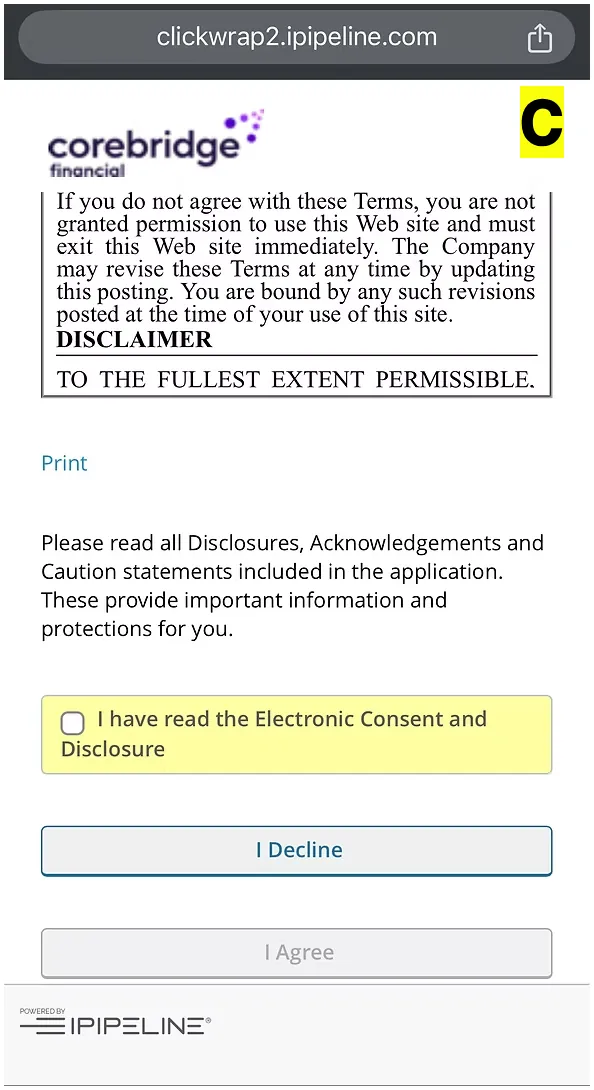
“On the next screen, you will see where it says TERMS OF USE. Go ahead and go all the way down to where there is a yellow box with a white check box that says I HAVE READ THE ELECTRONIC CONSENT AND DISCLOSURE.”
“Click on the white checkbox and once you click on the checkbox, you'll be able to click on the blue I AGREE button.”
33
Step 33 screenshot
Step 33 screenshot
Step 33 screenshot
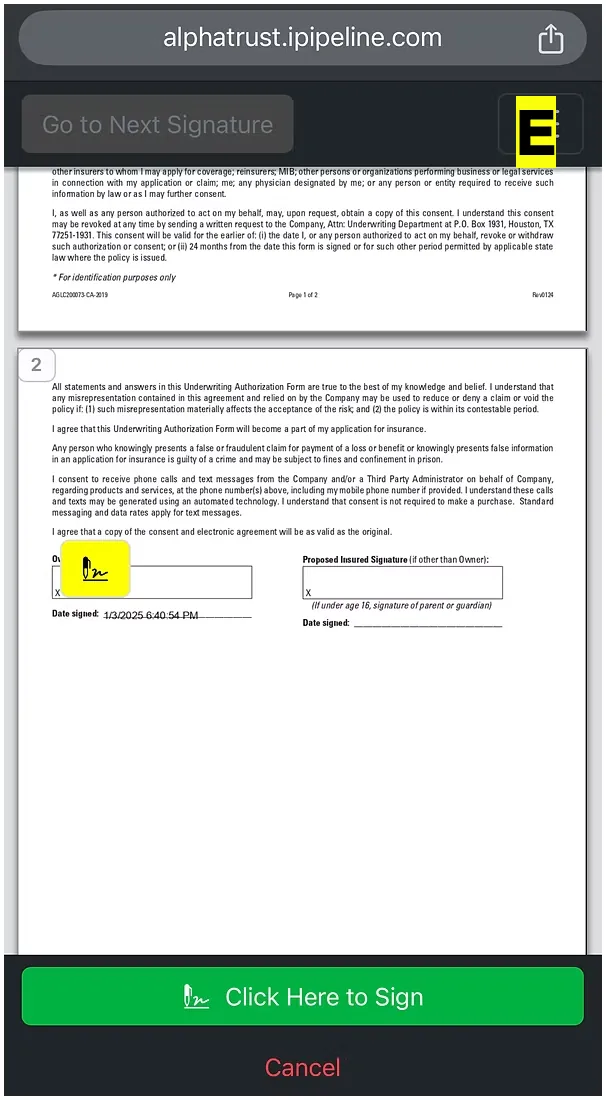
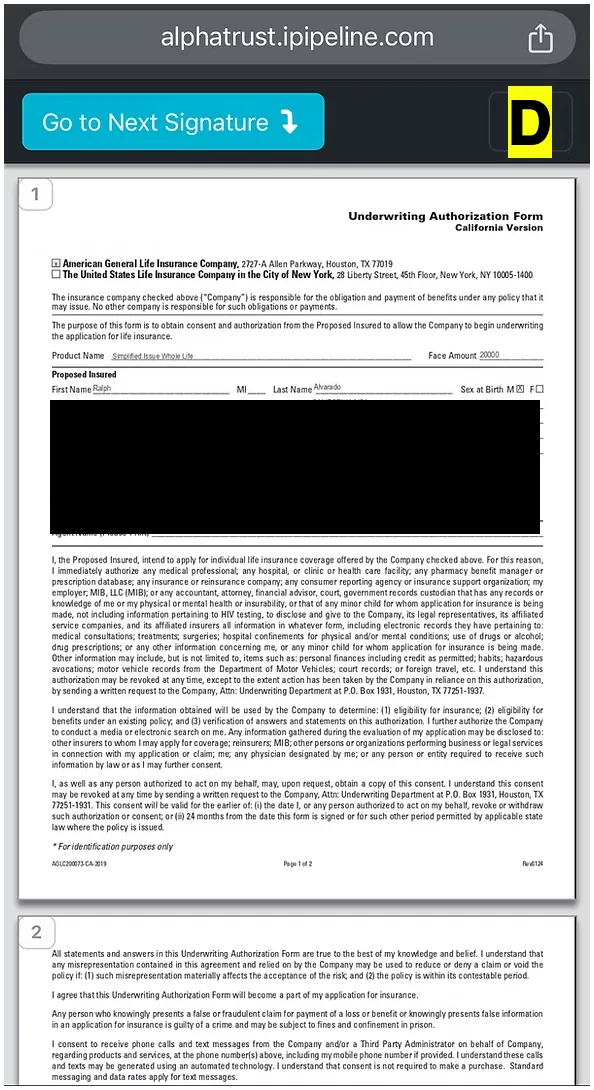
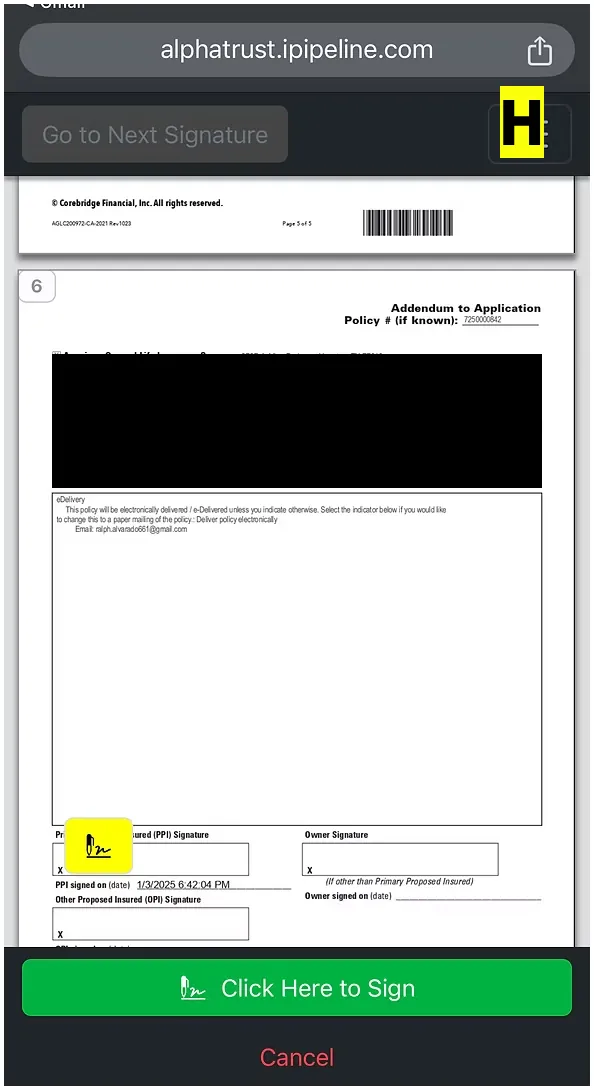
“Now on the next screen, you should see your application and a light blue button at the top that says GO TO NEXT SIGNATURE. Go ahead and click on that button.”
“It will now take you to a part where you will see a yellow box with a pen icon and a green button that says CLICK HERE TO SIGN. Go ahead and click on either one of those.”
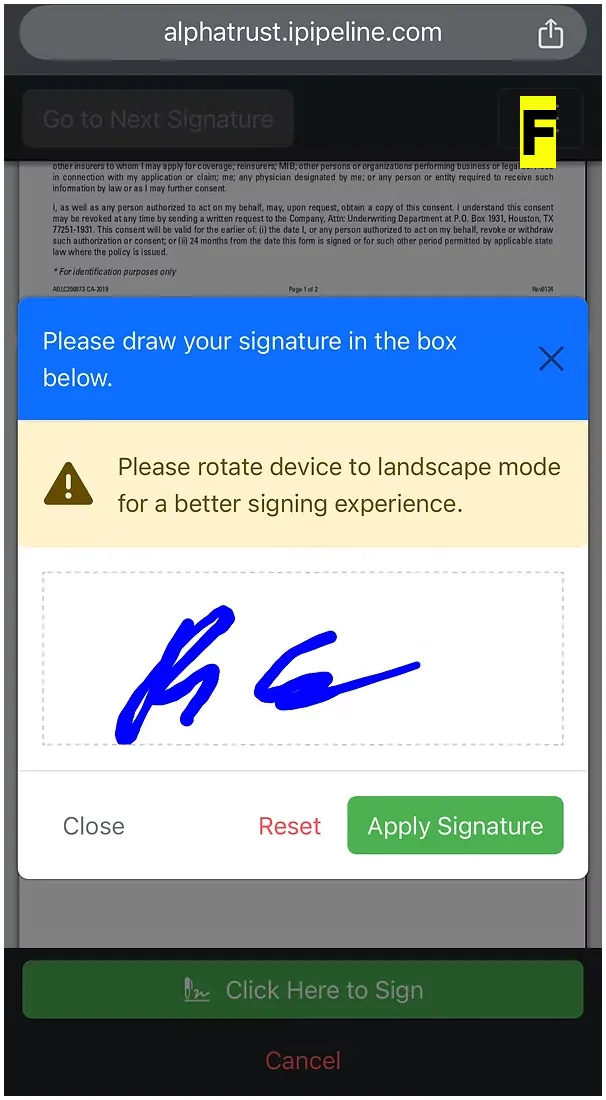
“Once you click on the box, you should now see a box come up that says PLEASE DRAW YOUR SIGNATURE with a white box that has dotted lines below that. Go ahead and sign your name inside of that white box with your finger. Once you sign, go ahead and press the green APPLY SIGNATURE button below.”
34
Step 34 screenshot
Step 34 screenshot
Step 34 screenshot
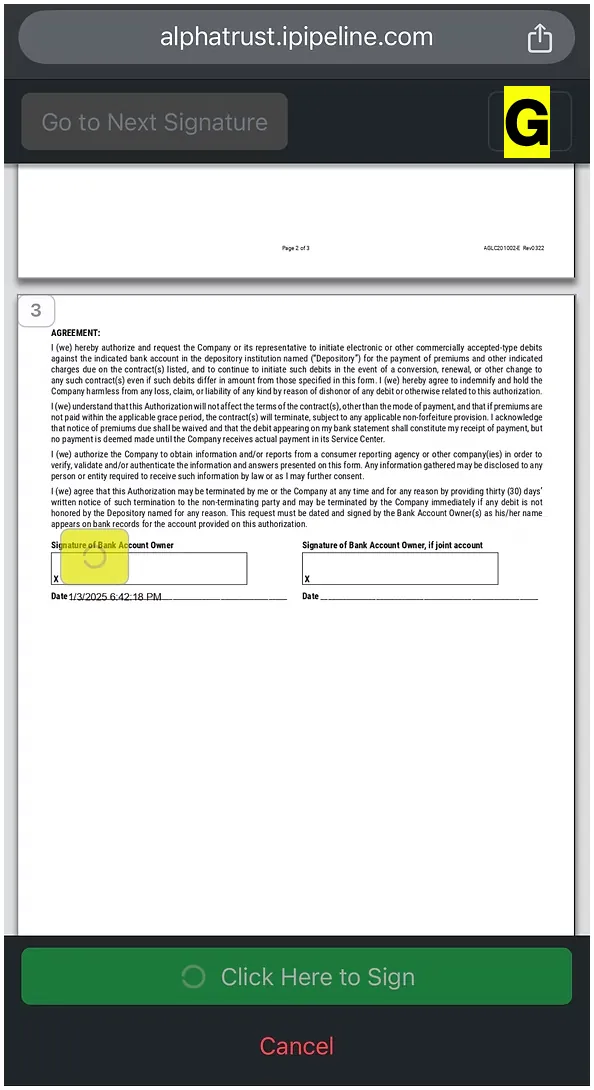
“Now should see the light blue button at the top left that says GO TO NEXT SIGNATURE. Go ahead and click on it and it should take you to another yellow box with the pen icon. Click on the yellow box and then press the light blue button again to be taken to the next yellow signature box.”
“Go ahead and keep going until all yellow boxes have been clicked to sign”
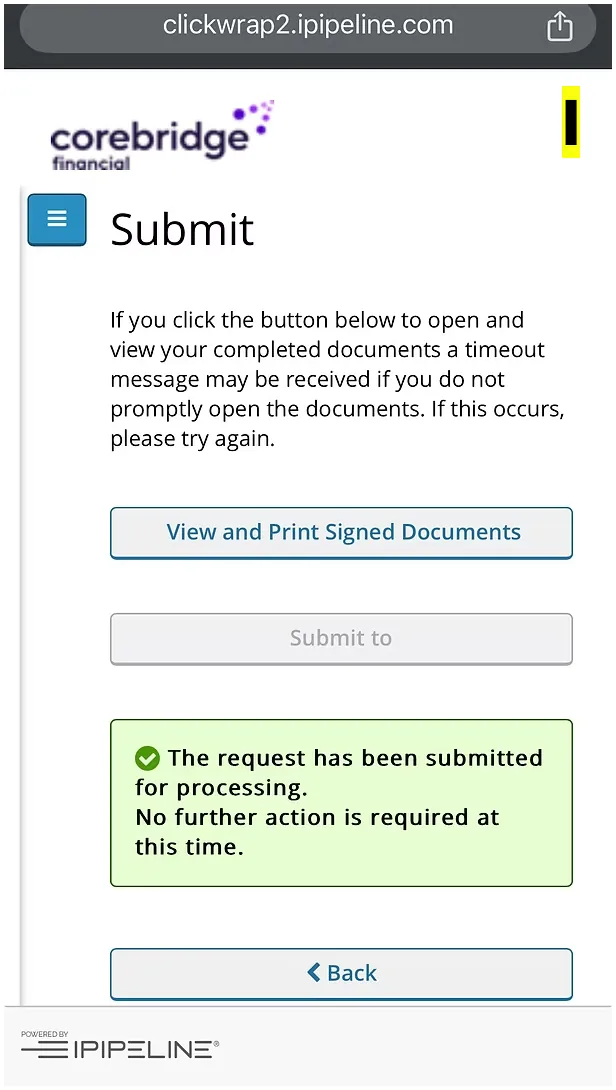
“Once all yellow boxes have been clicked to sign, you should now see a screen that says SUBMIT at the top. Now go down to a button that says SUBMIT TO and click on that button. Once you press the SUBMIT TO button, you should now see a green box that says THE REQUEST HAS BEEN SUBMITTED FOR PROCESSING.”
↩ back in the e-app
35
Step 35 screenshot

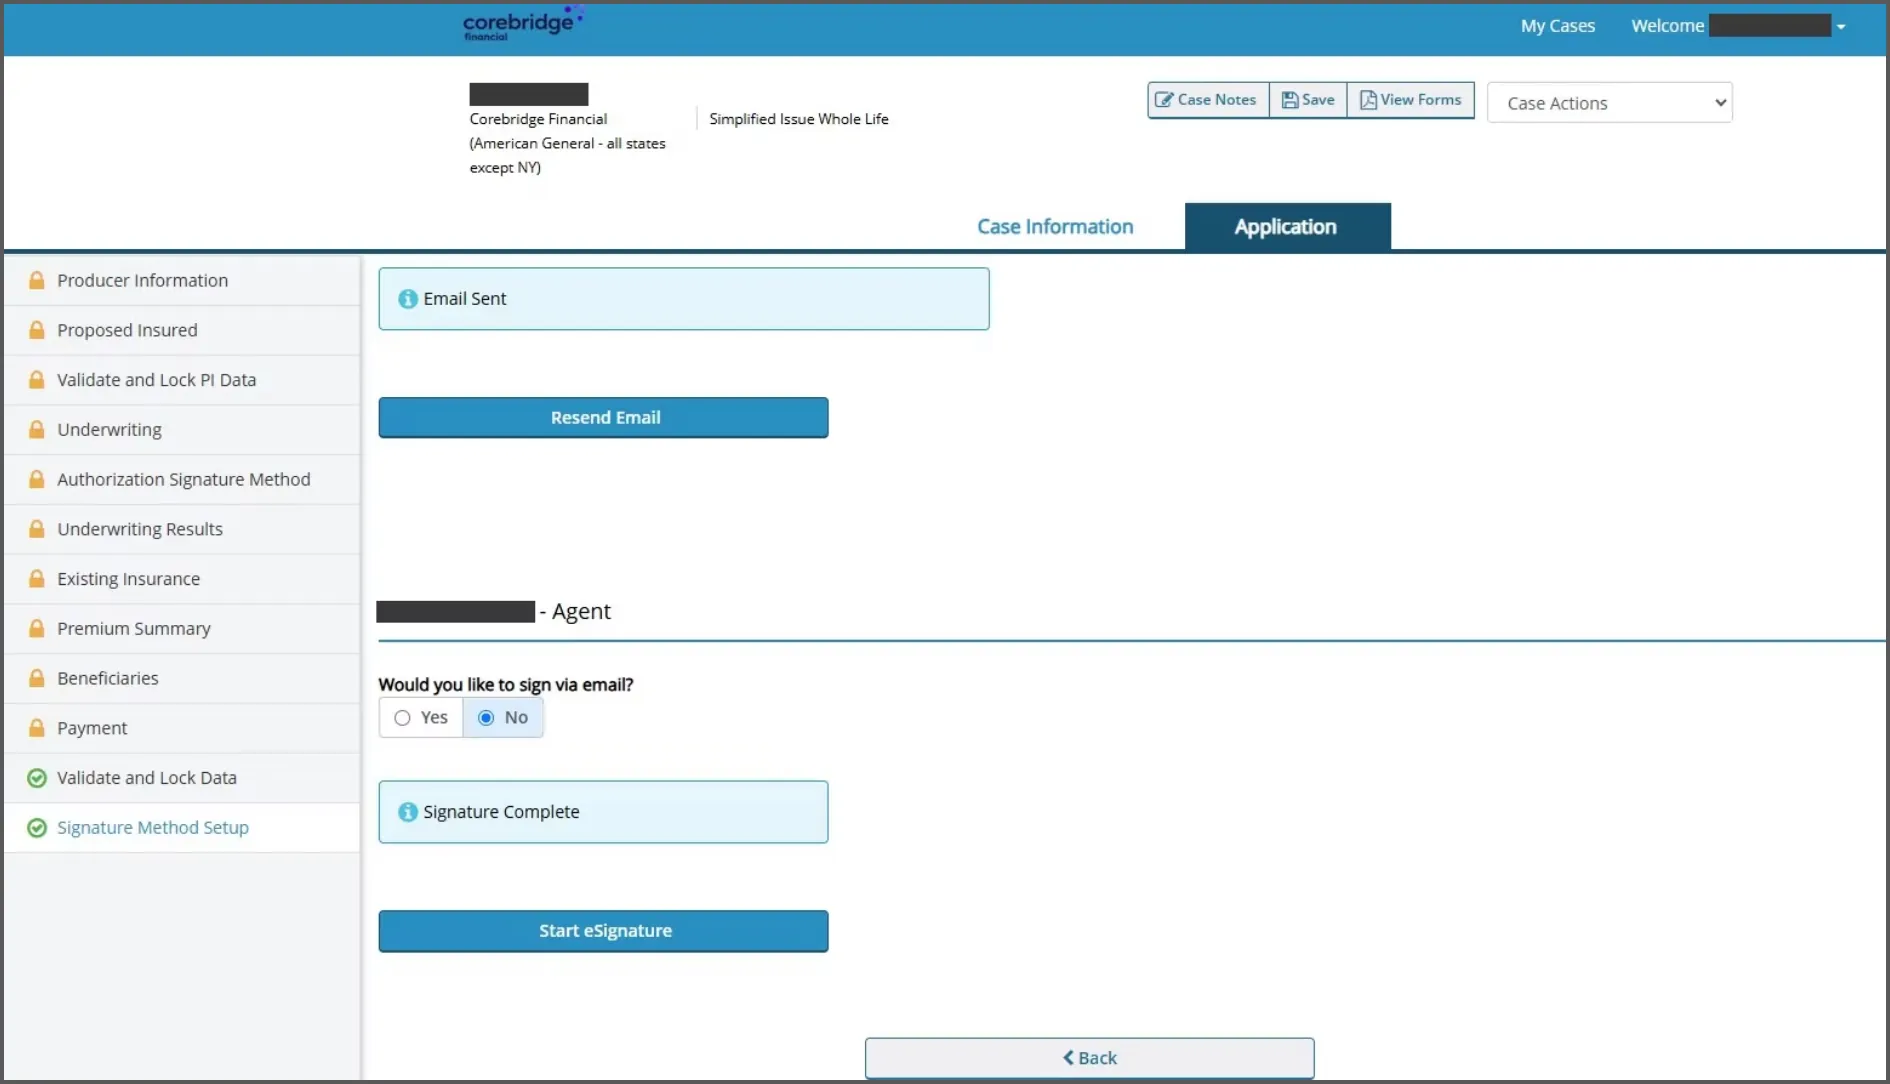
Once the applicant has signed, go ahead and click on the blue START SIGNATURE button for agent signature.
36
Step 36 screenshot
  1. 1
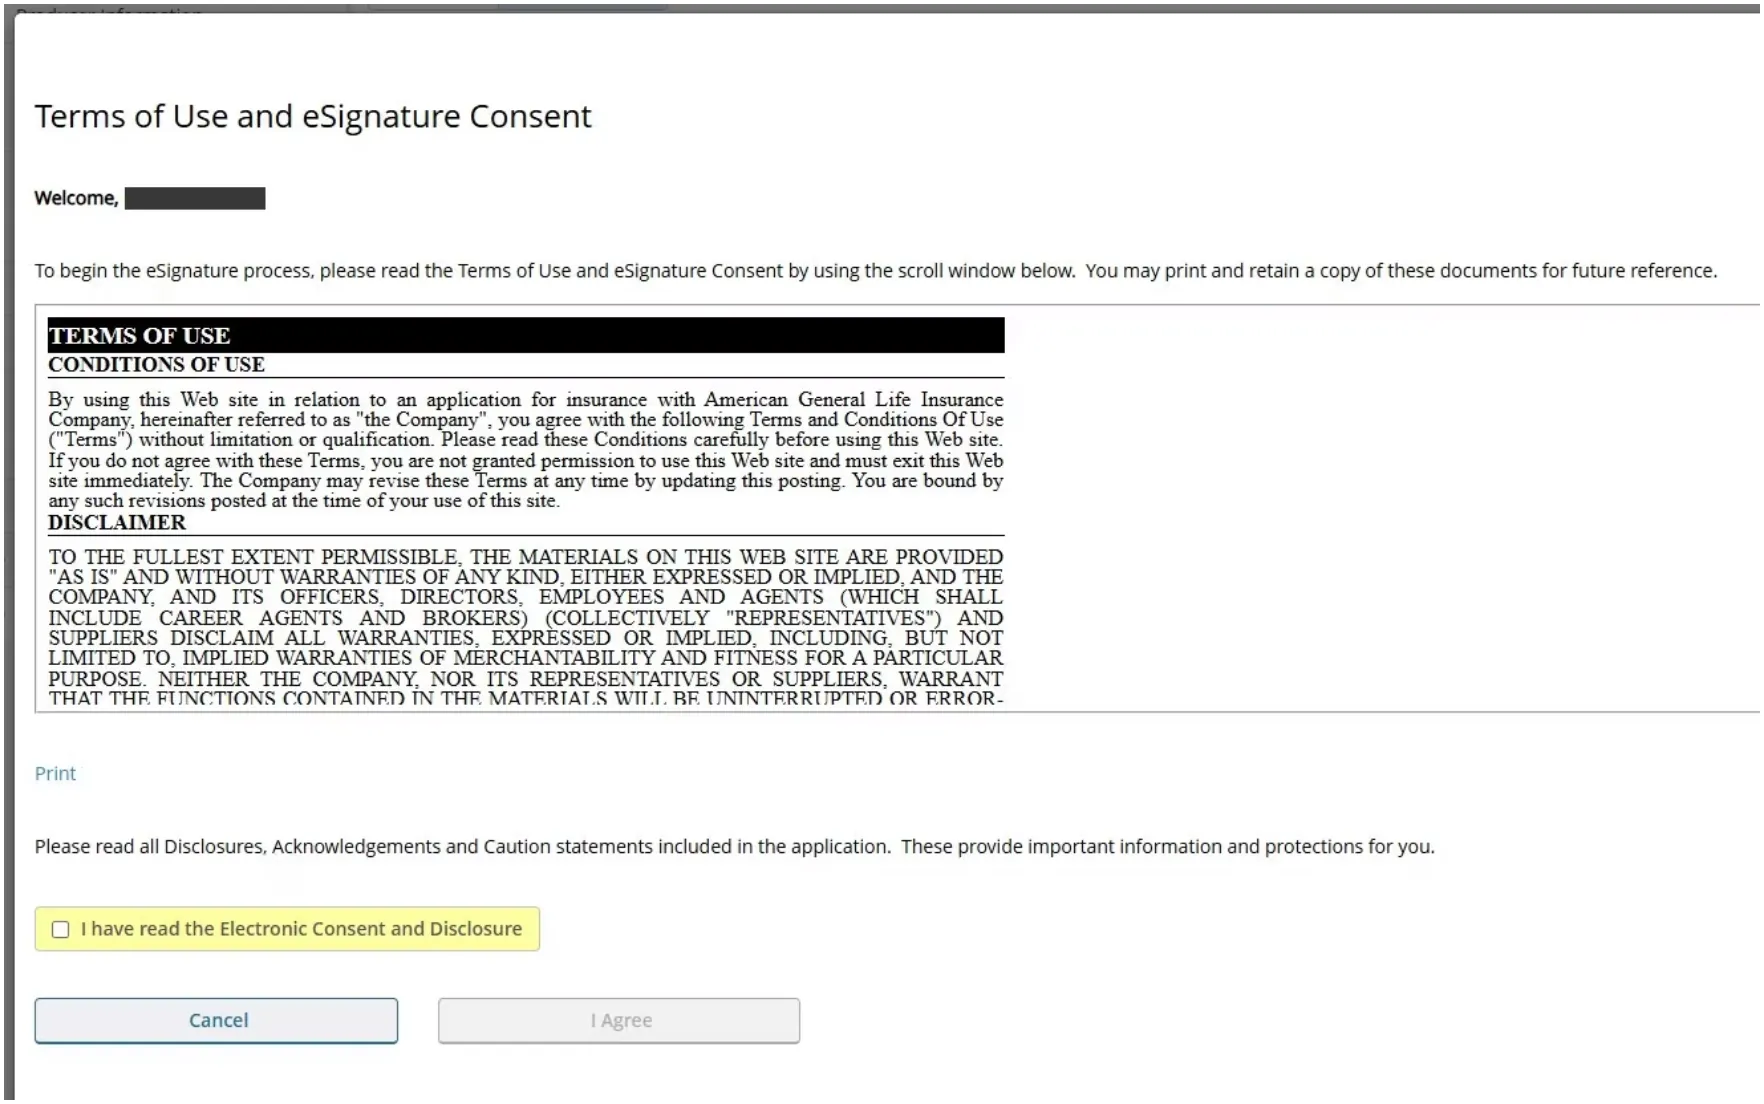
    a box will pop up with the TERMS OF USE. Go to the yellow box with a white checkbox that says I HAVE READ THE ELECTRONIC CONSENT AND DISCLOSURE and click on the white box.
  2. 2
    click on the I AGREE button.
37
Step 37 screenshot

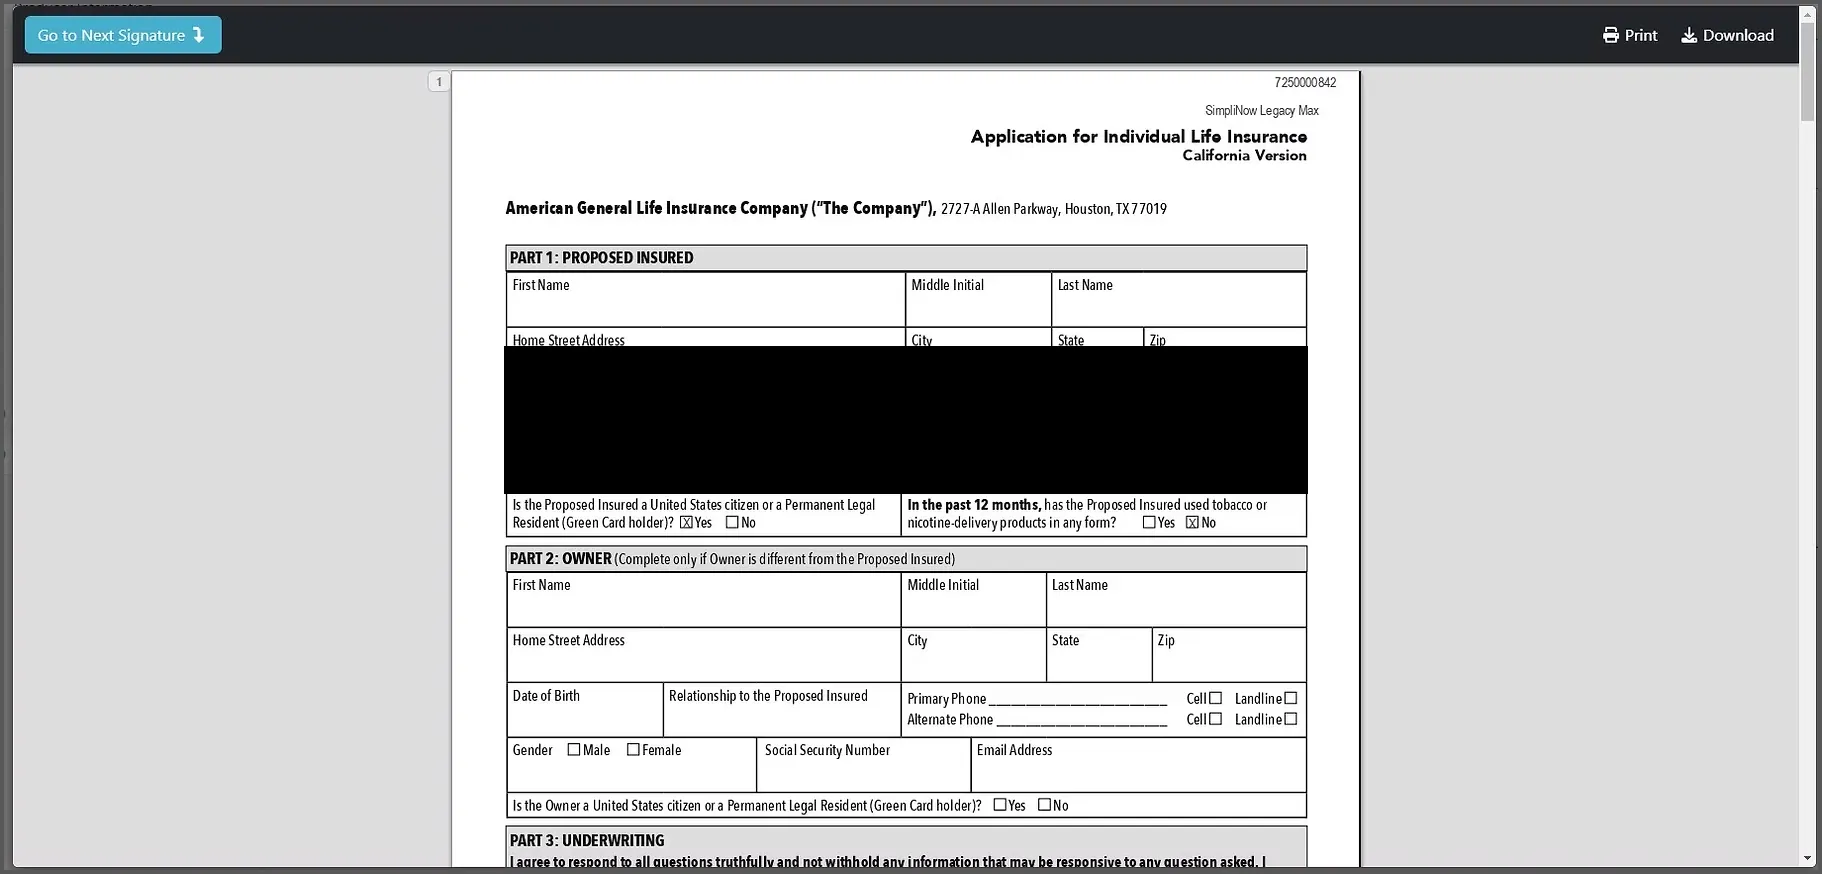
A box will pop up showing the application. Click on the blue button at the top left that says GO TO NEXT SIGNATURE.
38
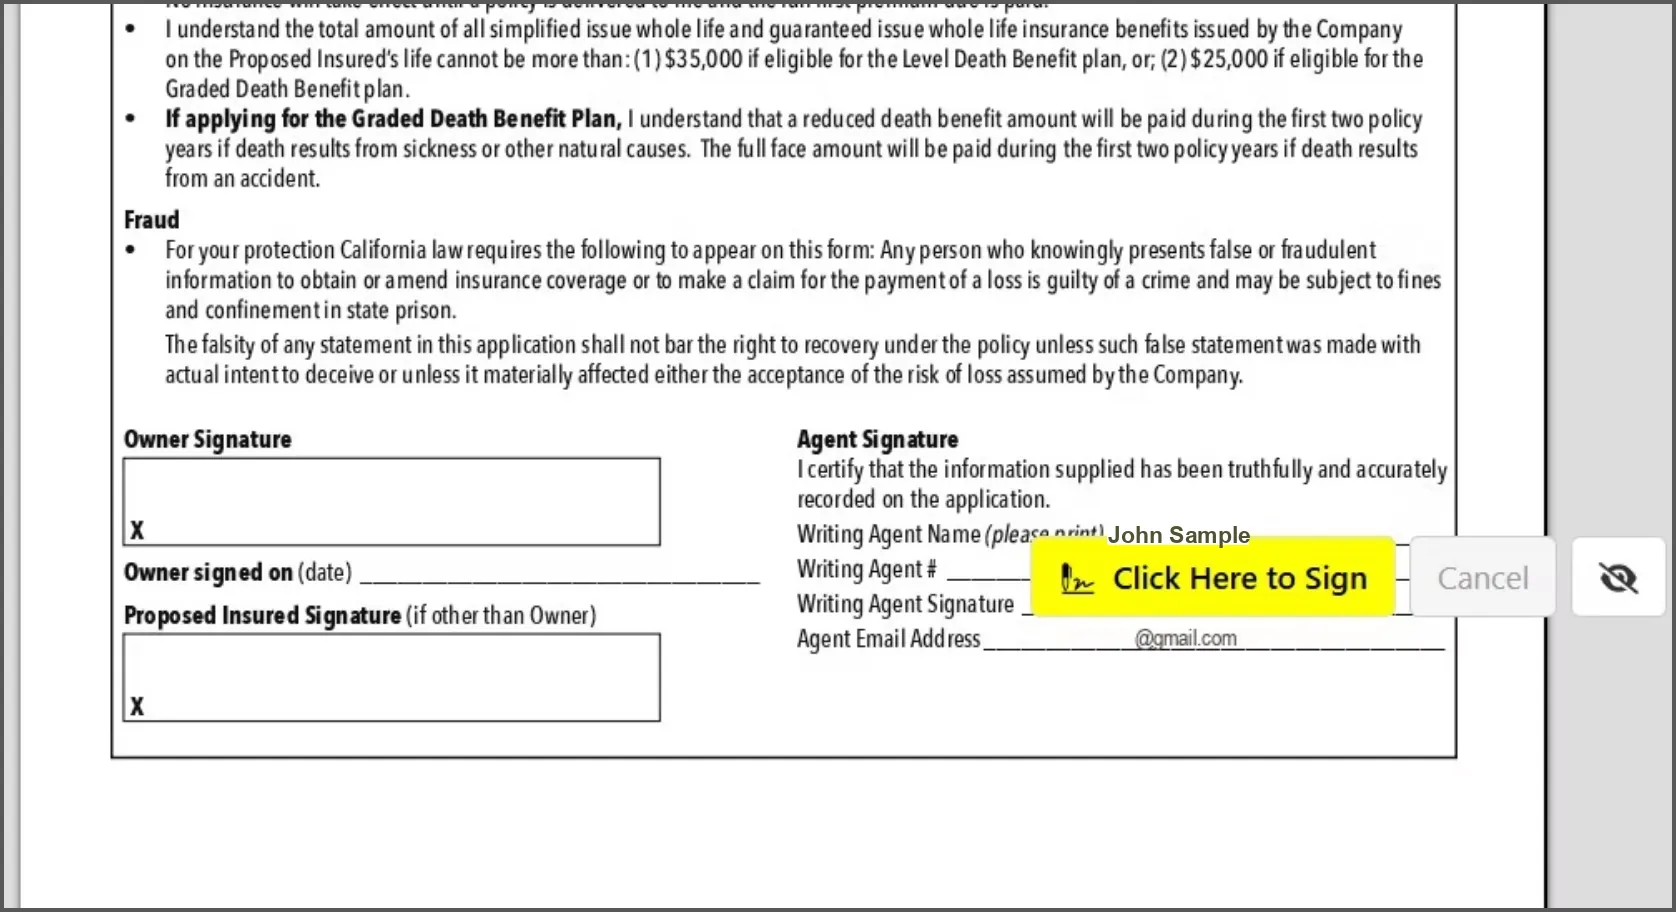
Step 38 screenshot

Should now be brought down to a yellow box that says CLICK HERE TO SIGN. Click on that box to sign.
39
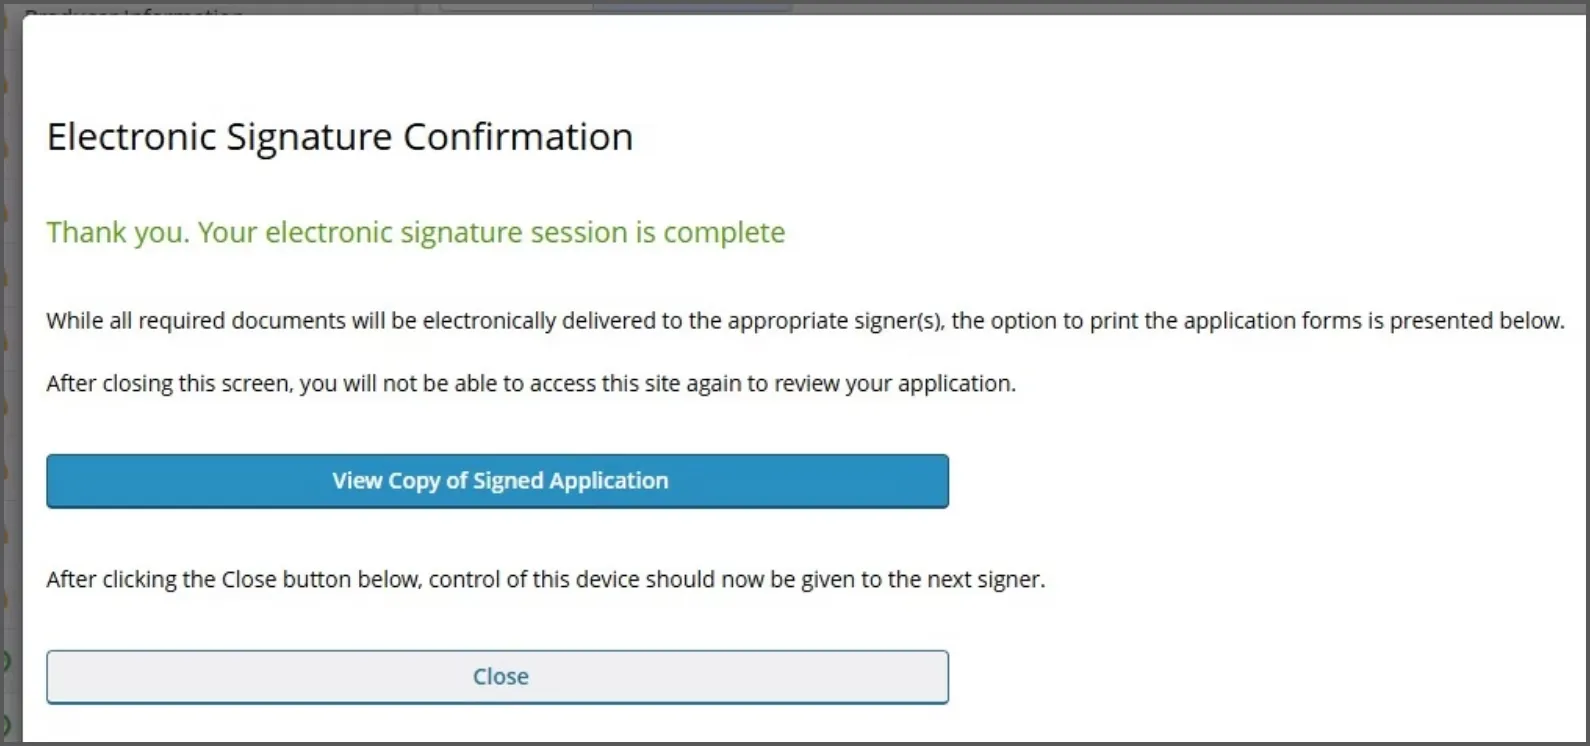
Step 39 screenshot
40
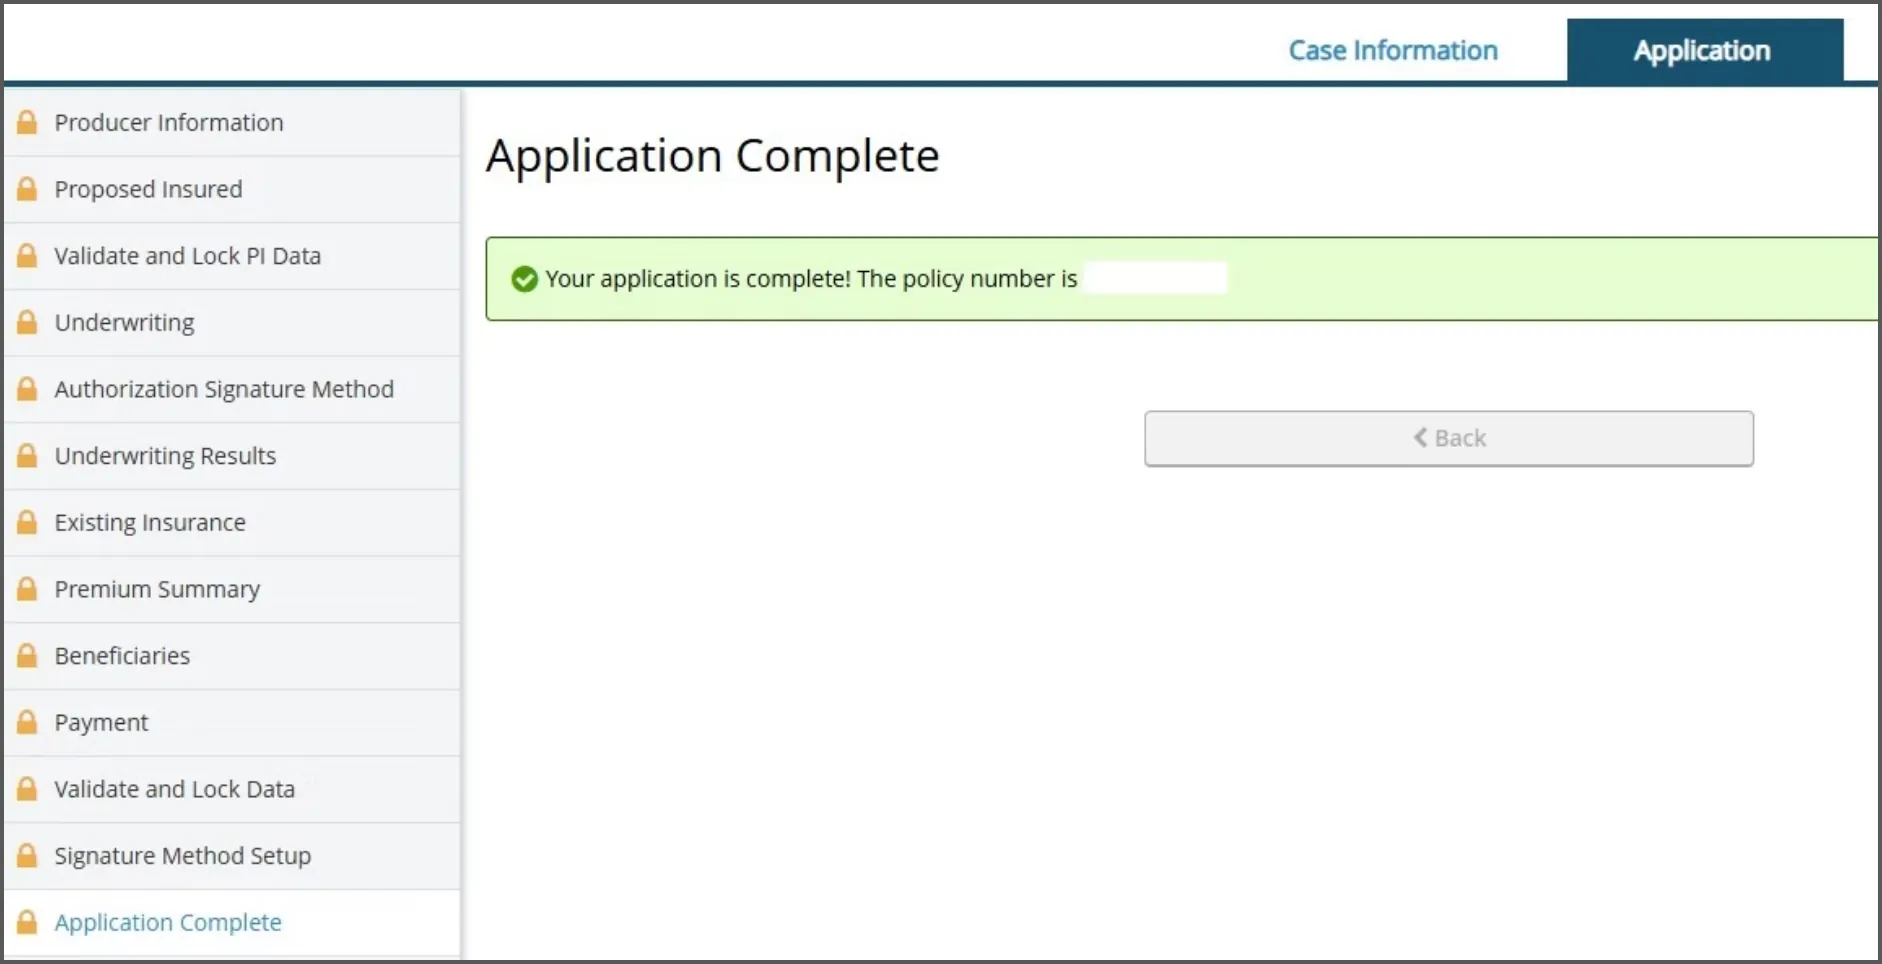
Step 40 screenshot