DFG

DFG Agents Only

Enter your access code to view this page.

Incorrect PIN — try again.
Duse Financial Group · Agents Only
← All carriers
Royal Neighbors
Royal Neighbors

Royal Neighbors e-App Guide

Ensured Legacy Final Expense · 31 steps · 1 e-sign script
Where to startRoyal Neighbors dashboard → Final Expense E-App
How the client signsAgent signs first (DocuSign), then client gets a text with a 5-digit secure code
ScreenshotsTap any screenshot to enlarge it. Yellow numbers in the shot match the numbered sub-steps.
Agent

E-App Guide

1
Step 1 screenshot

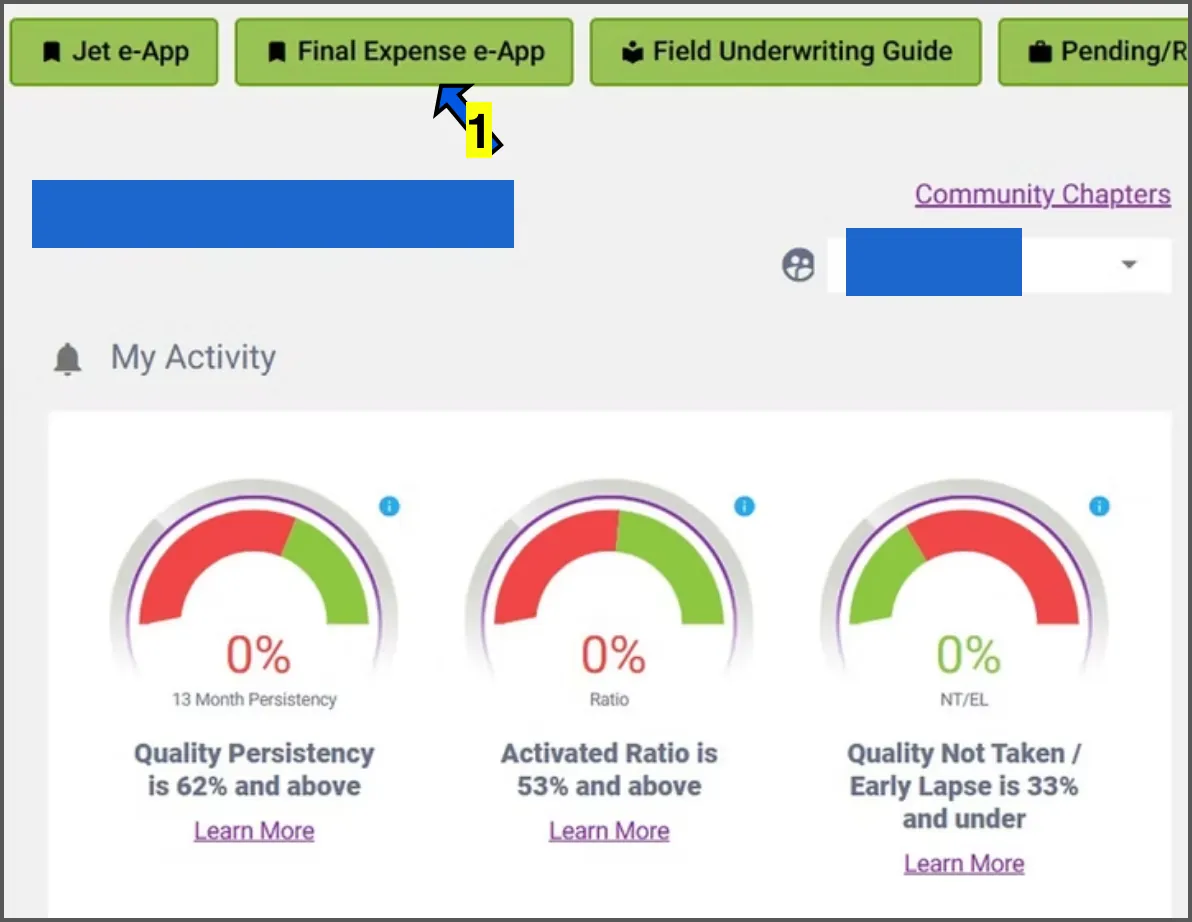
From your dashboard, click on FINAL EXPENSE E-APP located at the top.
2
Step 2 screenshot
  1. 1
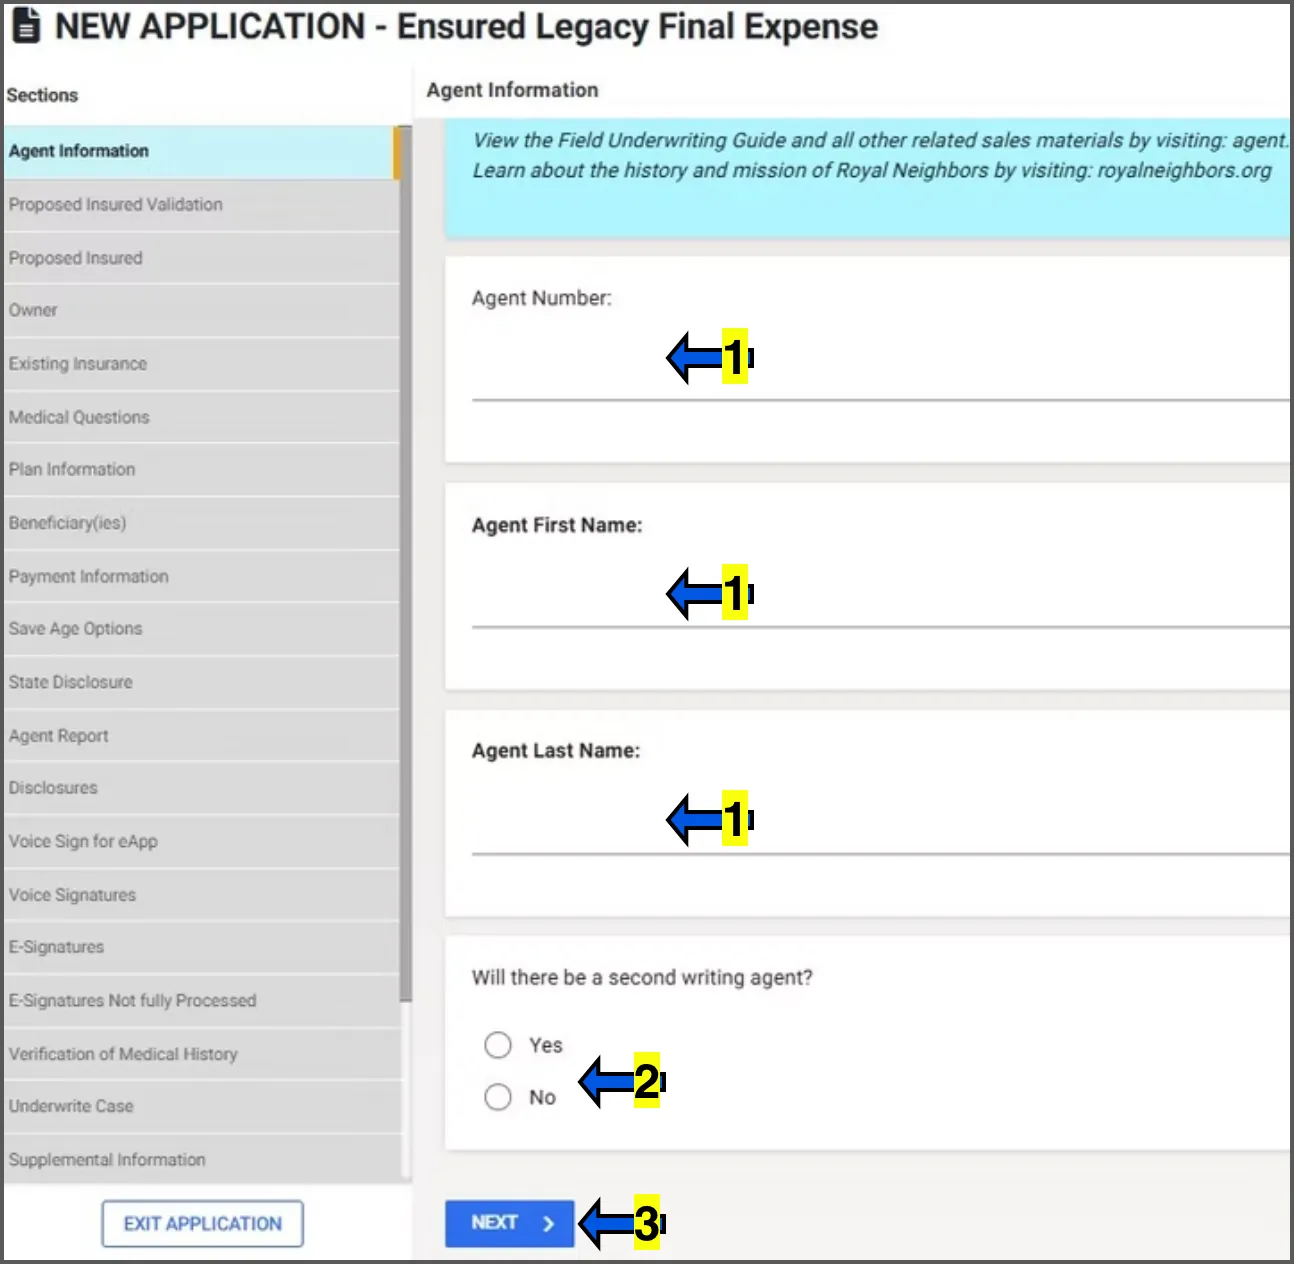
    enter your agent information.
  2. 2
    if you are the only agent who will be receiving commissions on this application, select NO. Select YES if you and another agent are splitting commissions on this application. Percentage split must equal 100% combined. For example 75/25, 50/50, 60/40.
  3. 3
    click NEXT
3
Step 3 screenshot
Step 3 screenshot
Step 3 screenshot
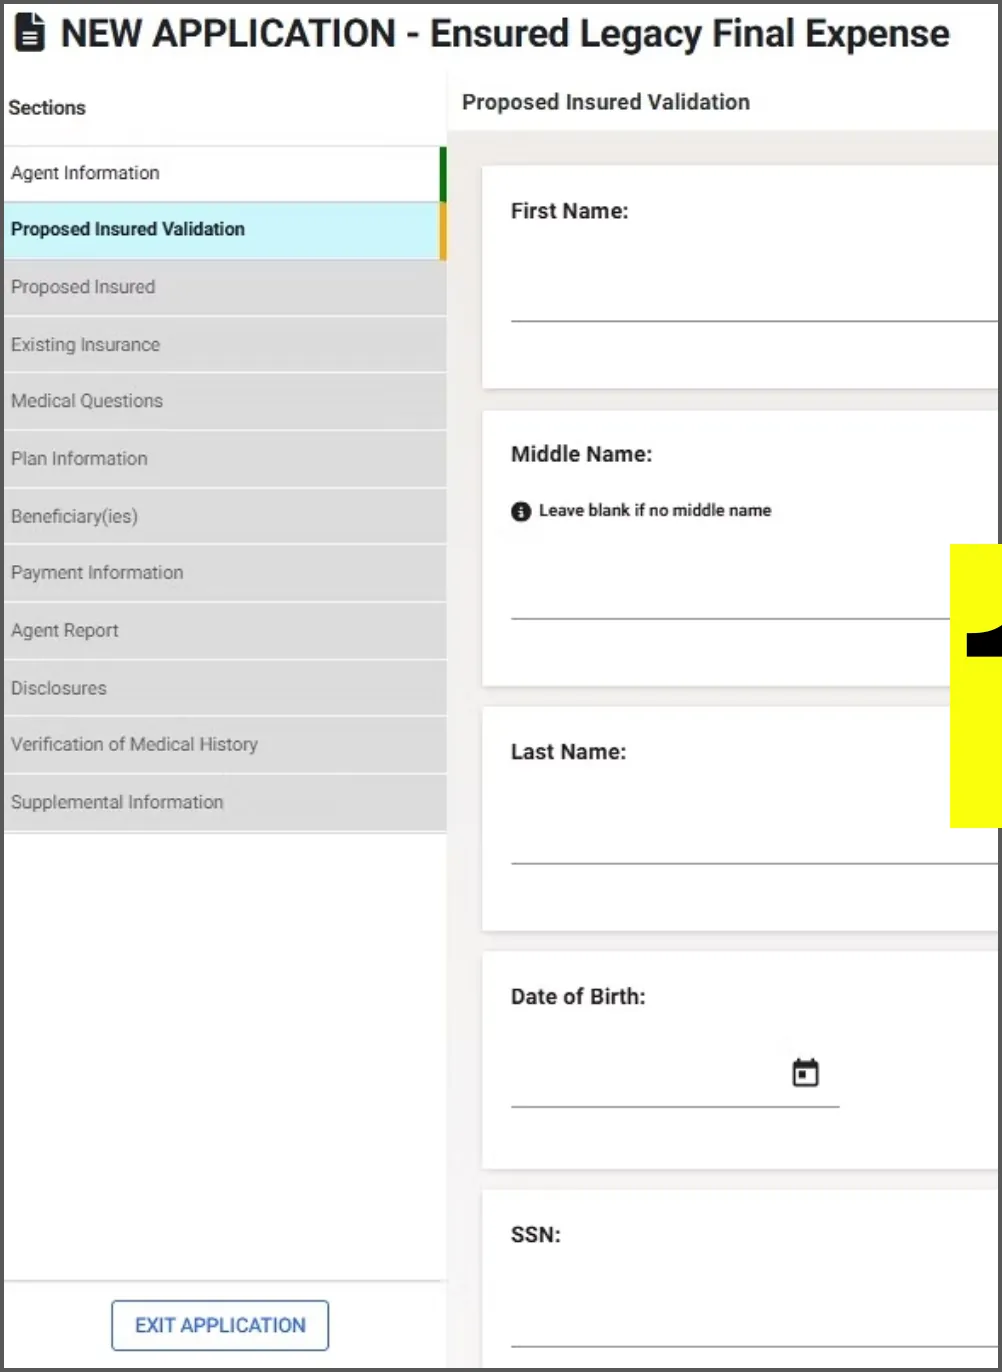
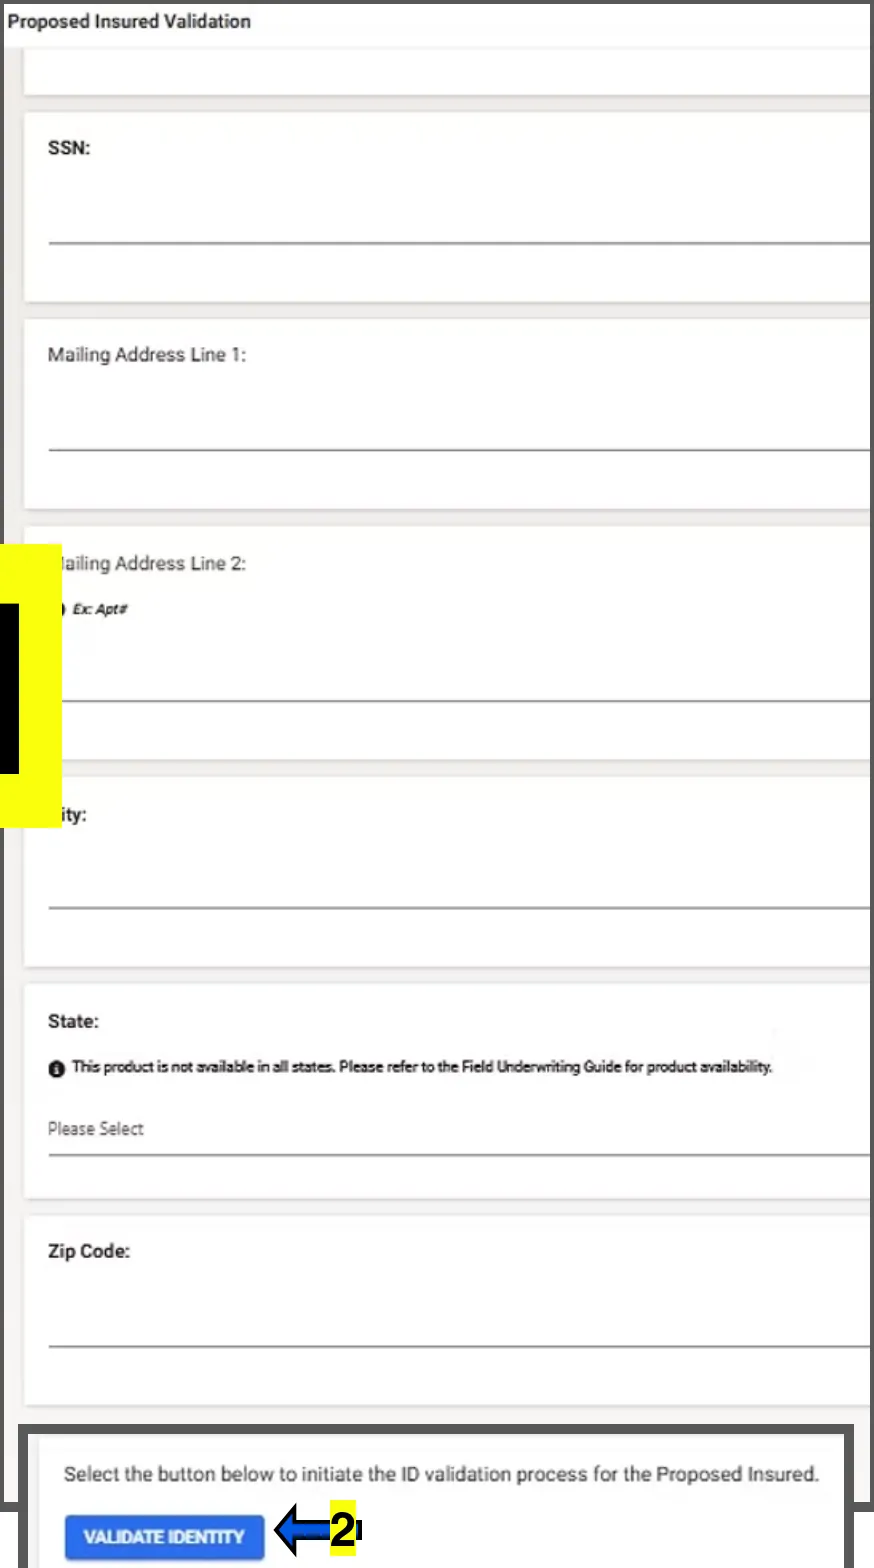
  1. 1
    enter the applicant's information.
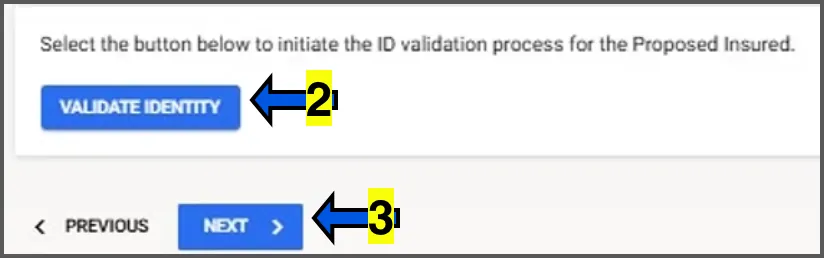
  2. 2
    click VALIDATE IDENTITY.
  3. 3
    click NEXT
4
Step 4 screenshot
Step 4 screenshot
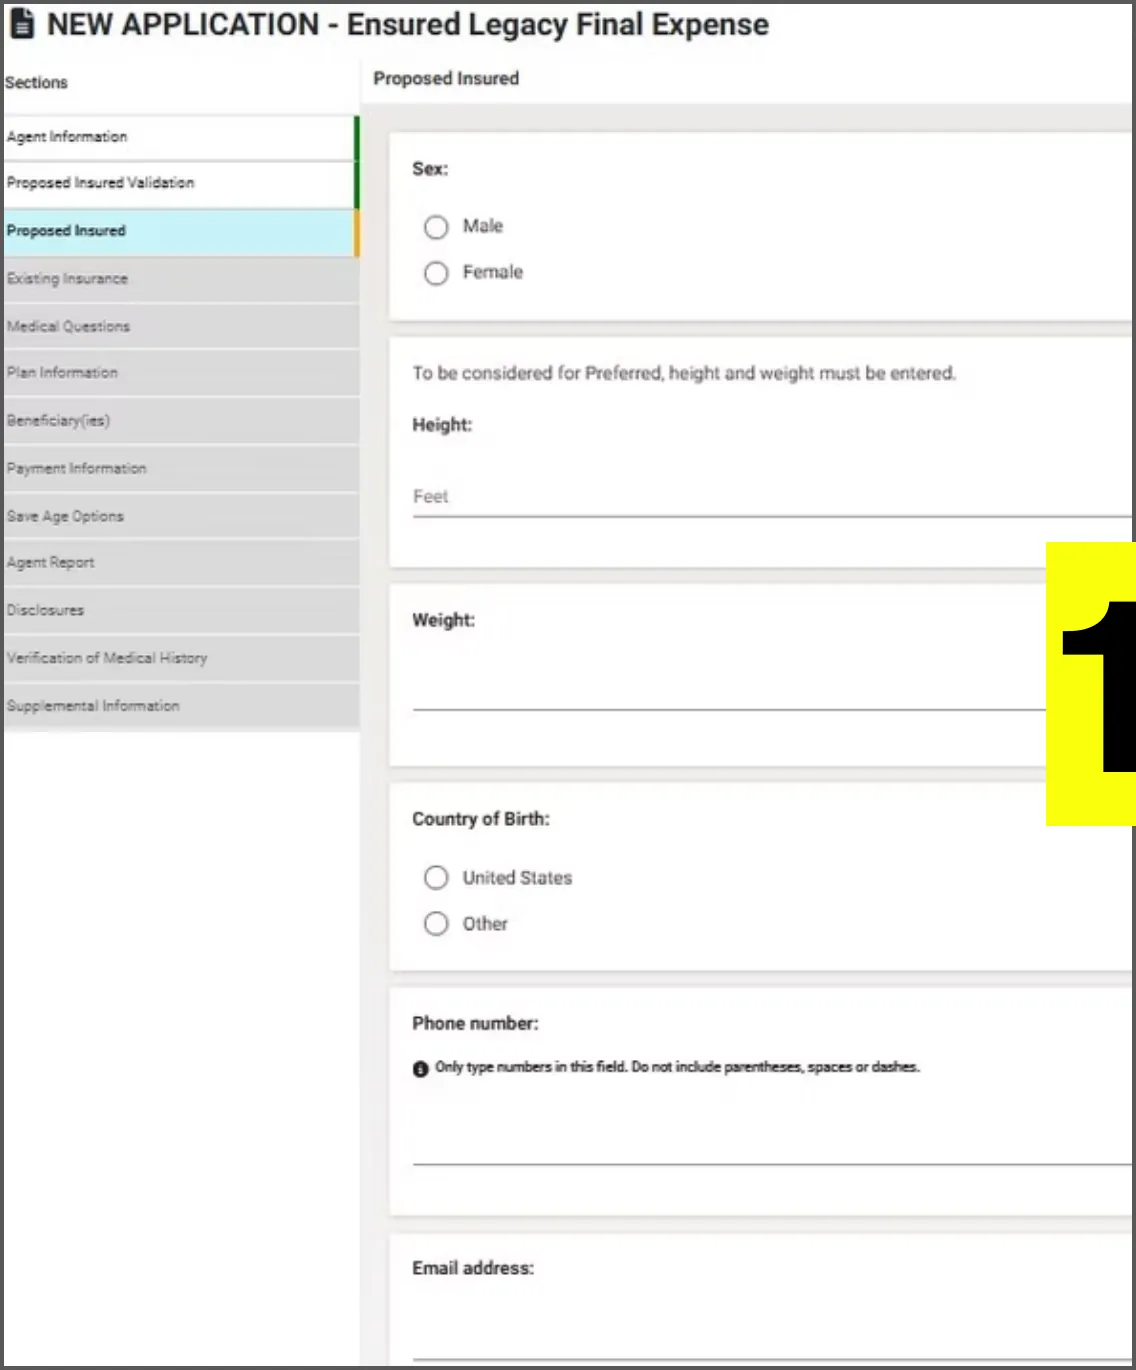
  1. 1
    enter the applicant's information.
  2. A
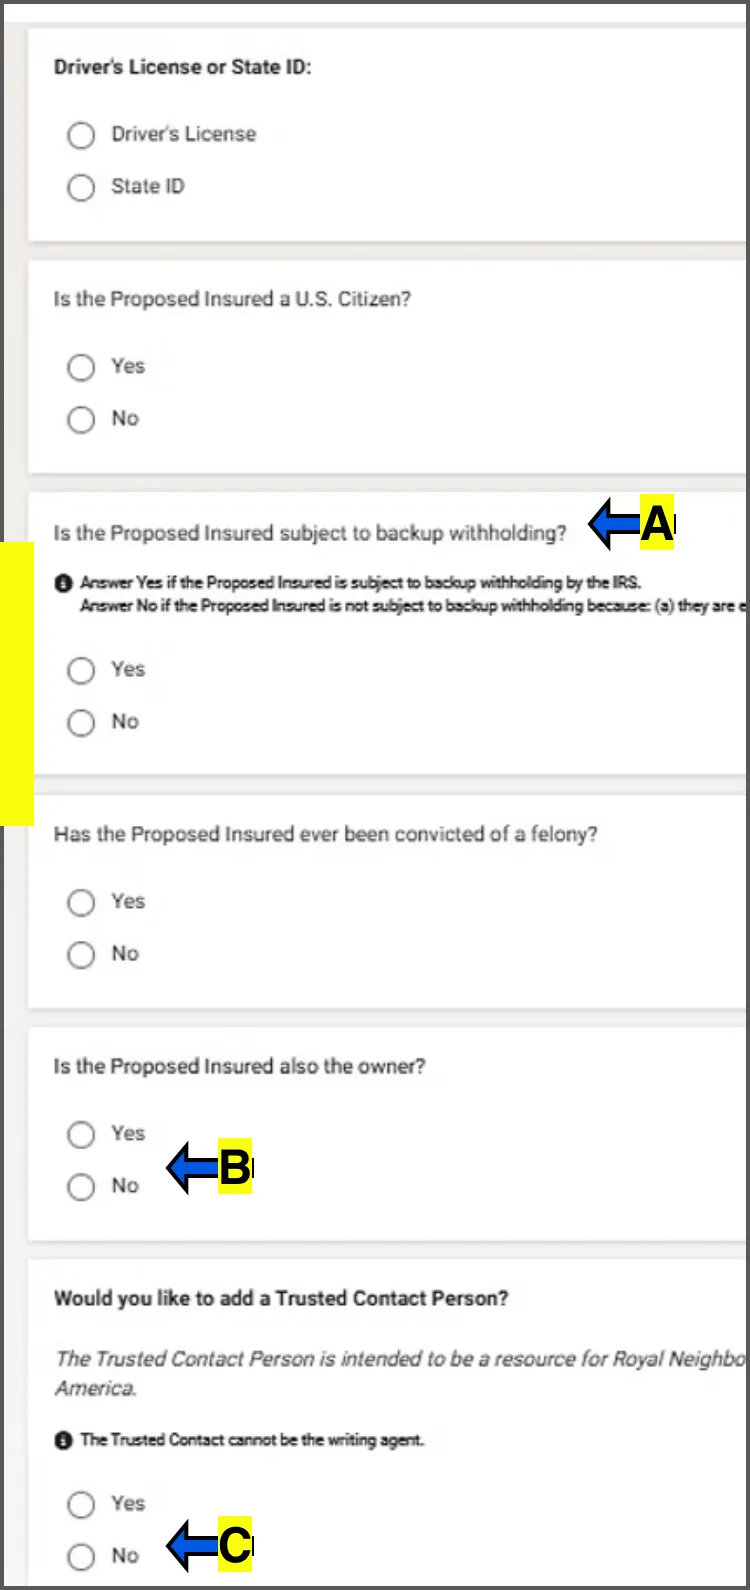
    BACKUP WITHHOLDING. U.S. citizens or resident aliens are considered exempt from backup withholding if their reported name and Social Security Number matches the IRS records. Additionally, you are exempt if you have not been notified by the IRS that you are subject to mandatory backup withholding.
5
Step 5 screenshot
  1. B
    POLICY OWNER. To keep it simple, try to keep the insured and owner the same. However sometimes someone may want coverage on a loved one (Child getting a policy on the parent to cover funeral expenses for example).
  2. C
    TRUSTED CONTACT PERSON. To keep it simple, you can select NO. Trusted contact is someone that Royal Neighbors can contact other than the insured.
  3. D
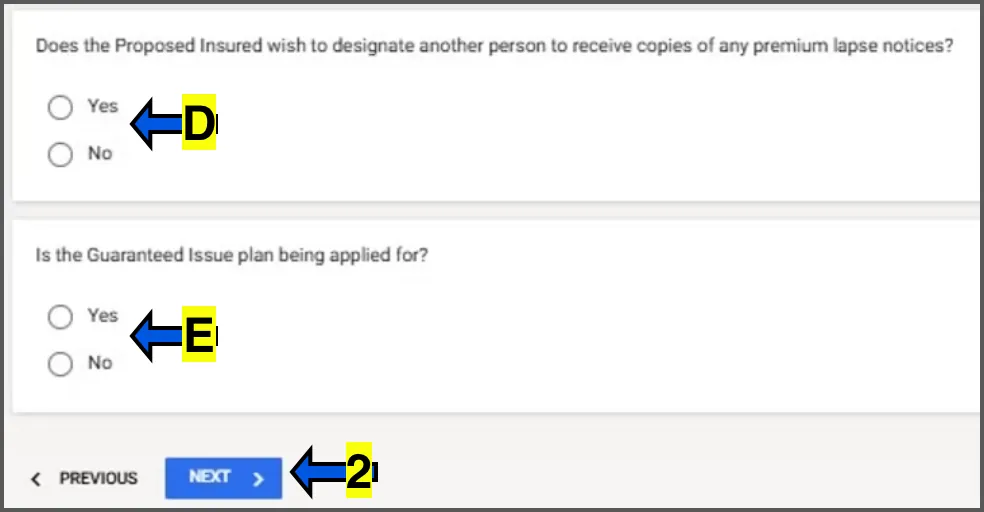
    DESIGNATED PERSON FOR LAPSE NOTICES. This person will receive notices that the policy is in danger of cancelling. This is optional.

E. GUARANTEED ISSUE PLAN. This is the guaranteed issue plan that doesn't ask any health questions and is an automatic graded plan. If you've done the proper underwriting before the application, you will know if this is the proper plan for the applicant.
  1. 2
    click NEXT.
6
Step 6 screenshot
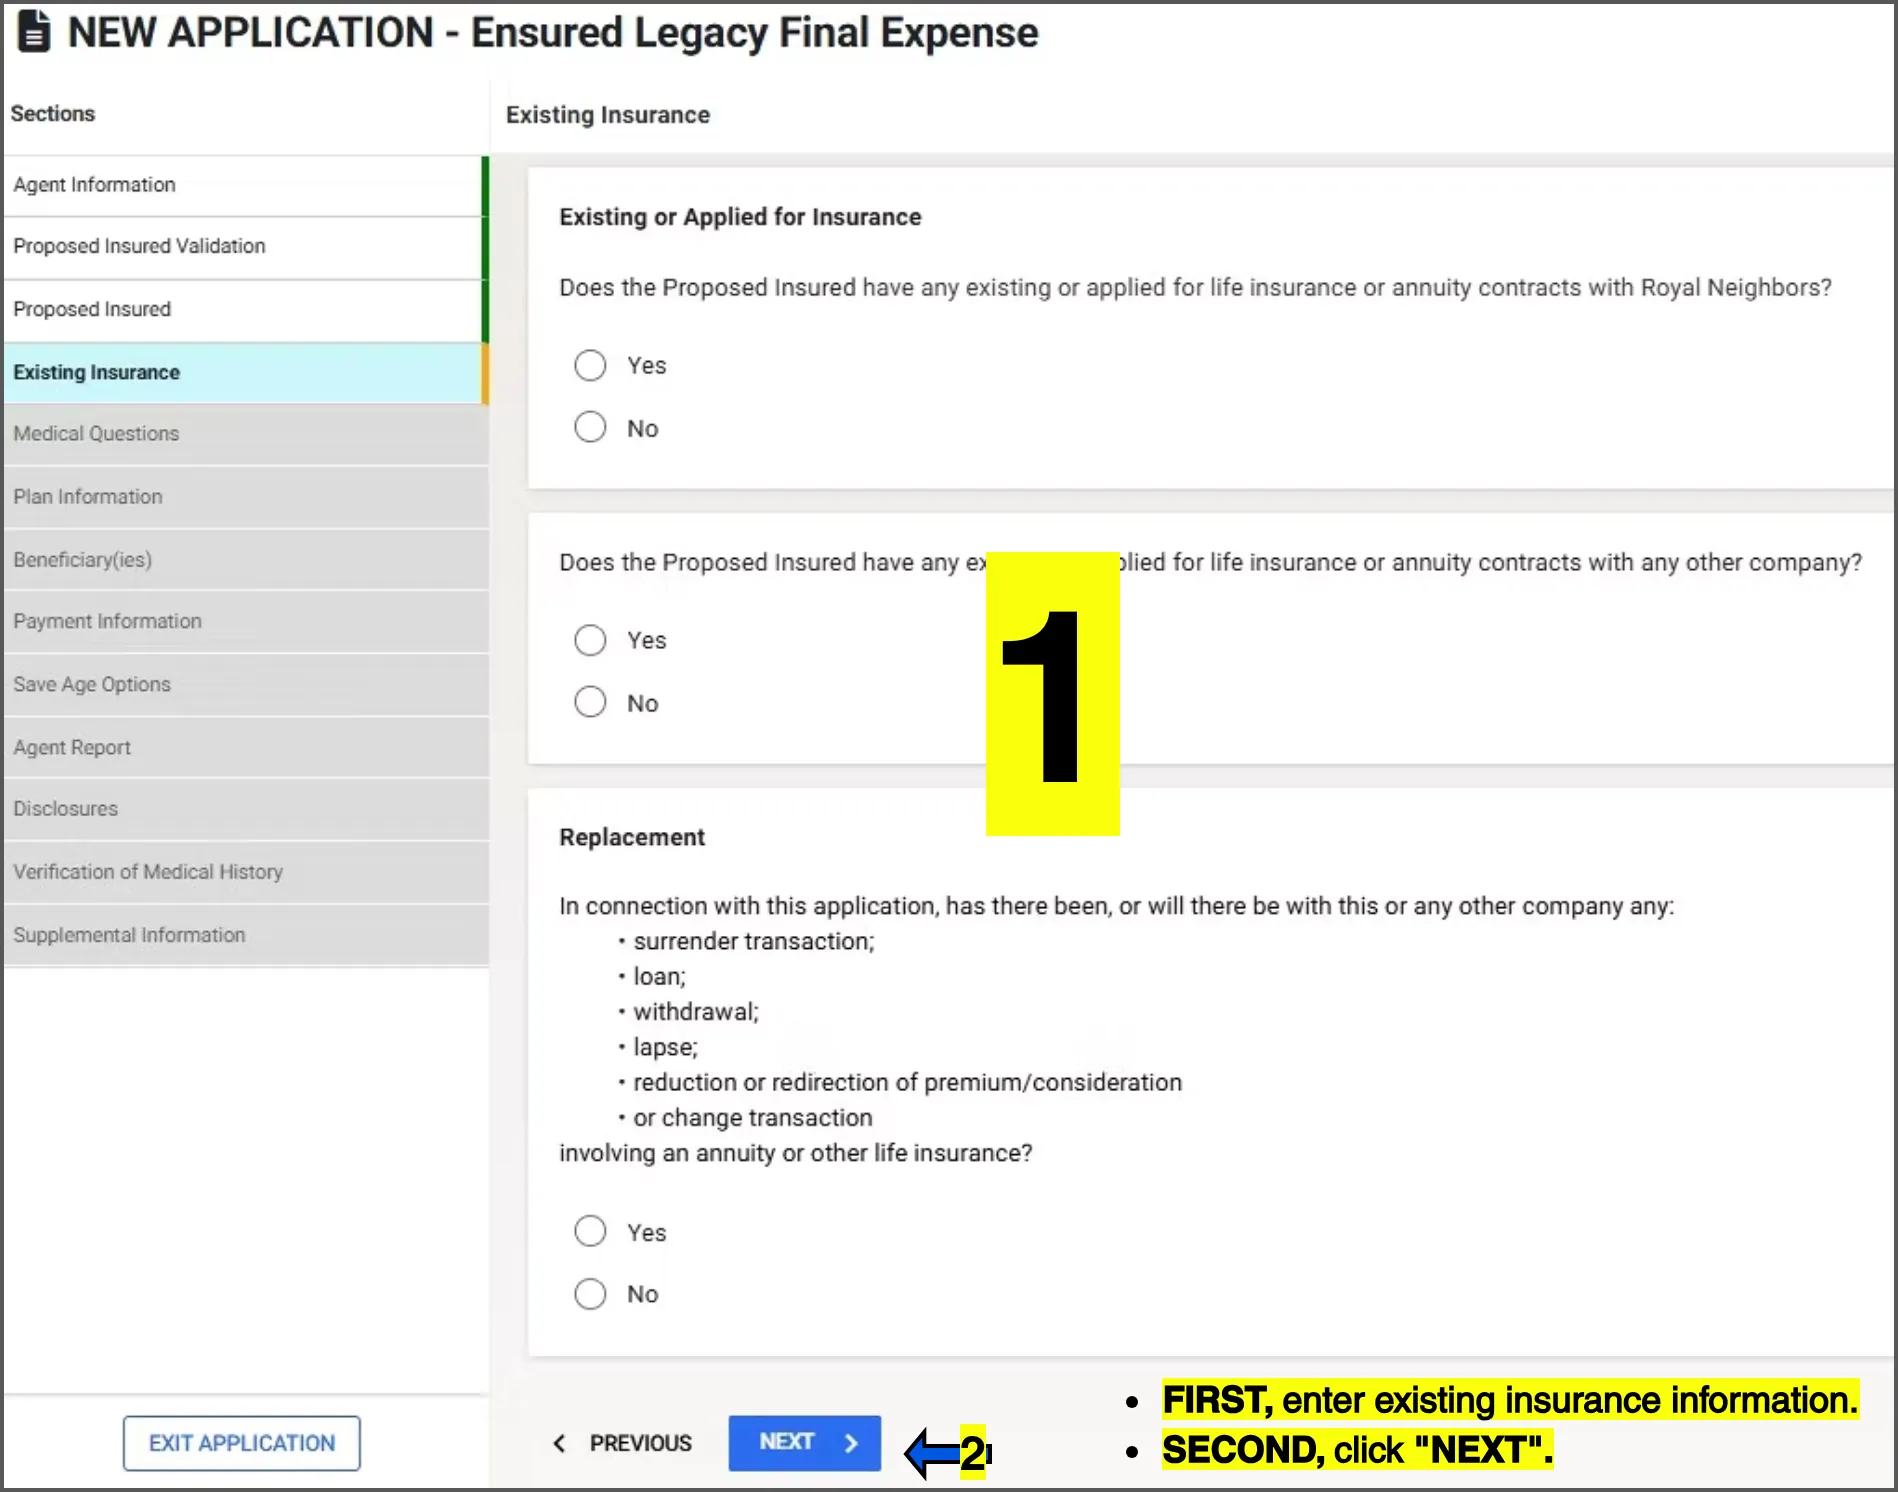
  1. 1
    enter existing insurance information.
  2. 2
    click NEXT.
7
Step 7 screenshot
Step 7 screenshot
Step 7 screenshot
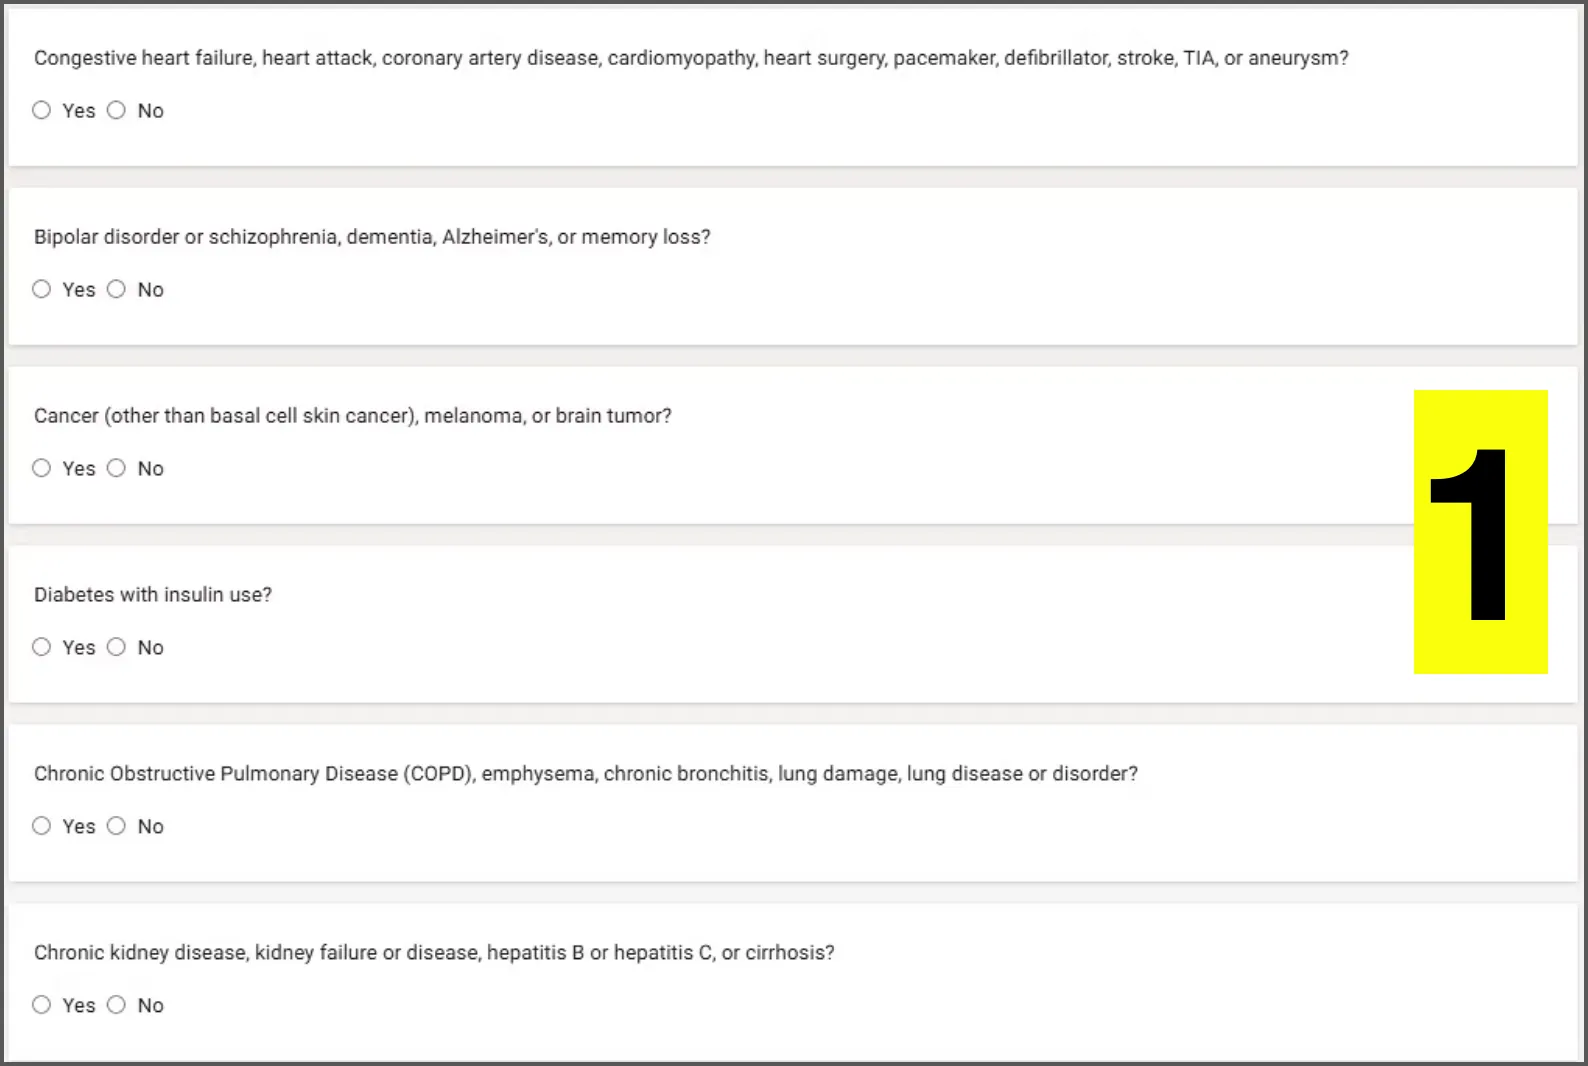
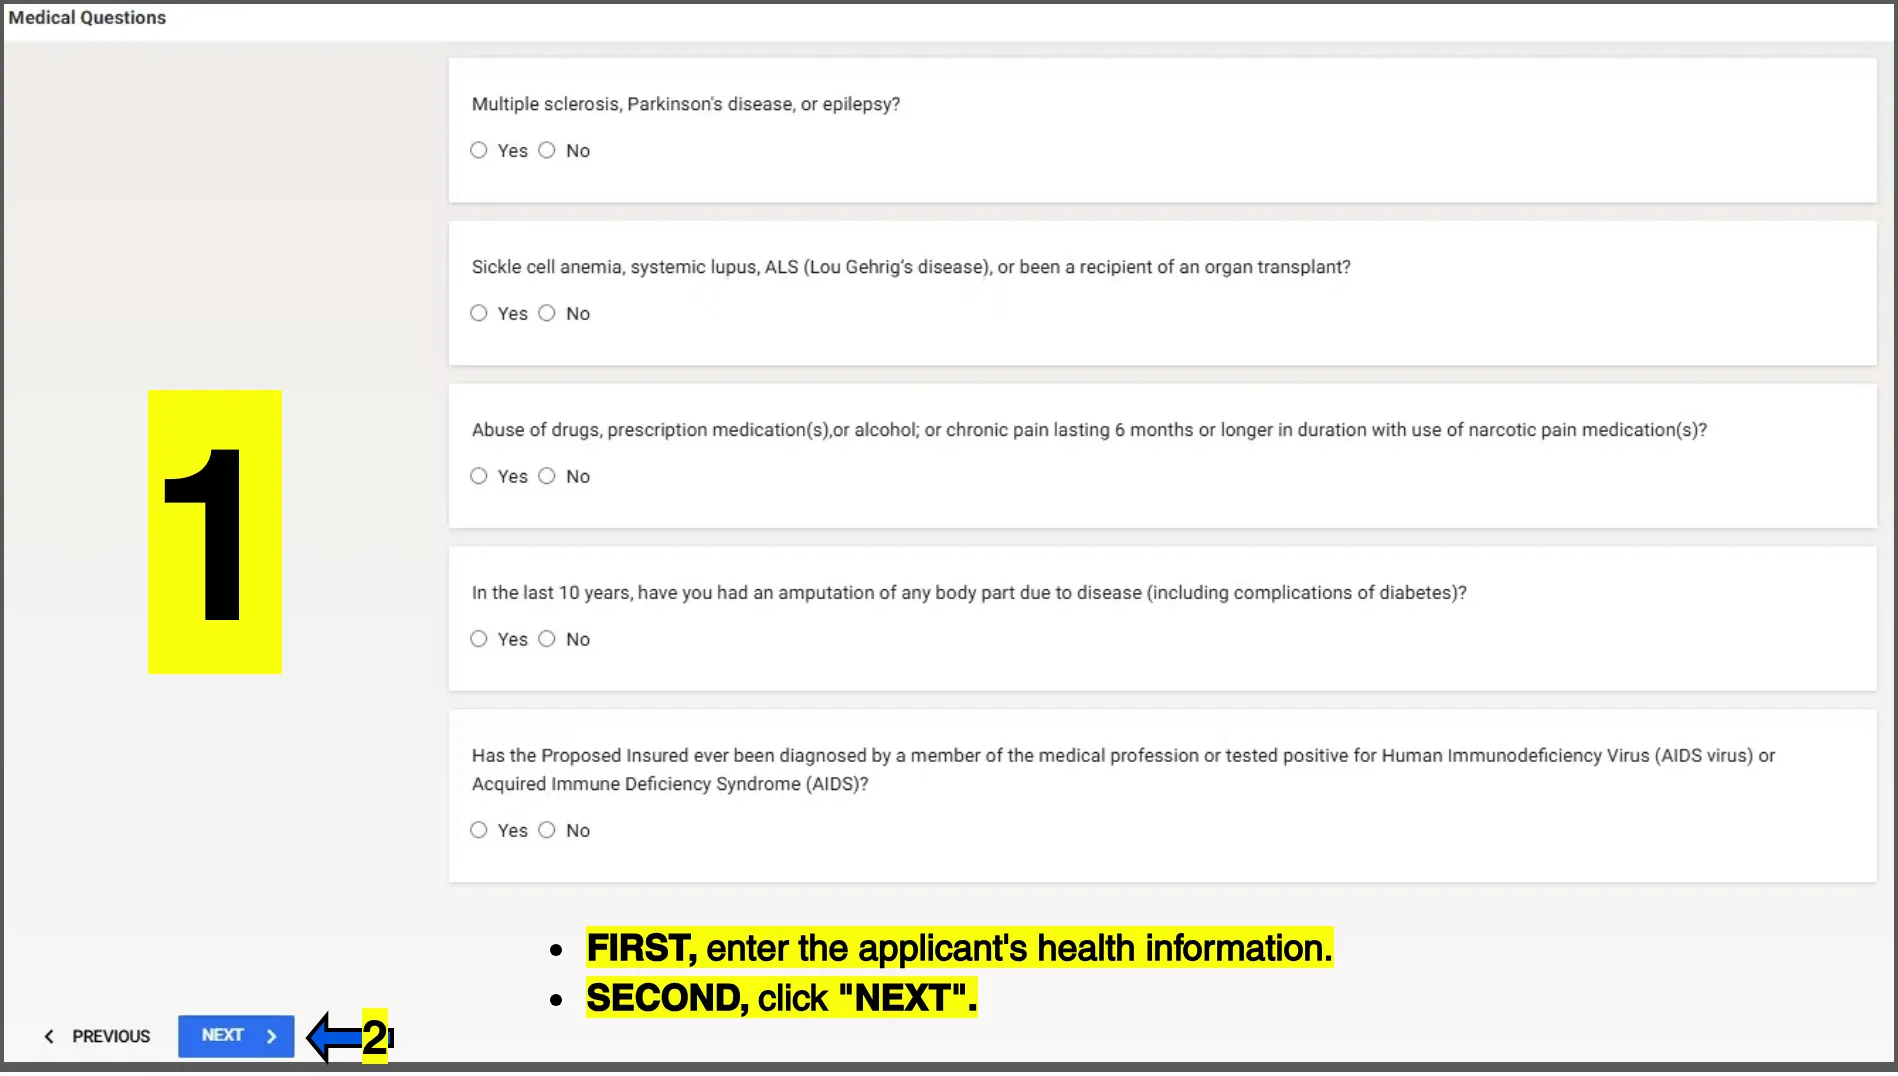
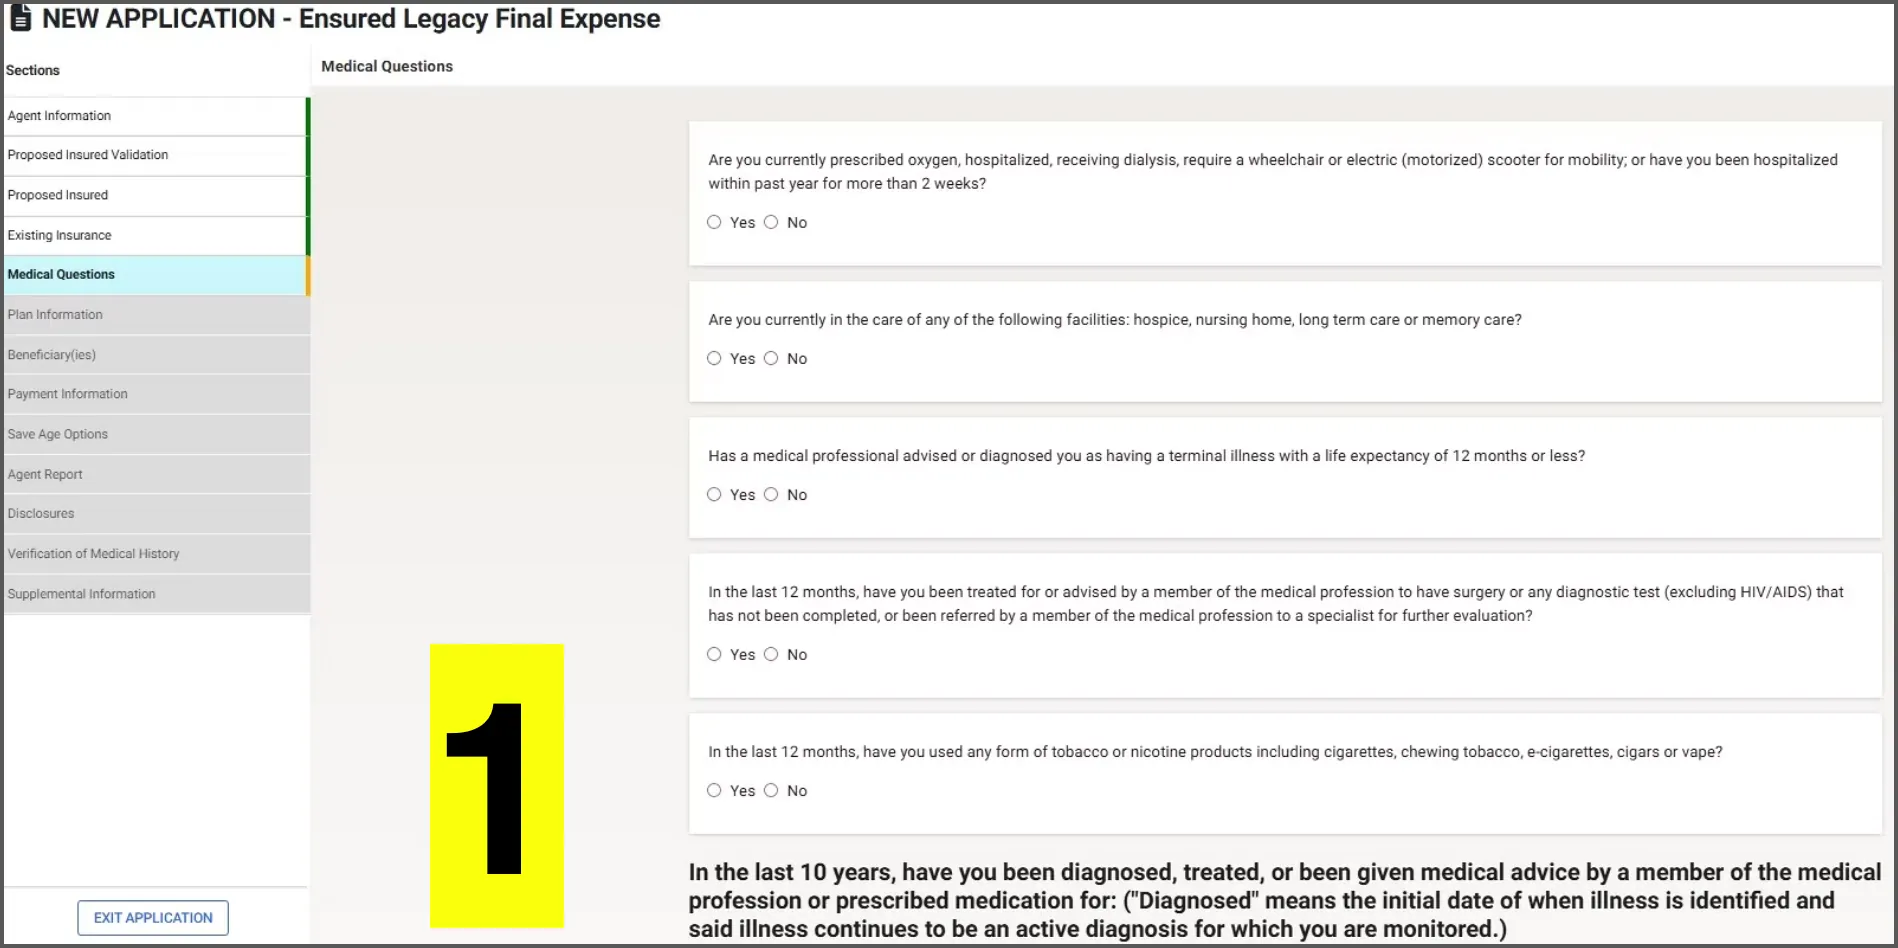
  1. 1
    enter the applicant's health information.
  2. 2
    click NEXT.
8
Step 8 screenshot
Step 8 screenshot
  1. 1
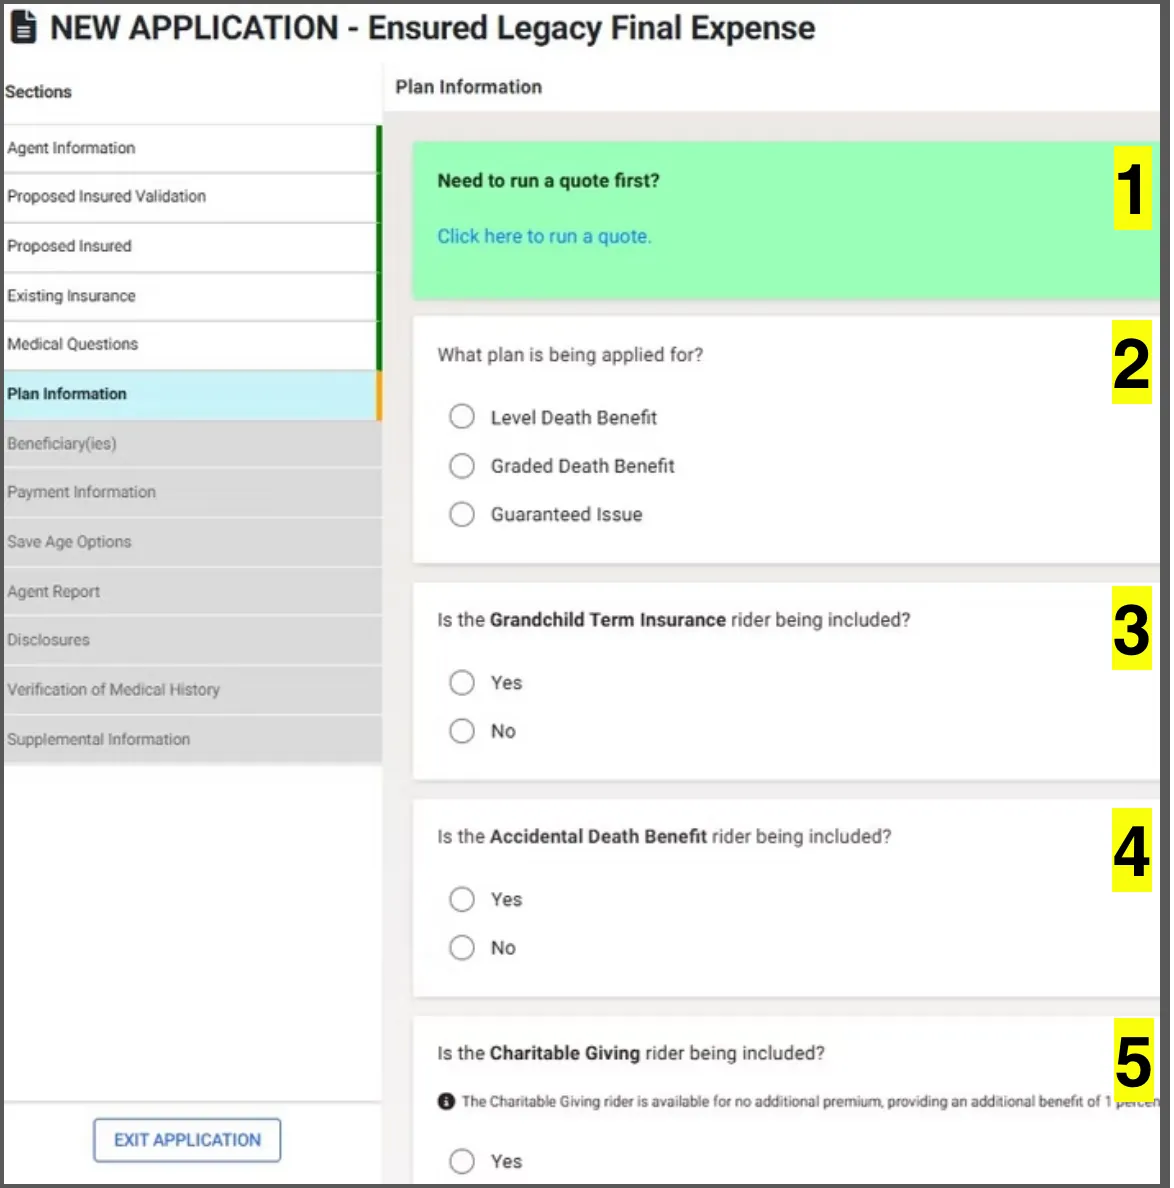
    if you did proper underwriting, you should already know the premium and may skip this part. But if not, it is better to skip this quote until all riders are added IF applicable.
  2. 2
    choose the plan. If proper underwriting has been done, you should know which plan is being applied for. Plan details are on the UW cheat sheet.
  3. 3
    GRANDCHILD RIDER. This rider allows the insured to insure their grandchildren under 18 for a limited amount of coverage. Coverage for the minor children expires upon their 22nd or 25th birthday. It is recommended that you do not add a child or grandchild rider if working with leads as there may be further underwriting needed on the children for their approval.
  4. 4
    ACCIDENTAL DEATH BENEFIT RIDER. Every policy already includes death due to an accident. However, the accidental death benefit rider doubles the coverage amount in case of an accidental death. For example, if a client has $20,000 in base coverage and they pass away of natural causes, their beneficiary will receive $20,000. If they pass due to an accidental death, the beneficiary will receive $40,000.
  5. 5
    CHARITABLE GIVING RIDER. This can be added at no additional cost and gives 1% of your death benefit to charity. This is optional.
  6. 6
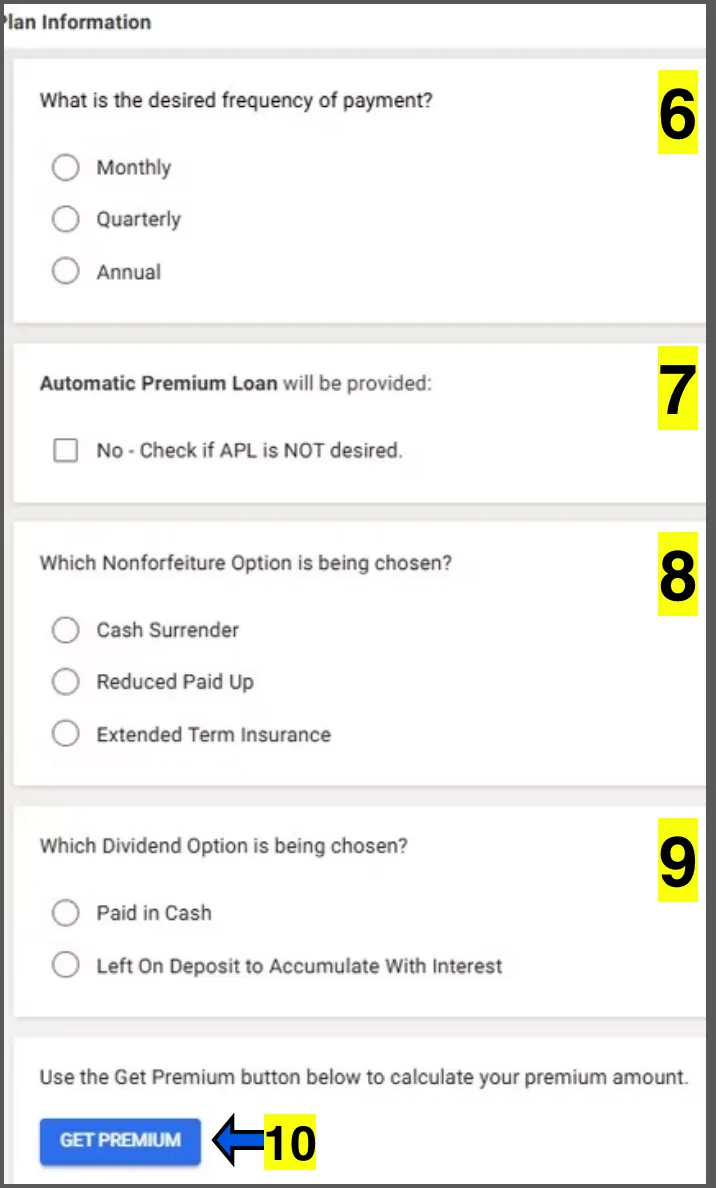
    it is recommended to choose MONTHLY to keep it simple.
  7. 7
    AUTOMATIC PREMIUM LOAN. This setting is automatic unless you check the box to opt out. This allows the insurer to automatically withdraw funds from the policy's cash value to pay an overdue premium if the policyholder fails to make a payment on time, essentially preventing the policy from lapsing and maintaining coverage without the policyholder needing to take action; this loan is then added to the policy's outstanding loan balance with interest charges applied. If the insured passes away without repaying the loan, their beneficiary will receive the coverage amount minus any outstanding loan amounts.
  8. 8
    NON-FORFEITURE OPTION. Cash Surrender: You can choose to cash out the accumulated value however this may be a taxable event. Paid-up Insurance: Based on the cash accumulation at the time, the insured can choose to accept a decreased paid-up amount of coverage which no longer requires premium payments to maintain coverage. The policy remains in effect until the insured dies, or the policy is canceled. Extended Term Insurance: Extended term insurance allows a policyholder to keep their policy active as term life coverage for a set period. The policyholder uses the cash value of their policy to purchase a term policy with the same death benefit. This is used if a policyholder fails to pay their premium within the grace period. The cash value is used to extend the term of coverage based on the benefit amount at the due date of the earliest unpaid premium.
  9. 9
    if dividends are paid out, you can choose to receive immediate payments or you can choose to allocate dividends to your cash accumulation for continued growth.
  10. 10
    click GET PREMIUM.
9
Step 9 screenshot
Step 9 screenshot
  1. 11
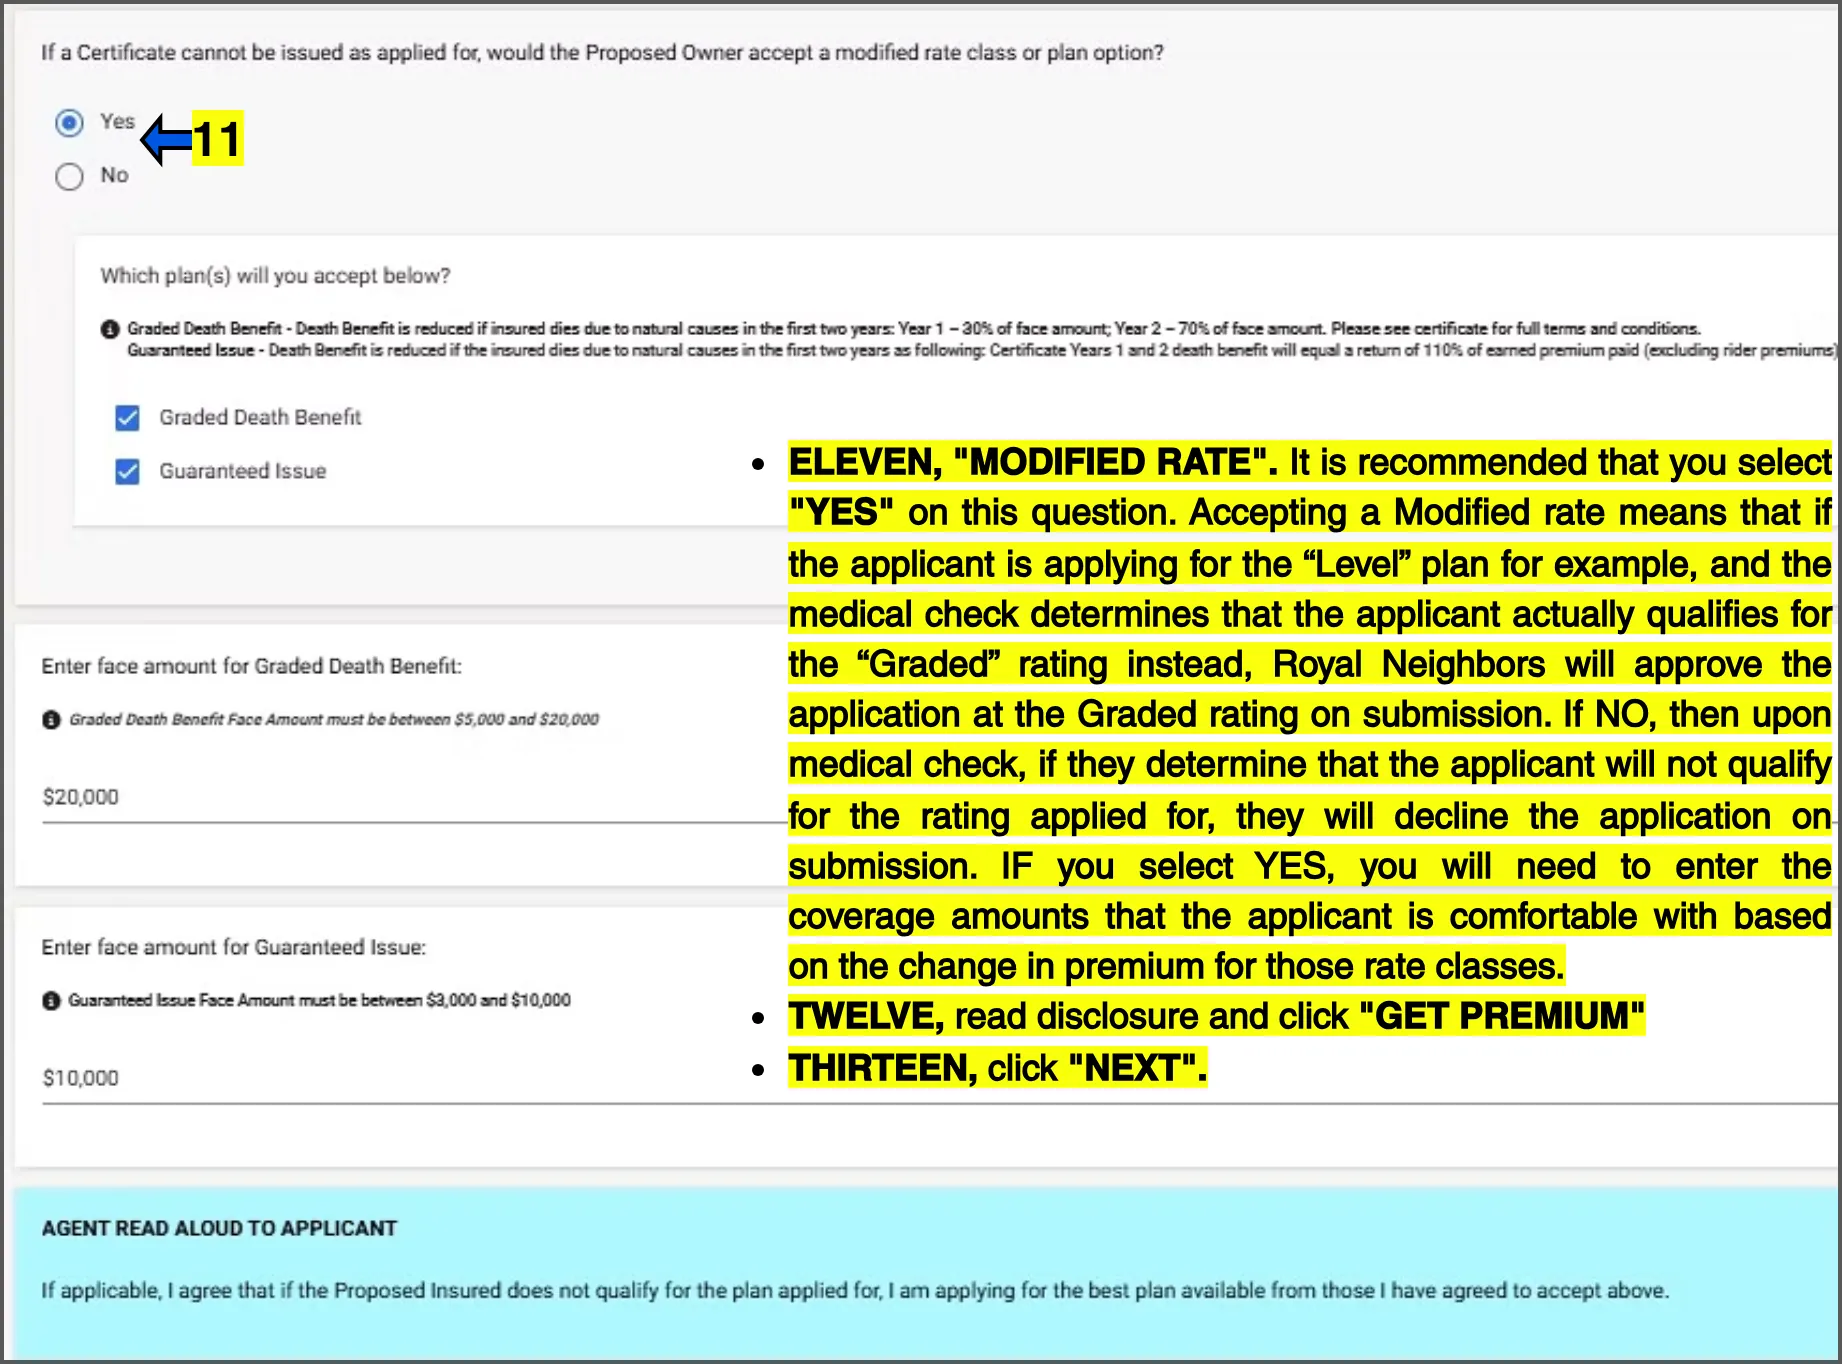
    MODIFIED RATE. It is recommended that you select YES on this question. Accepting a Modified rate means that if the applicant is applying for the “Level” plan for example, and the medical check determines that the applicant actually qualifies for the “Graded” rating instead, Royal Neighbors will approve the application at the Graded rating on submission. If NO, then upon medical check, if they determine that the applicant will not qualify for the rating applied for, they will decline the application on submission. IF you select YES, you will need to enter the coverage amounts that the applicant is comfortable with based on the change in premium for those rate classes.
  2. 12
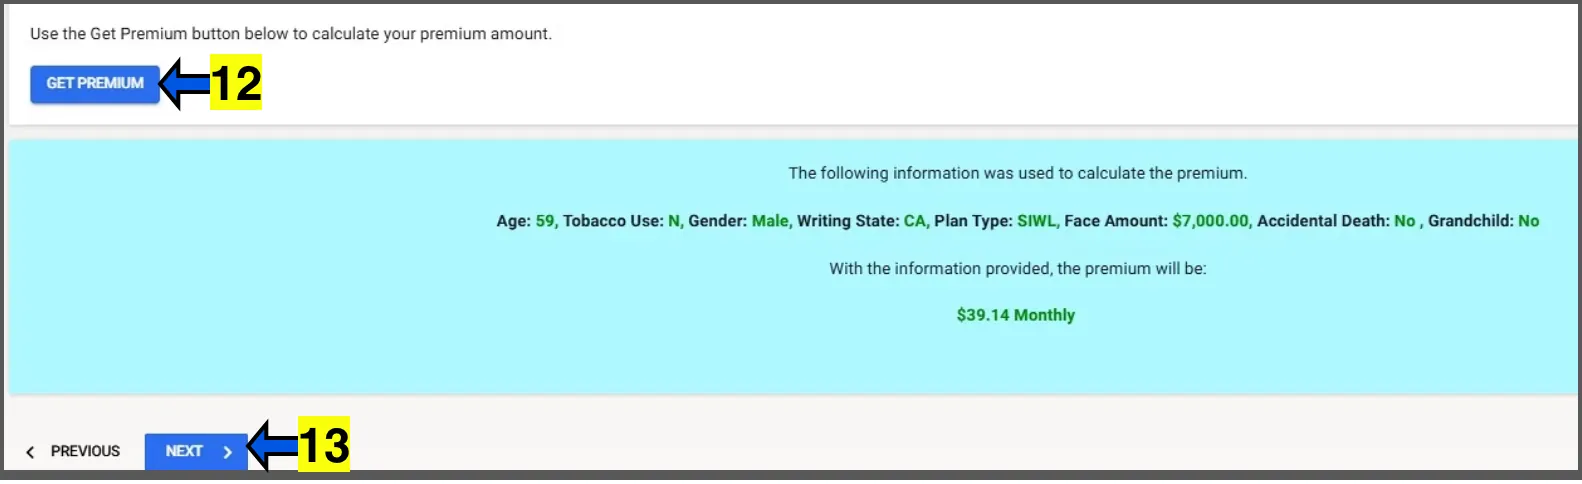
    read disclosure and click GET PREMIUM
  3. 13
    click NEXT.
10
Step 10 screenshot
Step 10 screenshot
Step 10 screenshot
Step 10 screenshot
Step 10 screenshot
  1. 1
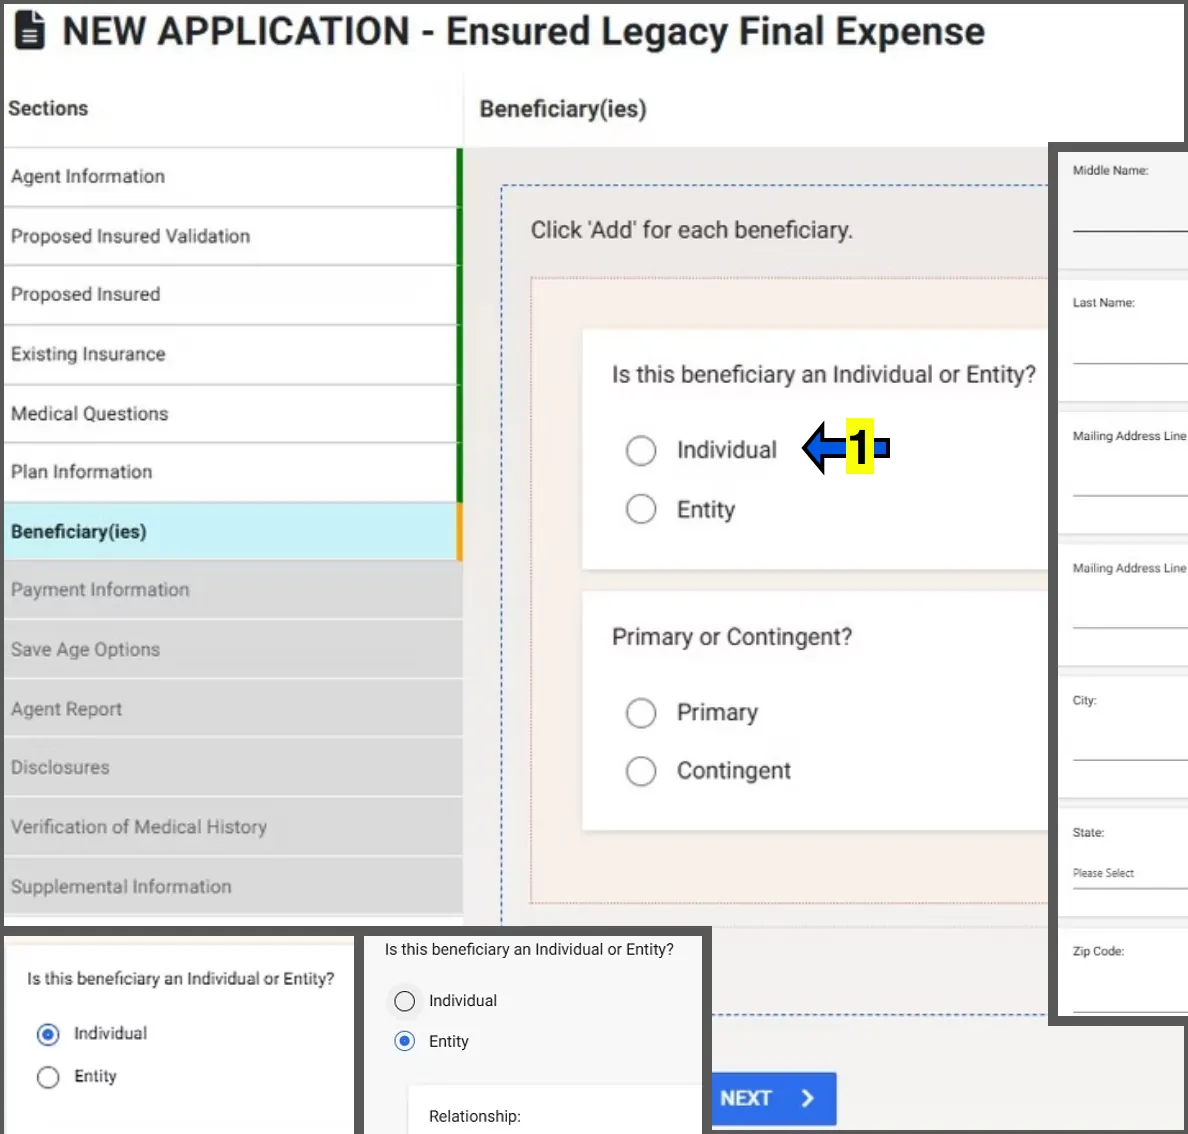
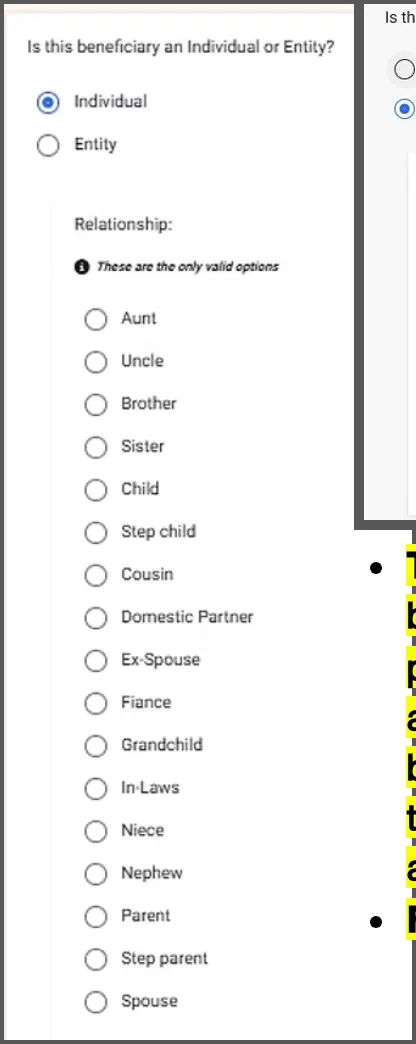
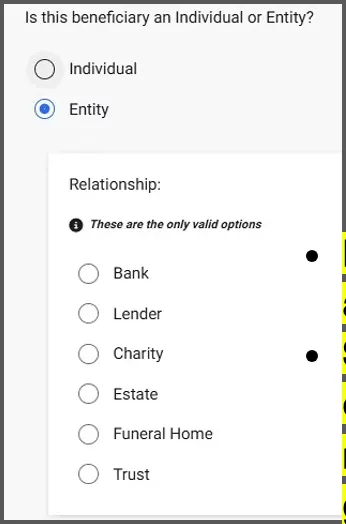
    choose a beneficiary type. To keep it simple, choose INDIVIDUAL and then the applicant may change it later if needed.
  2. 2
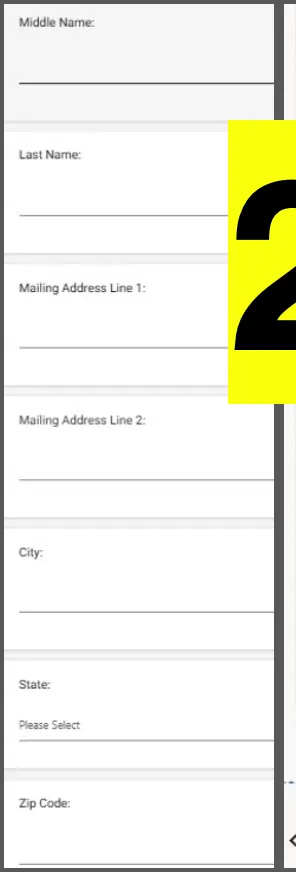
    enter the primary beneficiary information. Address, Phone# and email for the beneficiary may NOT be required, but if they are, you may use the applicant's to finish the application. However, always attempt to get the beneficiary's phone# to call as a potential client.
  3. 3
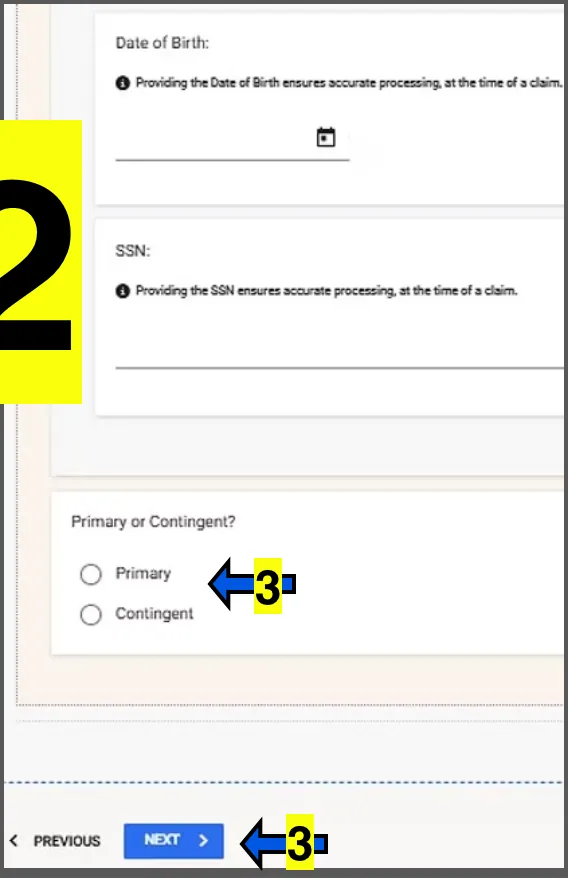
    choose if the beneficiary entered is a PRIMARY or CONTINGENT. The first beneficiary entered must be a "Primary". A "Contingent" is a back up beneficiary if the primary cannot receive the death benefit. It is not mandatory and can be added later by the applicant. Beneficiary must be 18 years of age and over. If there are more than one beneficiary, the percentage with all combined must equal 100%. For example, if there are two, then the percentage for both should be something like 50/50 or 60/40. If three, 34/33/33. Same applies to Contingents.
  4. 4
    click NEXT.
11
Step 11 screenshot
Step 11 screenshot
Step 11 screenshot
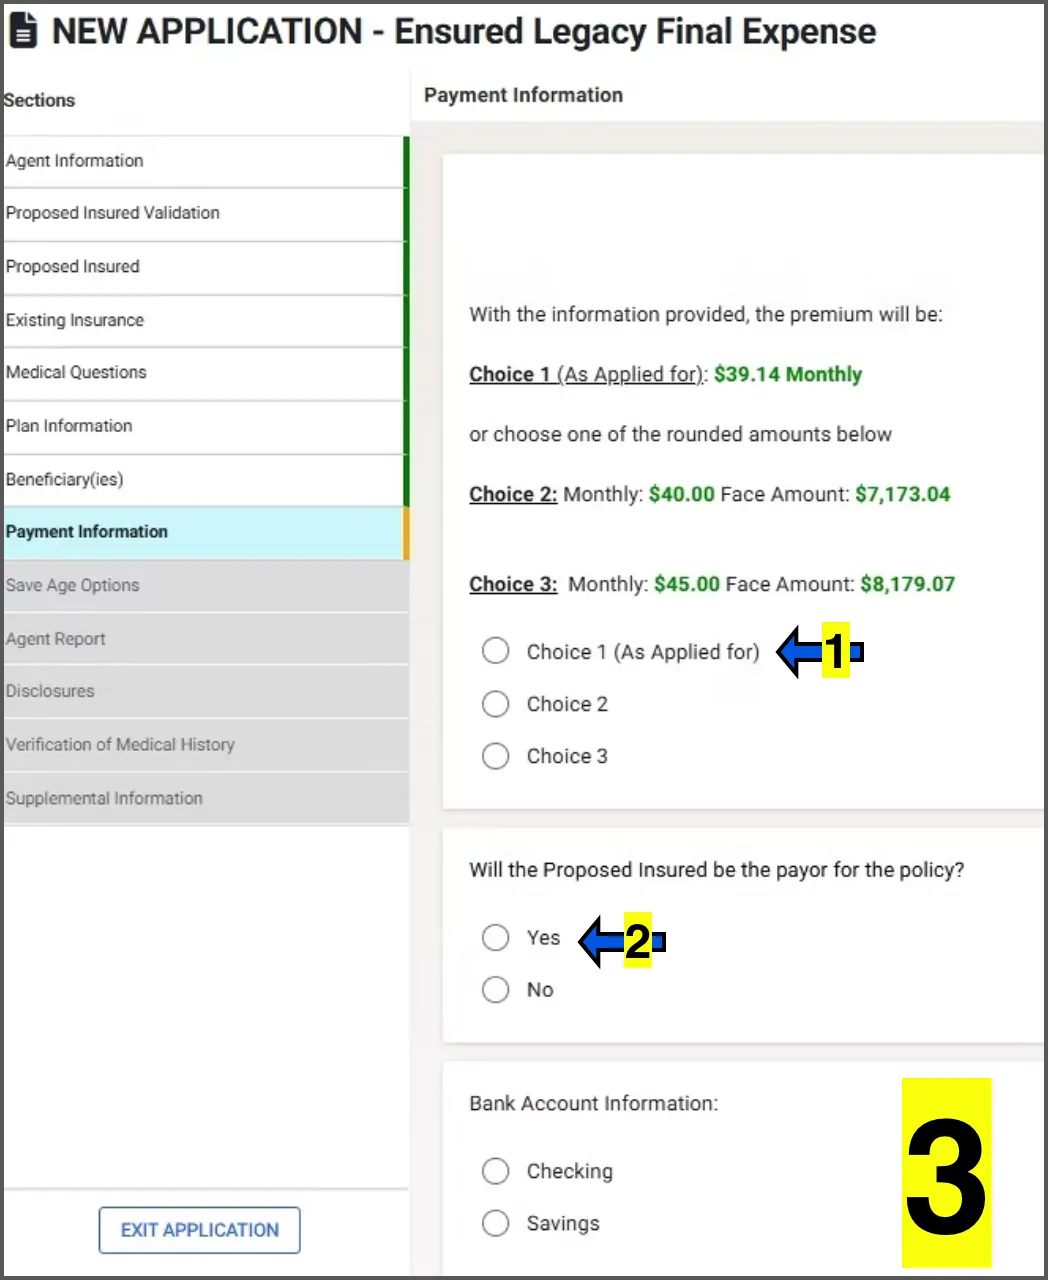
  1. 1
    choose AS APPLIED FOR.
  2. 2
    try to keep the Insured and the Payor the same person to keep it simple.
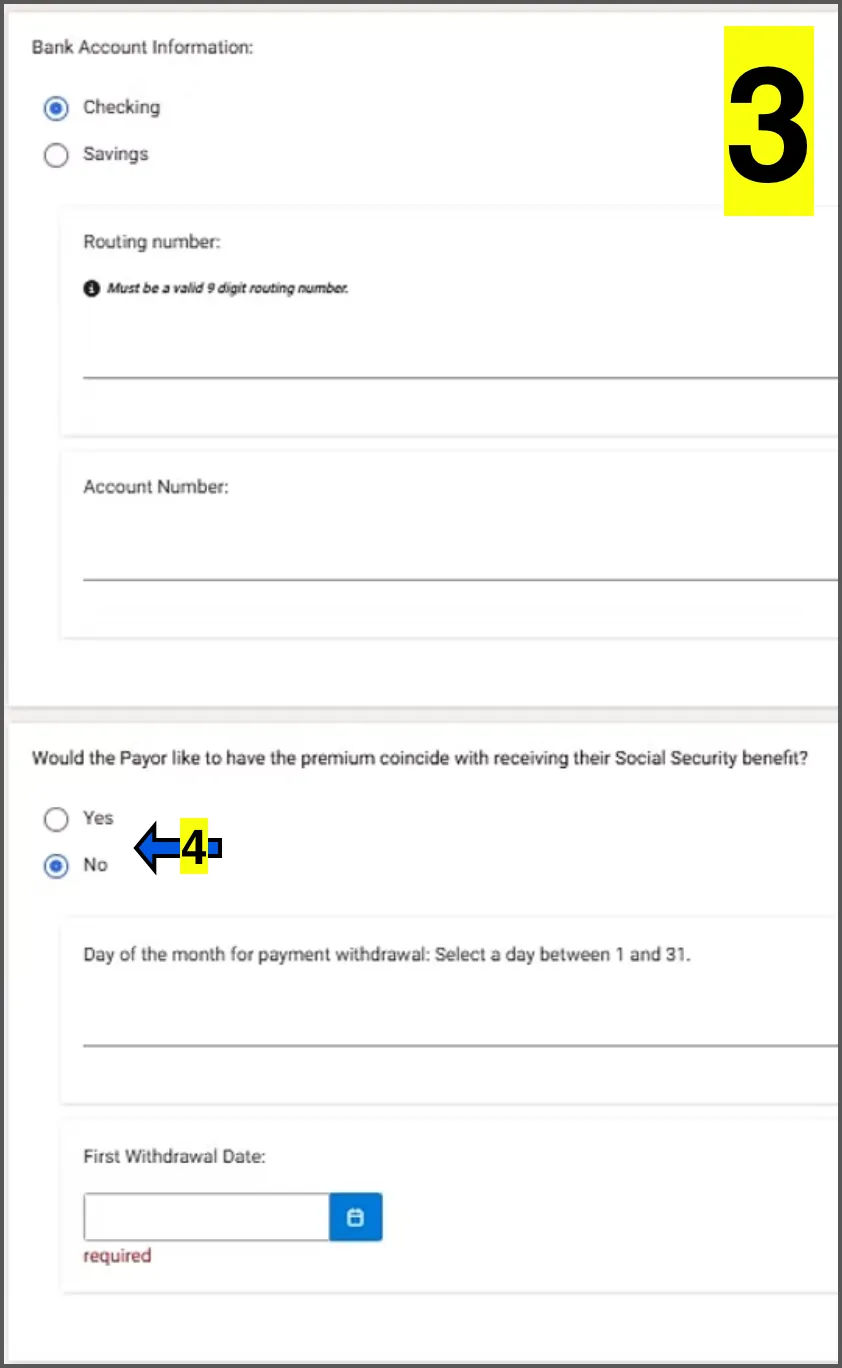
  3. 3
    choose account type and enter information.
  4. 4
    if applicant wants their recurring payments to draft on a specific day of the month, click NO. If they want it to match their social security deposit day, click YES. For example, every 2nd Wednesday of the month. Only select this if it makes sense to do so.
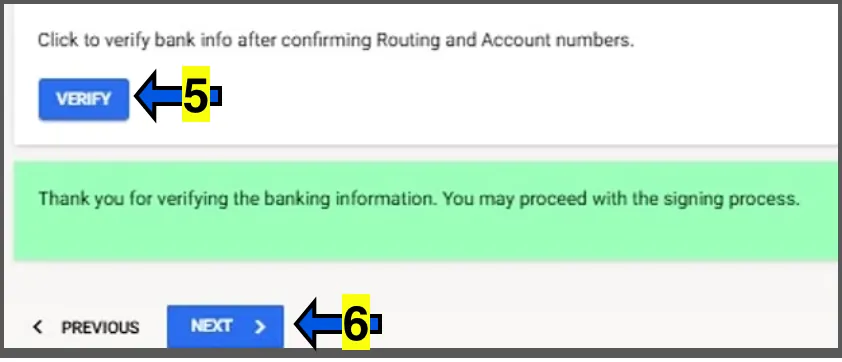
  5. 5
    click VERIFY.
  6. 6
    click NEXT.
12
Step 12 screenshot
Step 12 screenshot
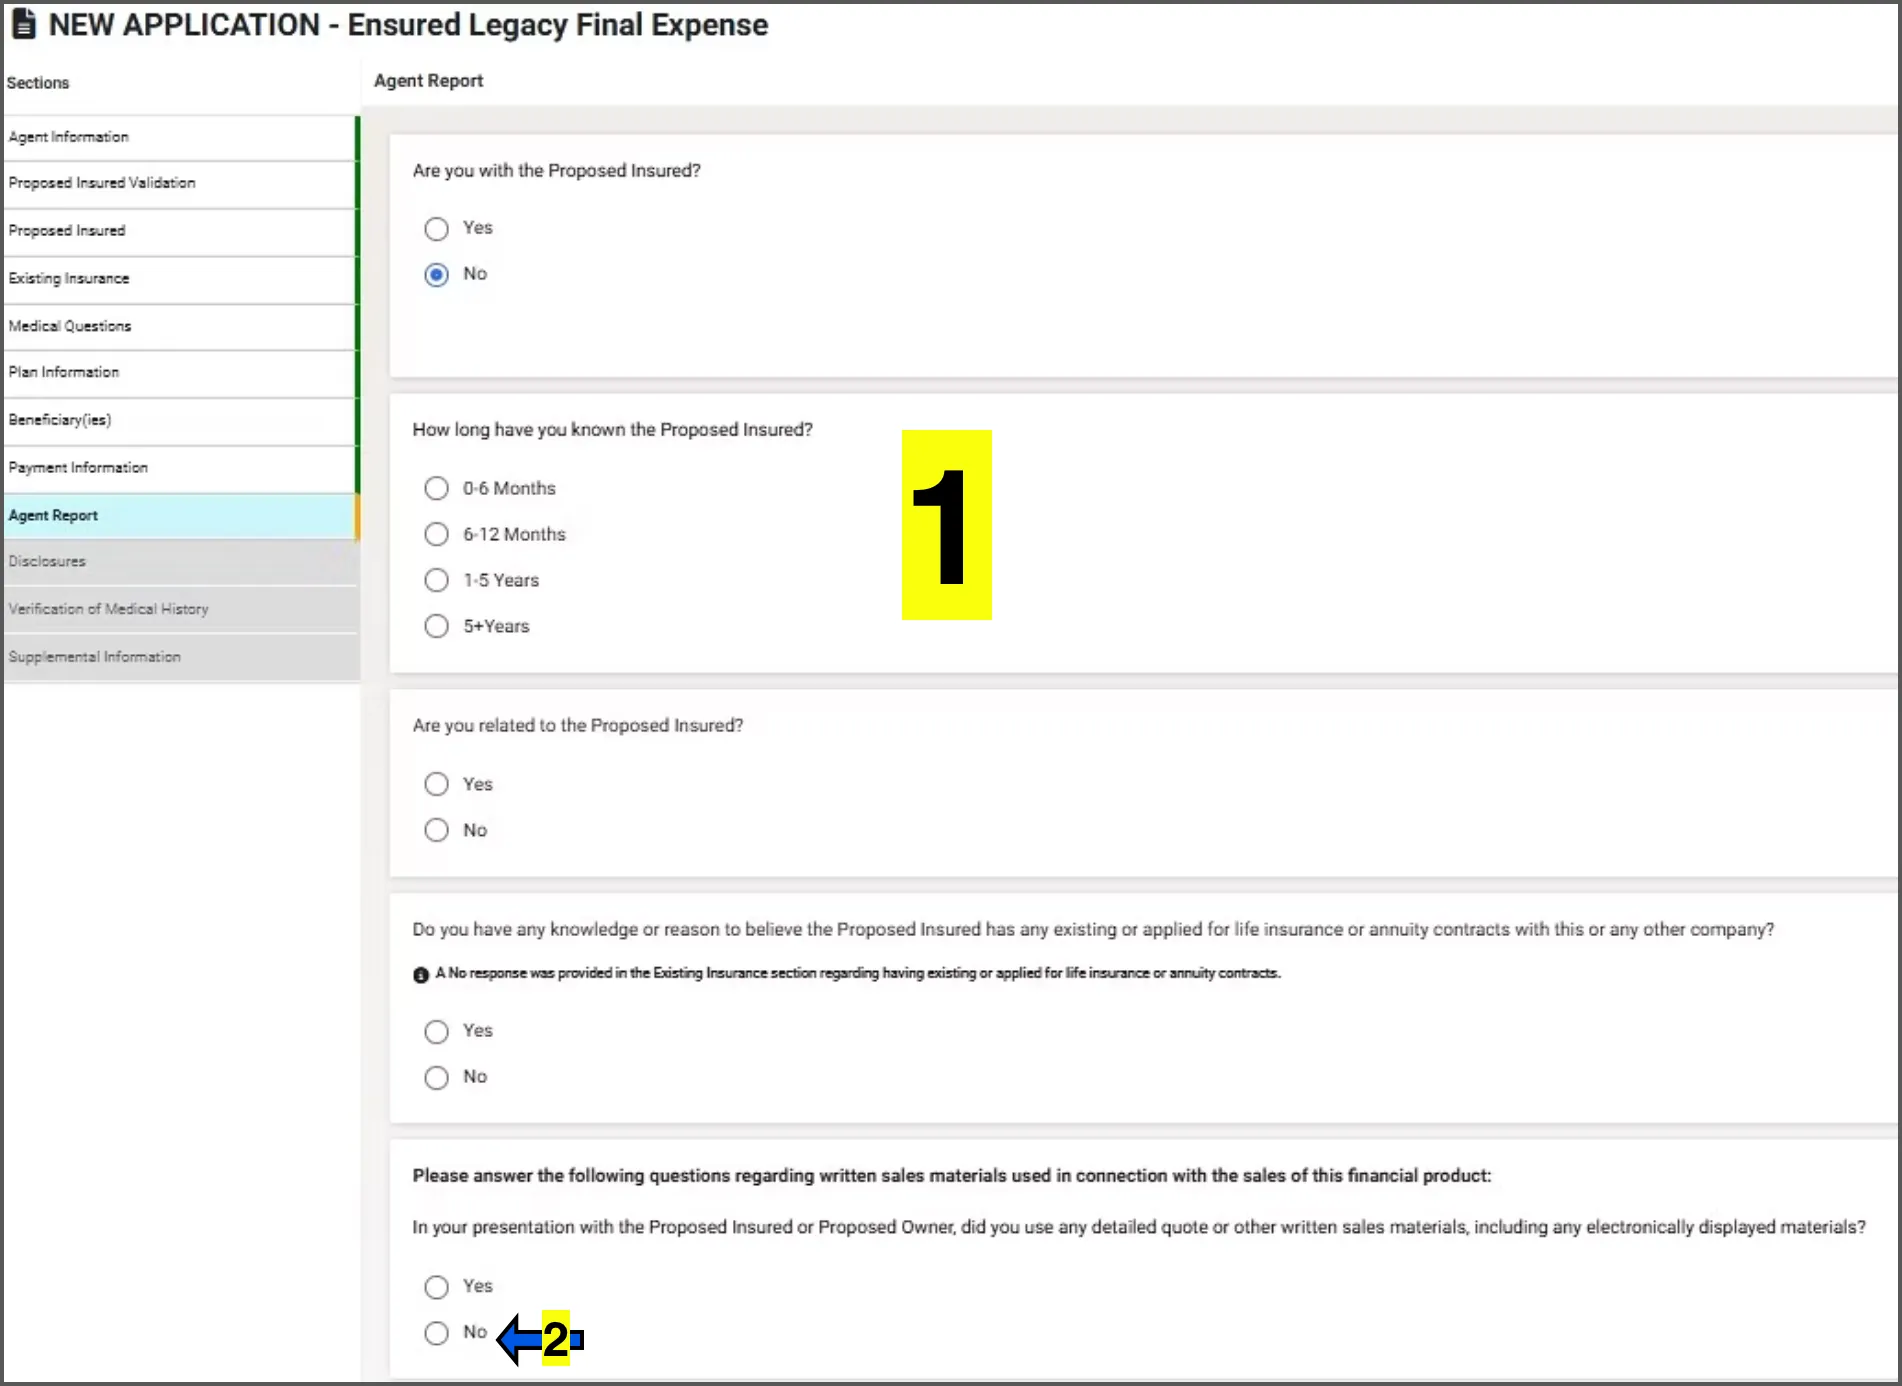
  1. 1
    complete the Agent Report.
  2. 2
    to keep it simple, select NO.
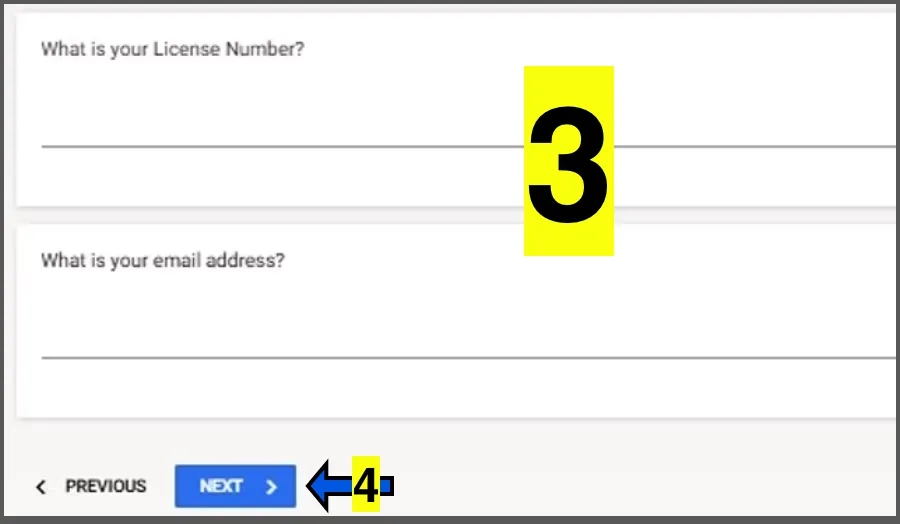
  3. 3
    continue with the rest of the agent report.
  4. 4
    click NEXT.
13
Step 13 screenshot
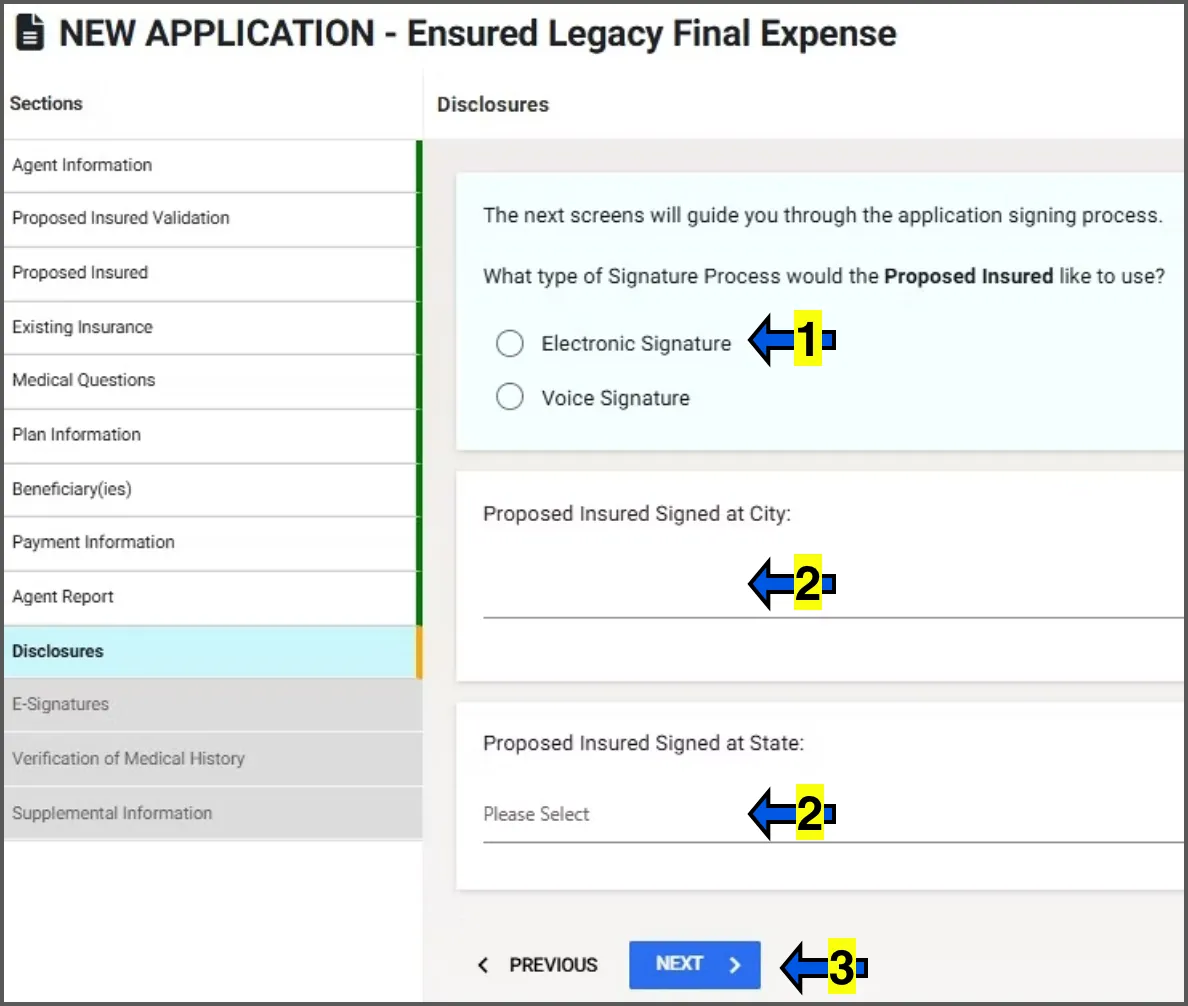
  1. 1
    select ELECTRONIC SIGNATURE.
  2. 2
    enter applicant's City and state.
  3. 3
    click NEXT.
14
Step 14 screenshot
Step 14 screenshot
Step 14 screenshot
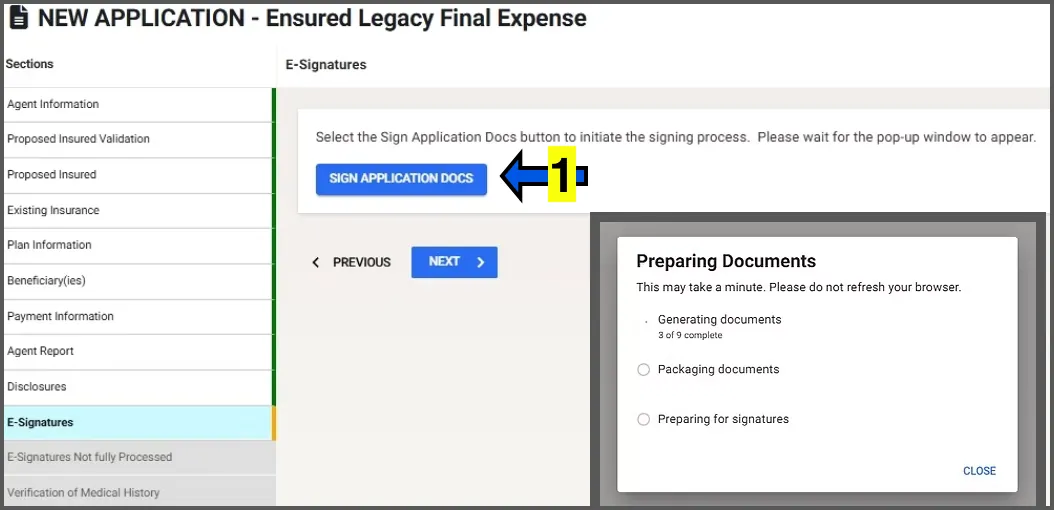
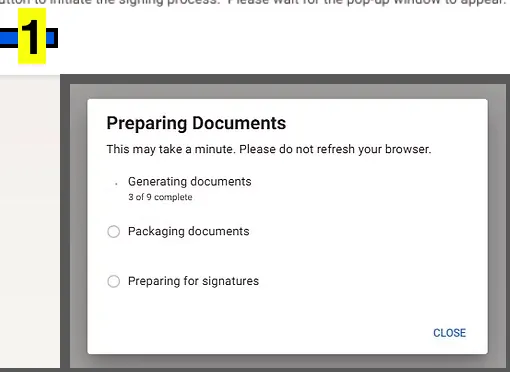
  1. 1
    click SIGN APPLICATION DOCS.
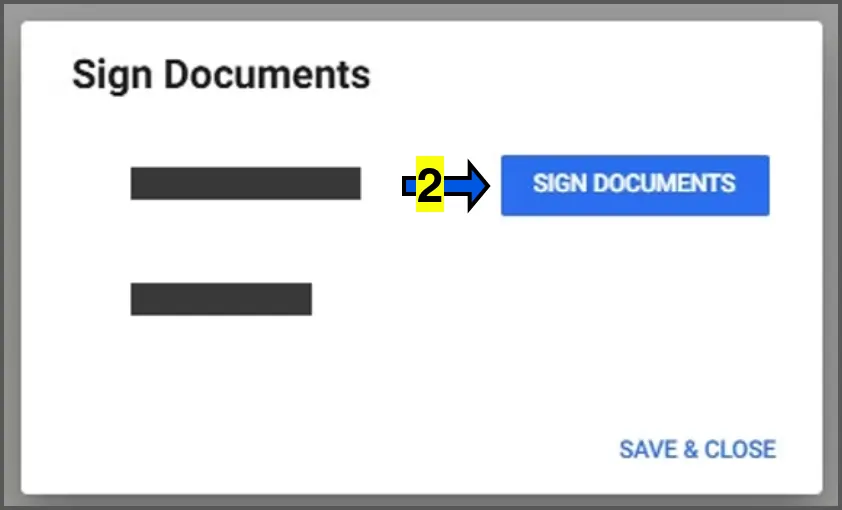
  2. 2
    once the pop up box loads, click SIGN DOCUMENTS
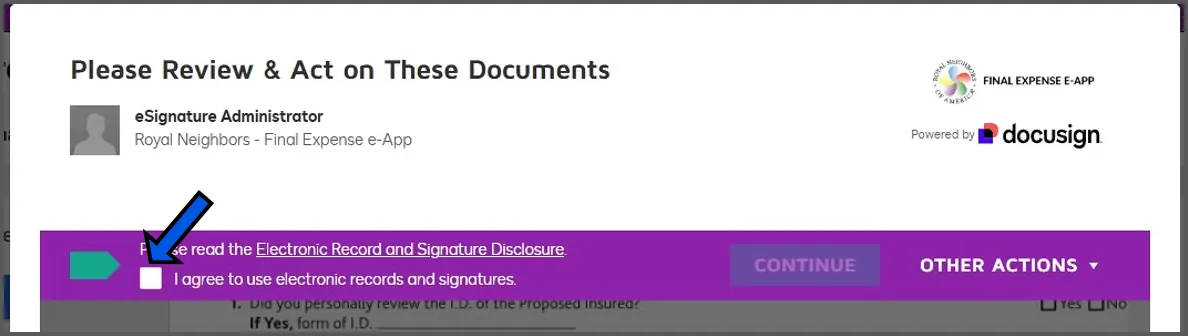
15
Step 15 screenshot

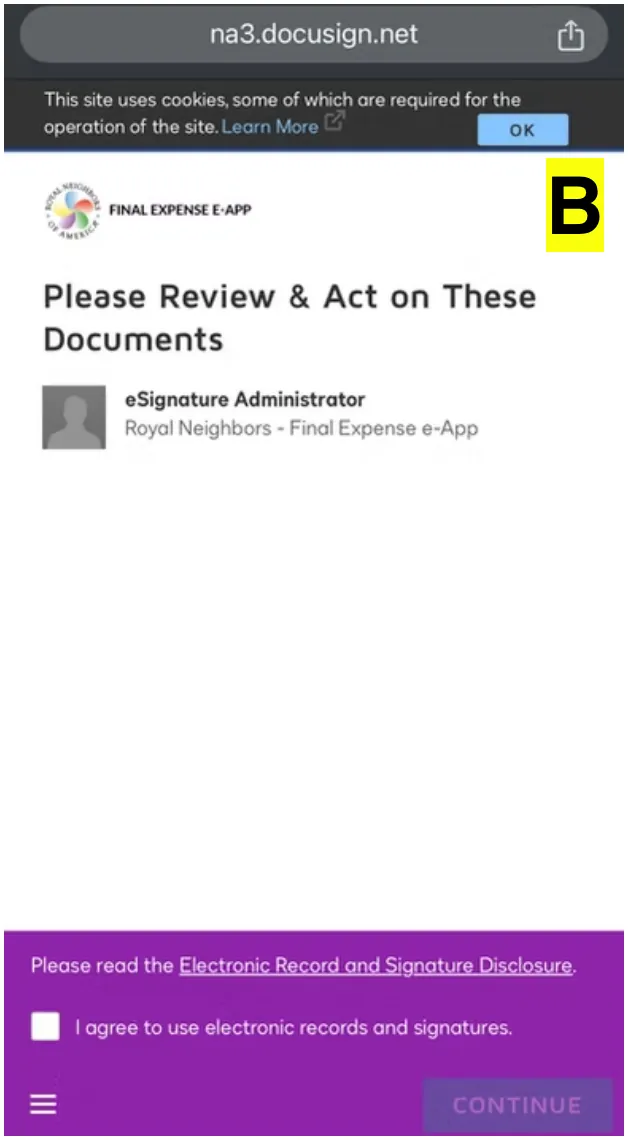
Click the checkbox that says I AGREE TO USE ELECTRONIC RECORDS.
16
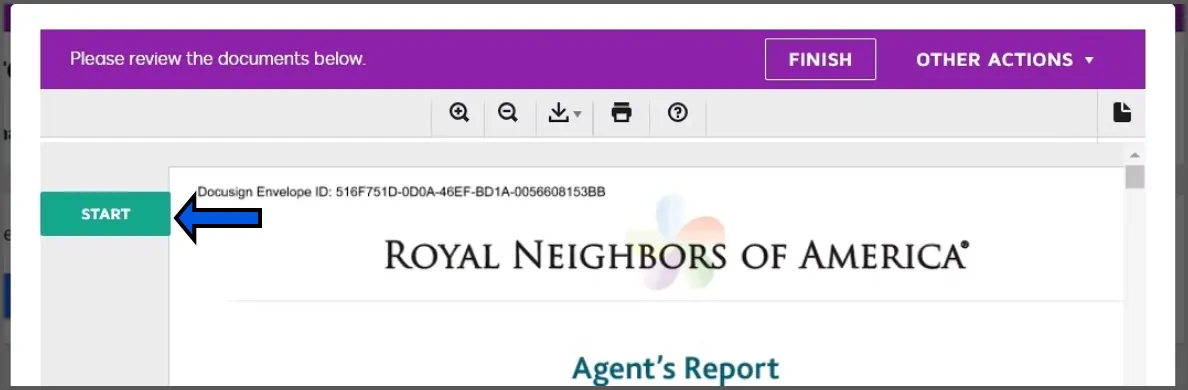
Step 16 screenshot

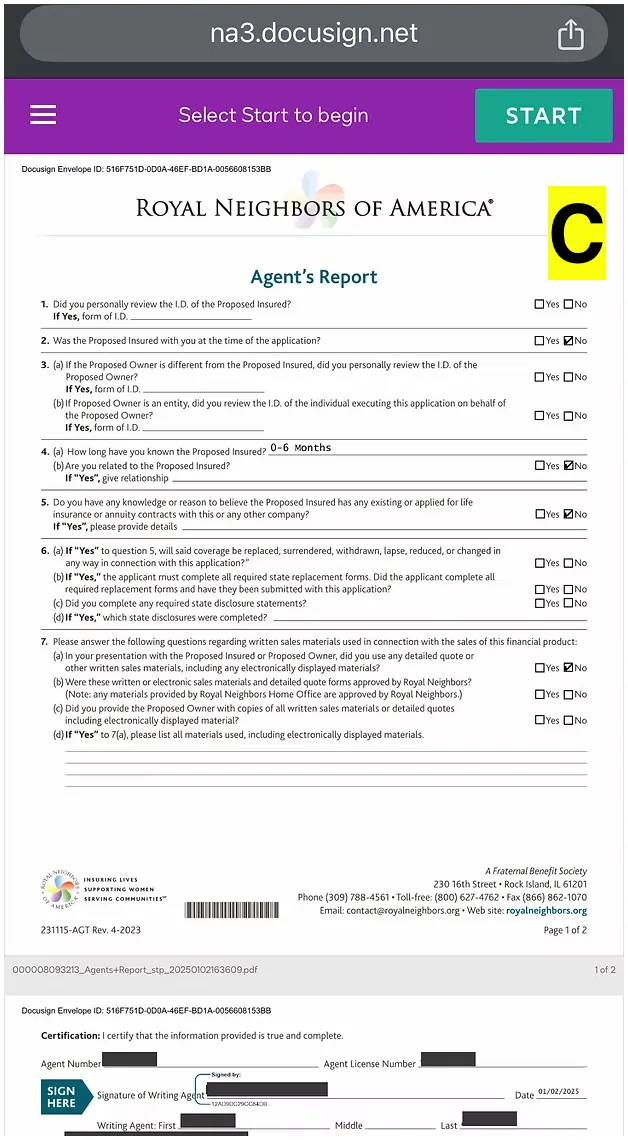
Click START

17
Step 17 screenshot

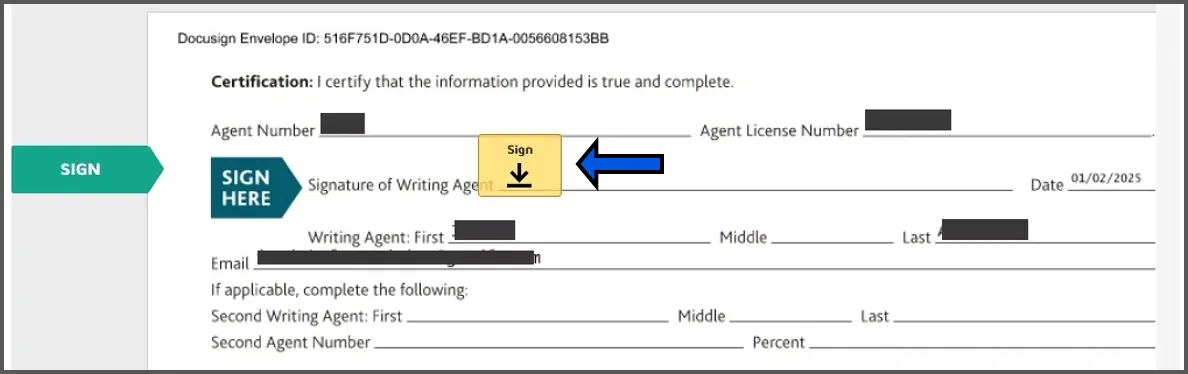
Click the brown SIGN button.

18
Step 18 screenshot

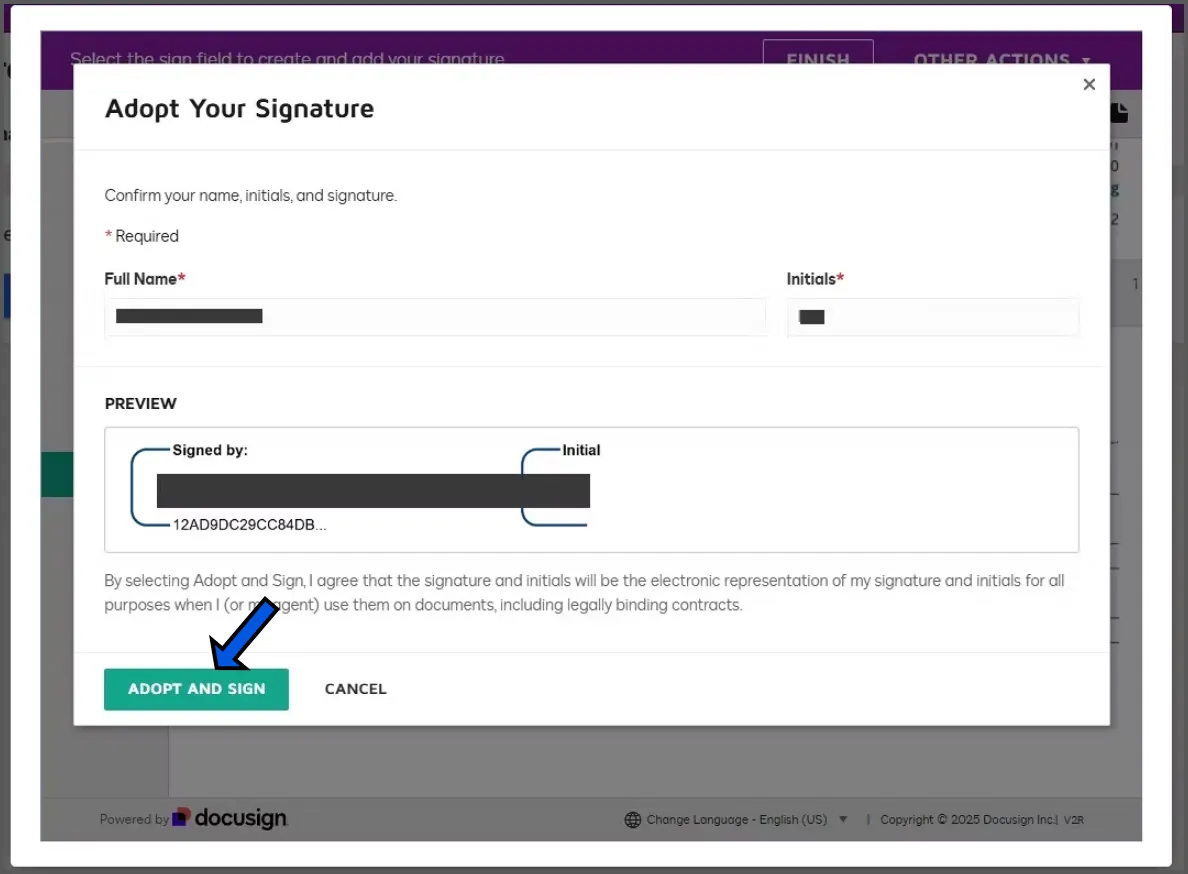
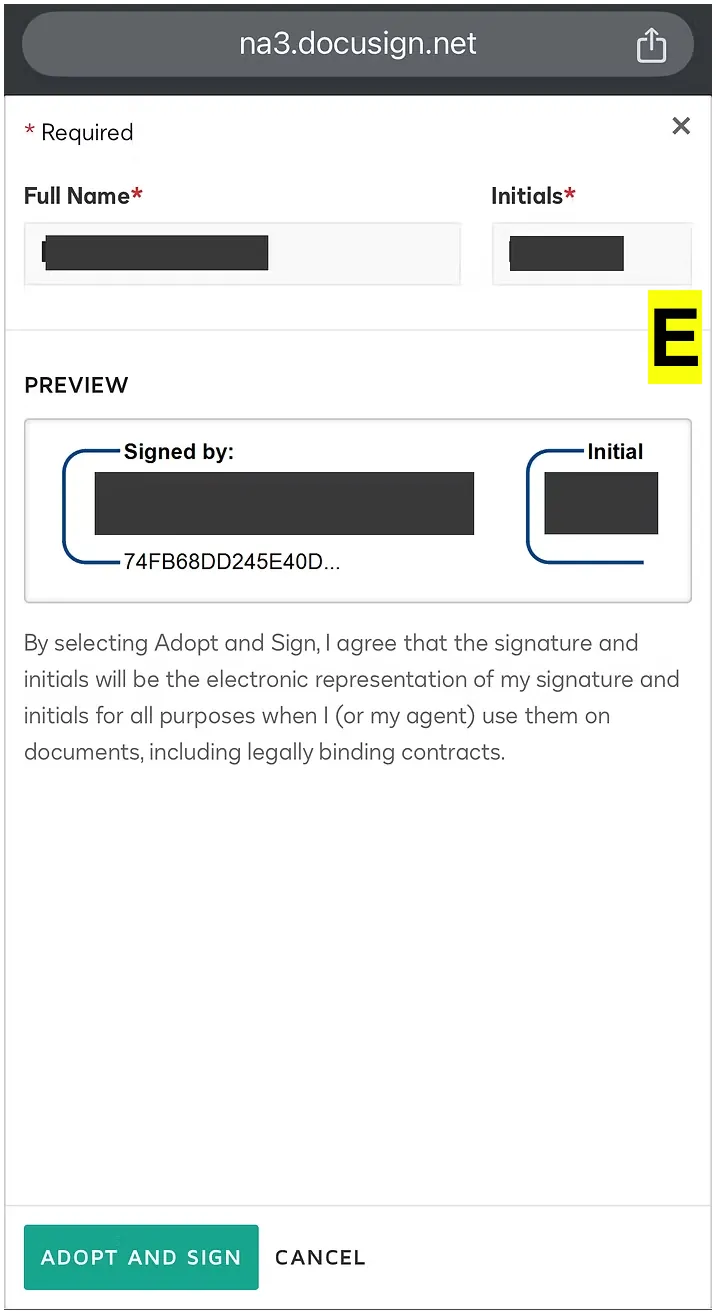
Confirm your name and initials are correct. Then click ADOPT AND SIGN.
19
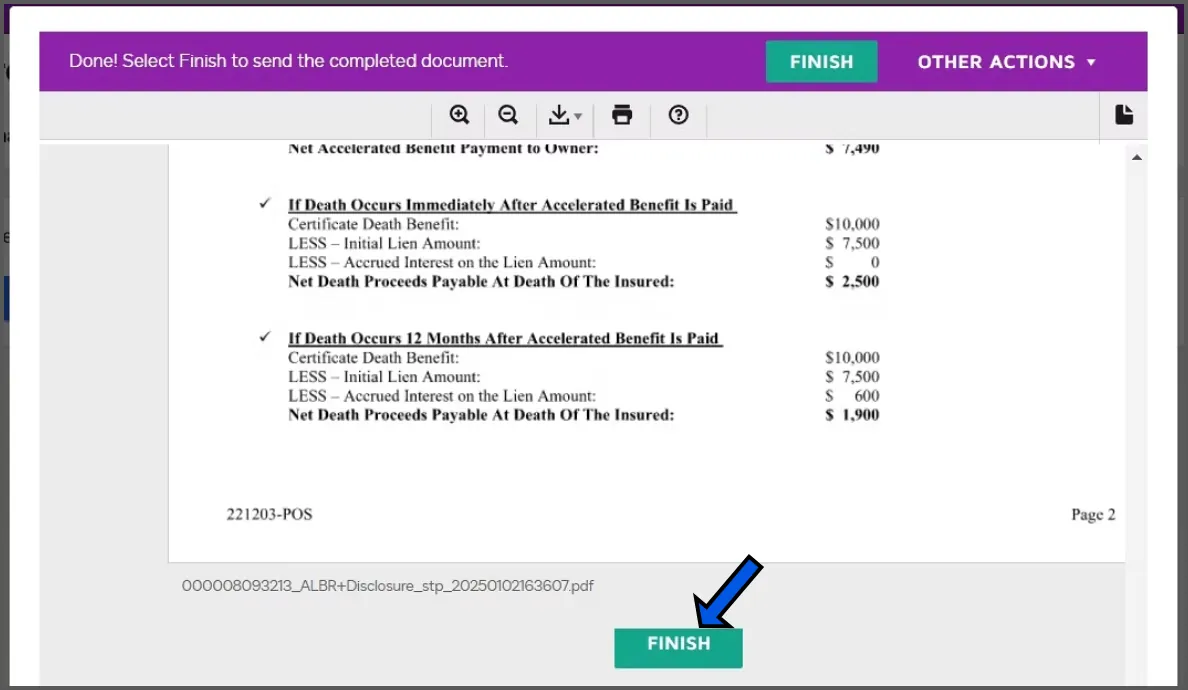
Step 19 screenshot

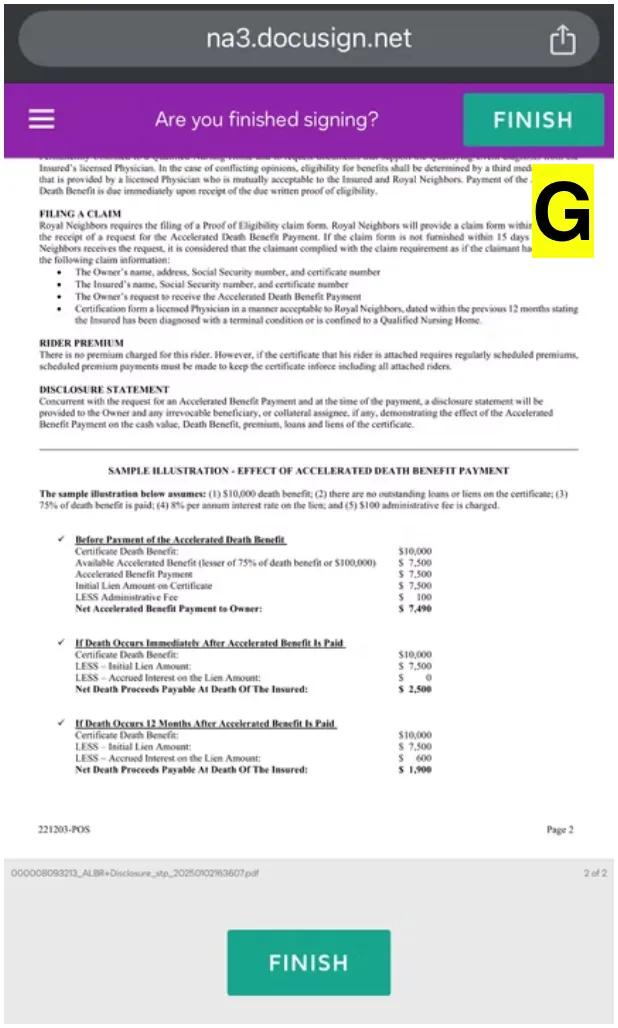
After signatures have been collected, click FINISH.
20
Step 20 screenshot

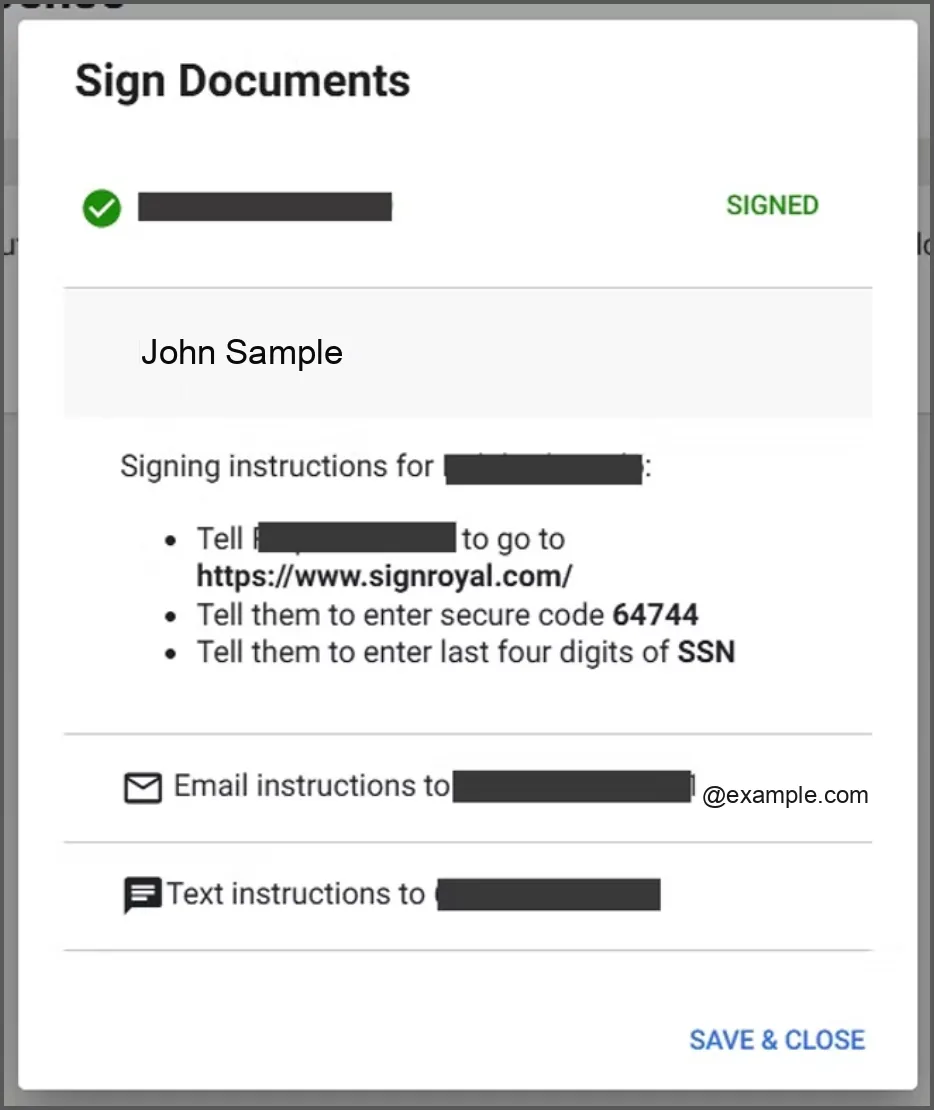
Once your signature process is complete, choose the signature method and then follow the signature guide below. TEXT is preferred. MAKE SURE TO KEEP NOTE OF THE 5 DIGIT SECURE CODE.

Client script

E-Signature Guide

Read the blue script lines to the client word for word. The screenshots are what the client sees on their phone.
21
Step 21 screenshot
Step 21 screenshot
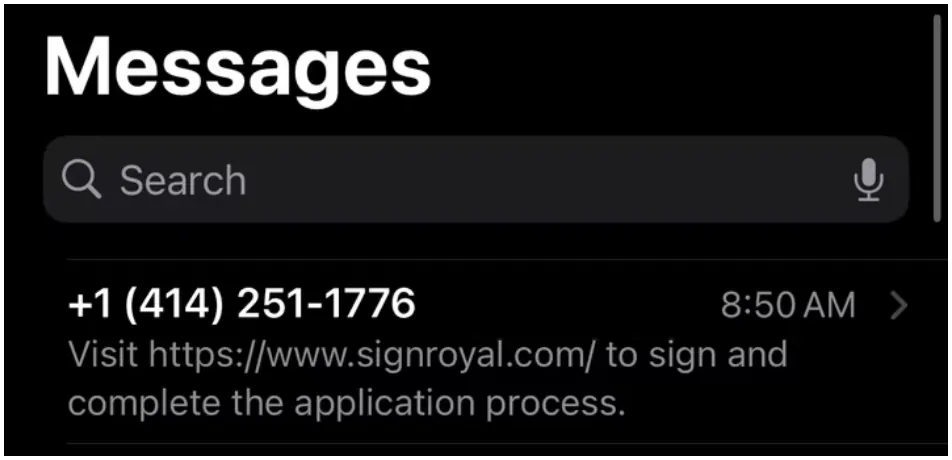
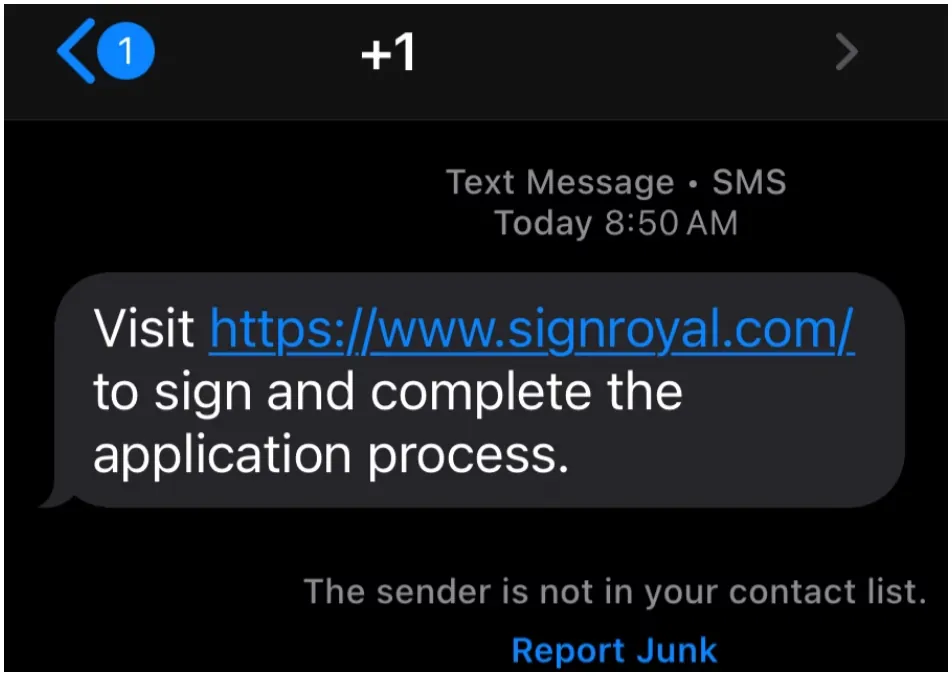
“Now [Client's Name], I'm going to send you a text for signature right now so when you get the text message, do me a favor and wait for me to guide you before you move forward. Did you get it?”
“Ok, in the text you will see a link that starts with HTTPS. Go ahead and click on that link.”
22
Step 22 screenshot
Step 22 screenshot
Step 22 screenshot
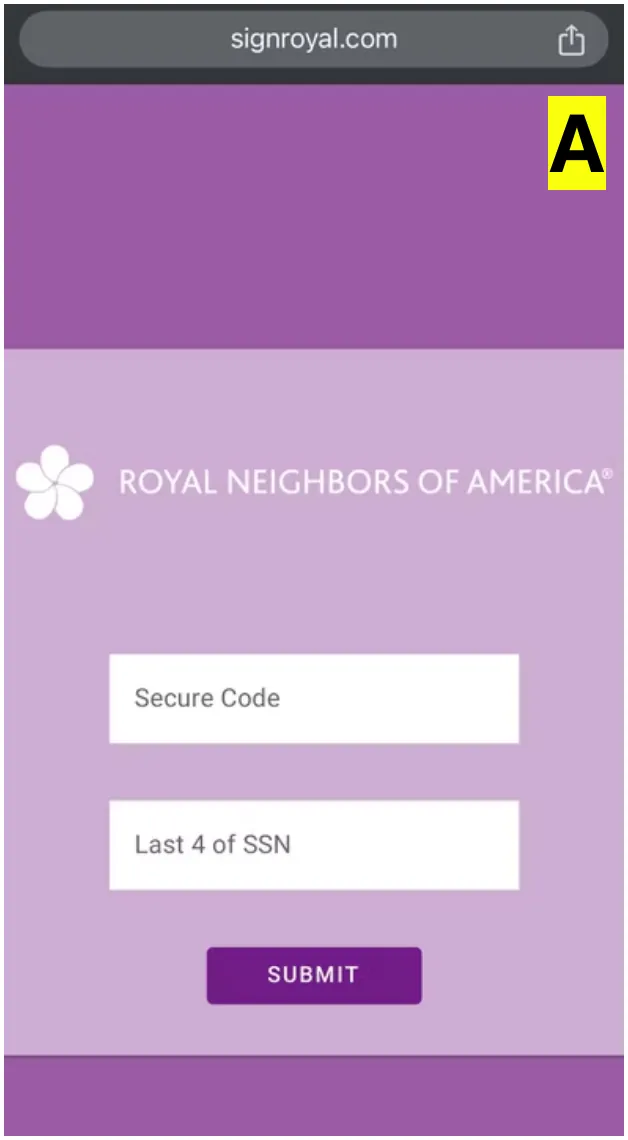
“Now when you click on that link, you should see on the next screen where it says ROYAL NEIGHBORS with two white boxes below. In the first box that says SECURE CODE go ahead and put in this number [5 Digit Code].”
“In the second box, enter the last four of your social and then click the SUBMIT button.”
“On the next screen, you should see where it says PLEASE REVIEW. Go ahead and go to the bottom left of the screen and click in the white checkbox that says I AGREE TO USE ELECTRONIC RECORDS. And then click on the CONTINUE button.”
“On the next screen, you should see a copy of the application. Go ahead and click on the button at the top right that says START".”
23
Step 23 screenshot
Step 23 screenshot
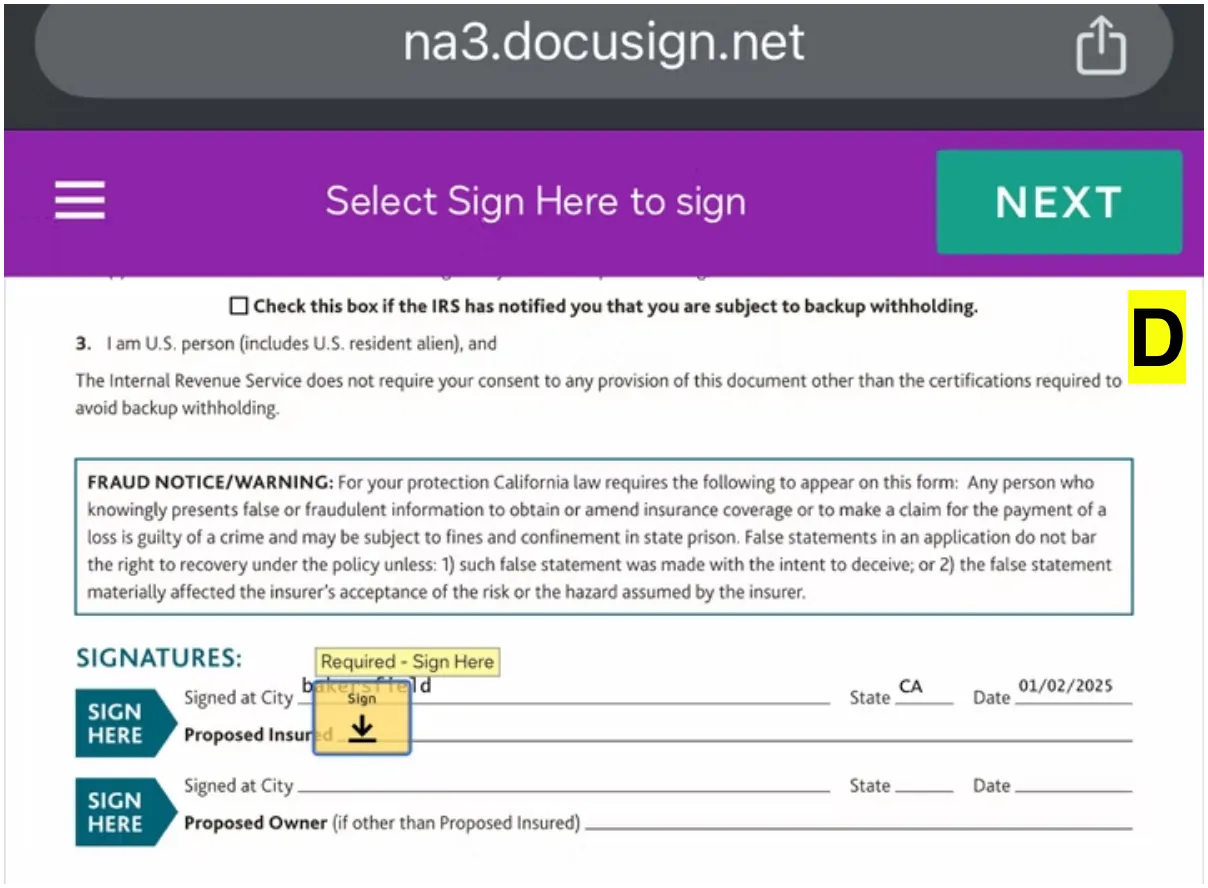
“On the next screen, you should see a colored box that says SIGN and has a downward arrow. Go ahead and click on that box.”
“When the next box pops up, go ahead and make sure your name and initials are correct and then click ADOPT AND SIGN on the bottom left of the screen.”
24
Step 24 screenshot
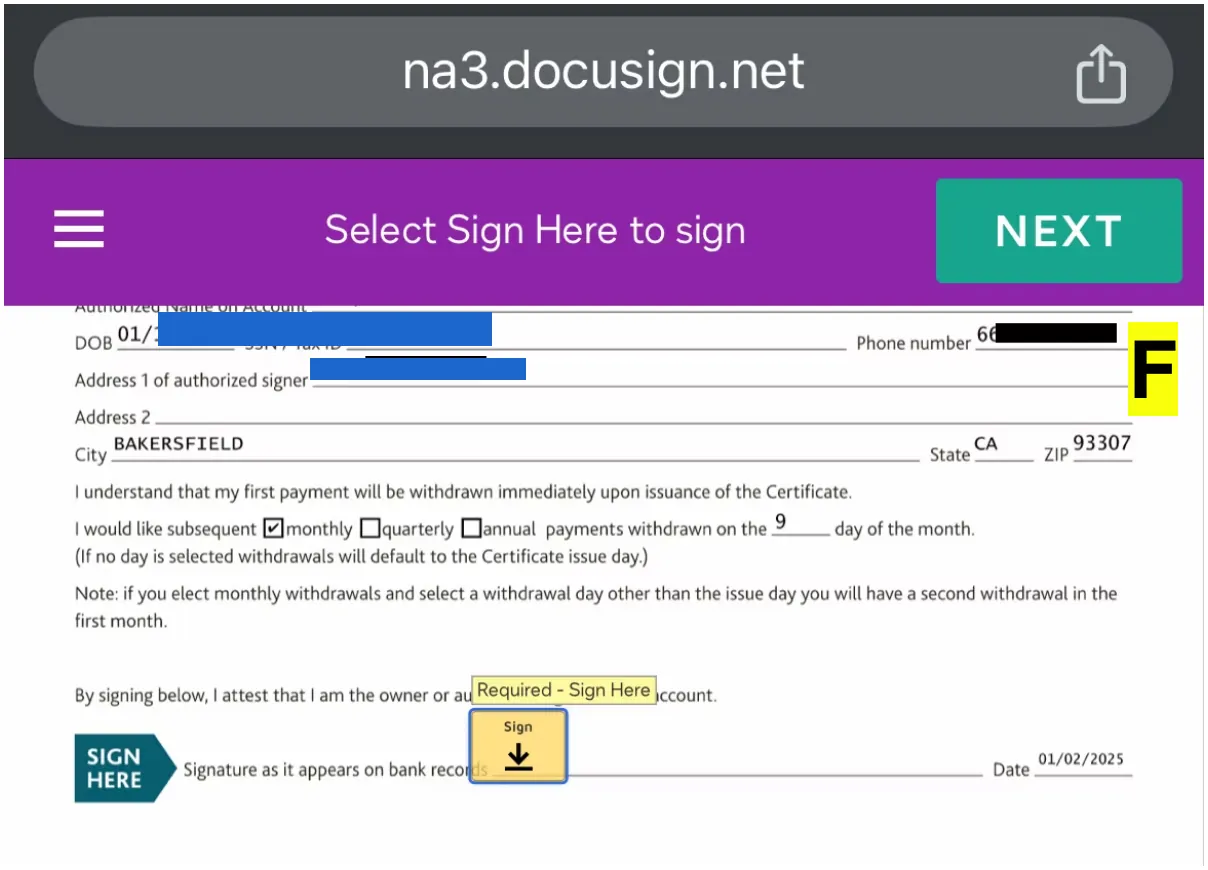
“On the next screen, you should see another colored box that says SIGN and has a downward arrow. Go ahead and click on that box. There should be another 2 or 3 of those boxes to click on, so If it doesn't automatically take you to the next one after you click, go ahead and click the NEXT button on the top right.”
25
Step 25 screenshot
Step 25 screenshot
“After all signature buttons have been clicked, go ahead and click on the FINISH button.”
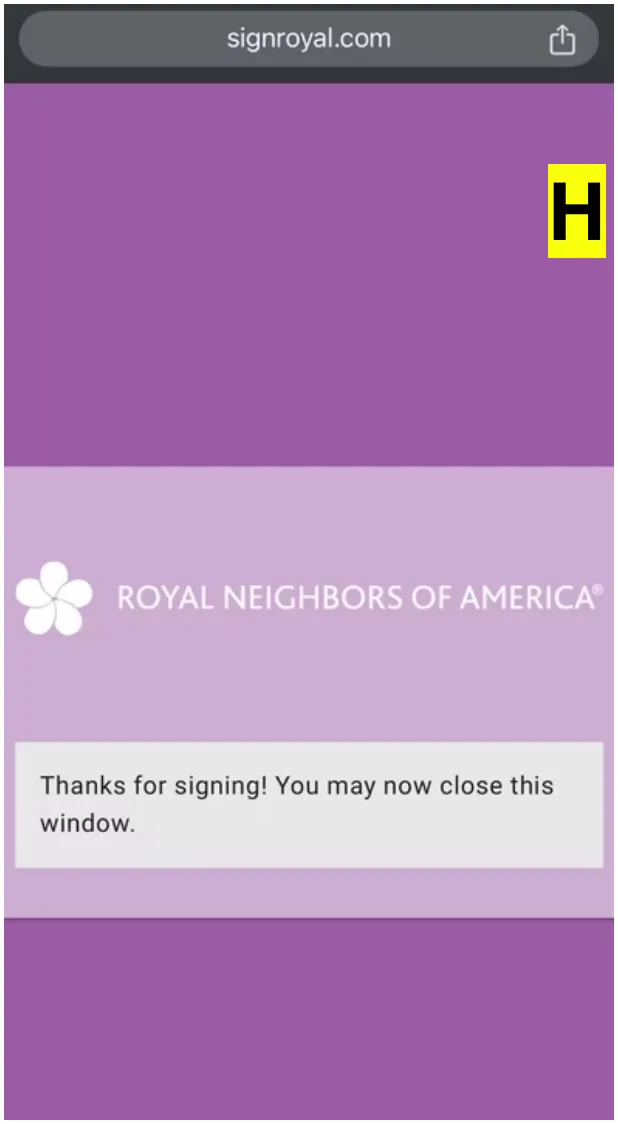
“Then on the next screen, it should now say THANKS FOR SIGNING.”
↩ back in the e-app
26
Step 26 screenshot

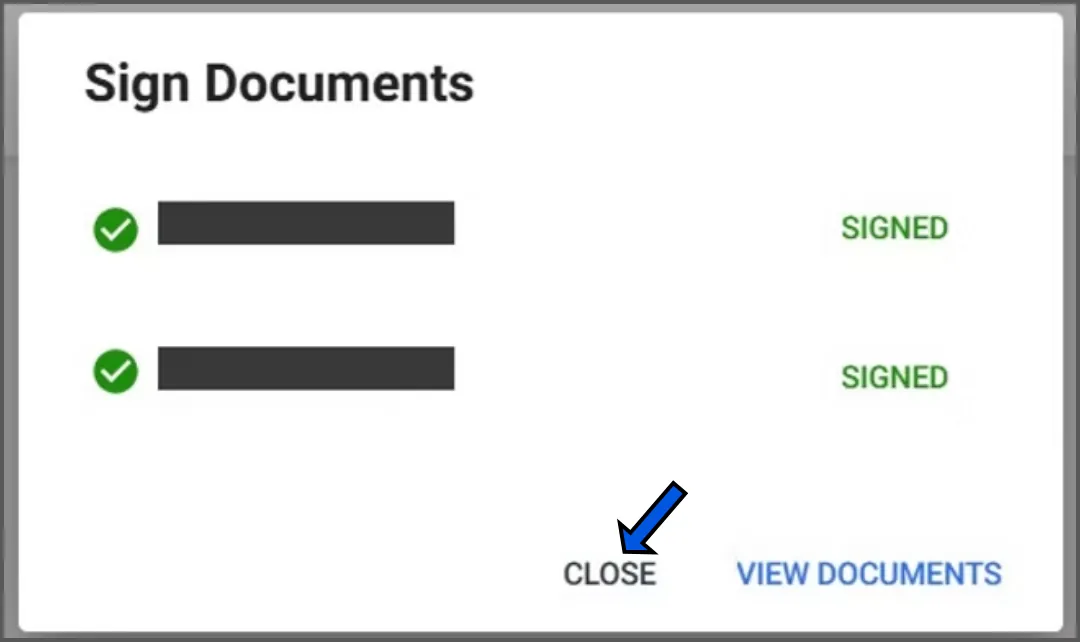
Once the applicant is finished signing, click CLOSE.
27
Step 27 screenshot

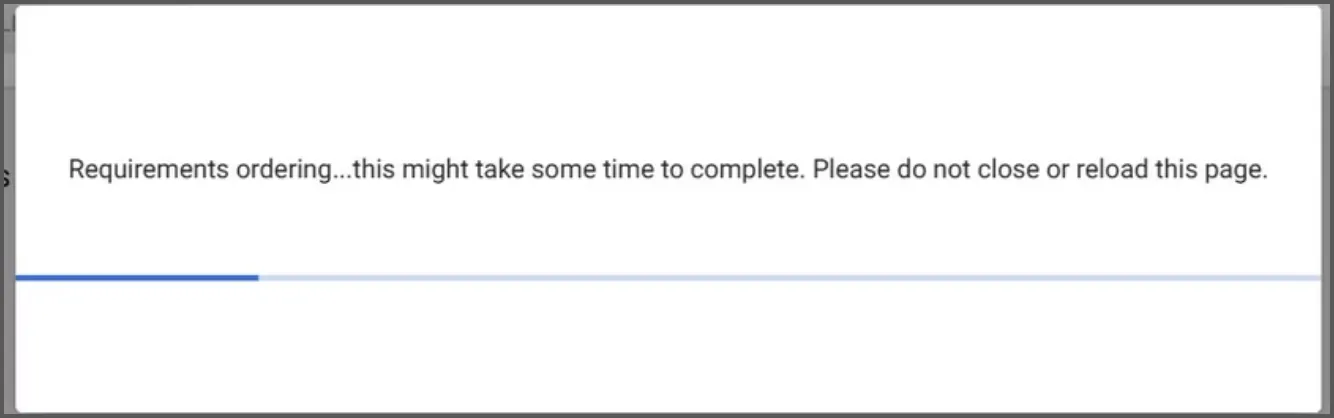
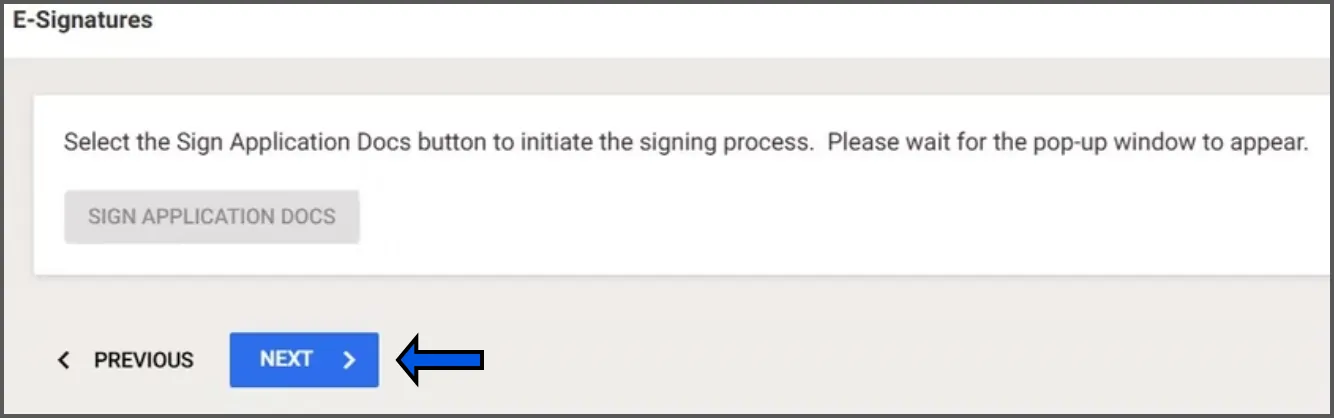
Click NEXT.

28
Step 28 screenshot
29
Step 29 screenshot
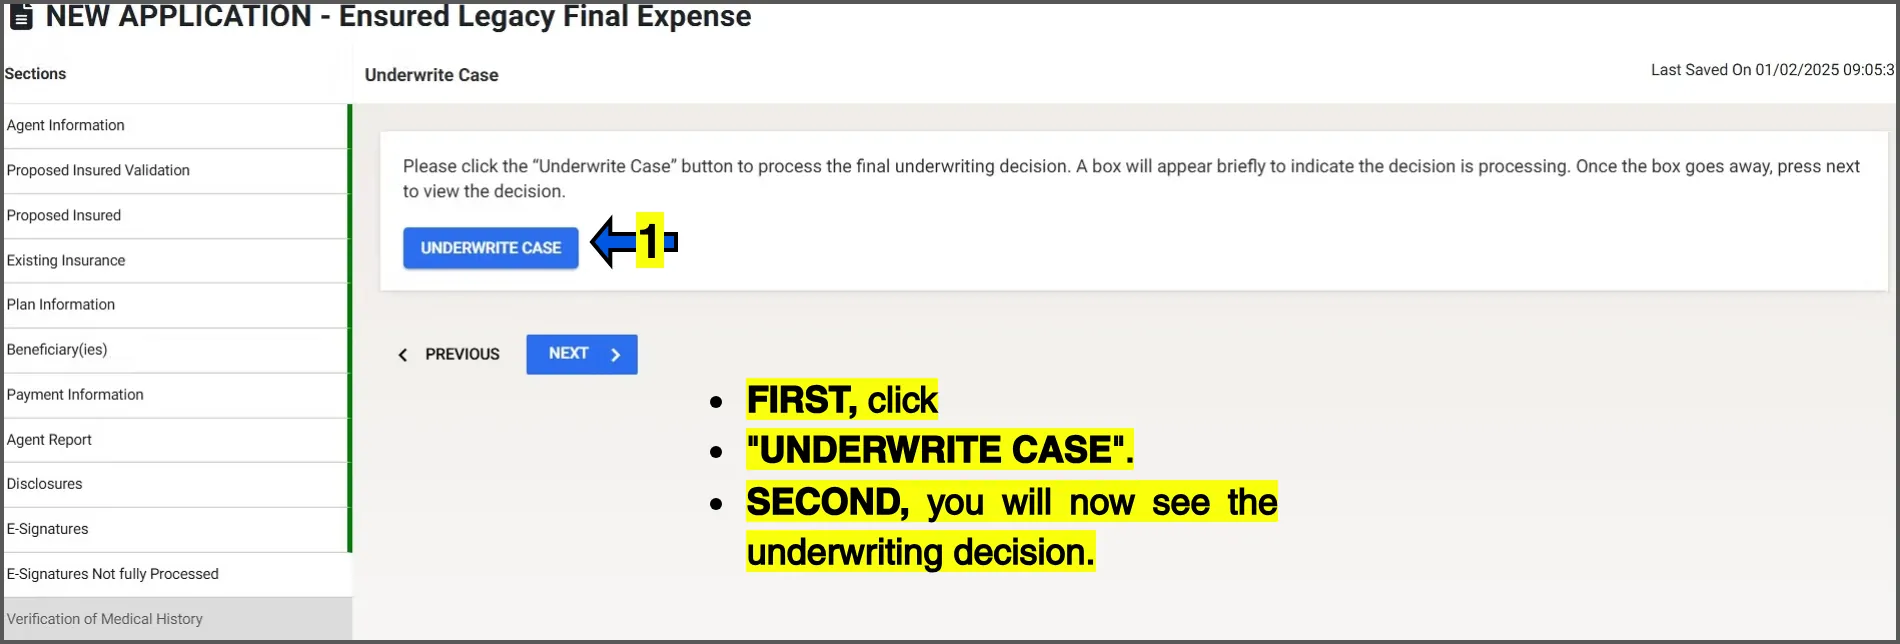
  1. 1
    click UNDERWRITE CASE.
  2. 2
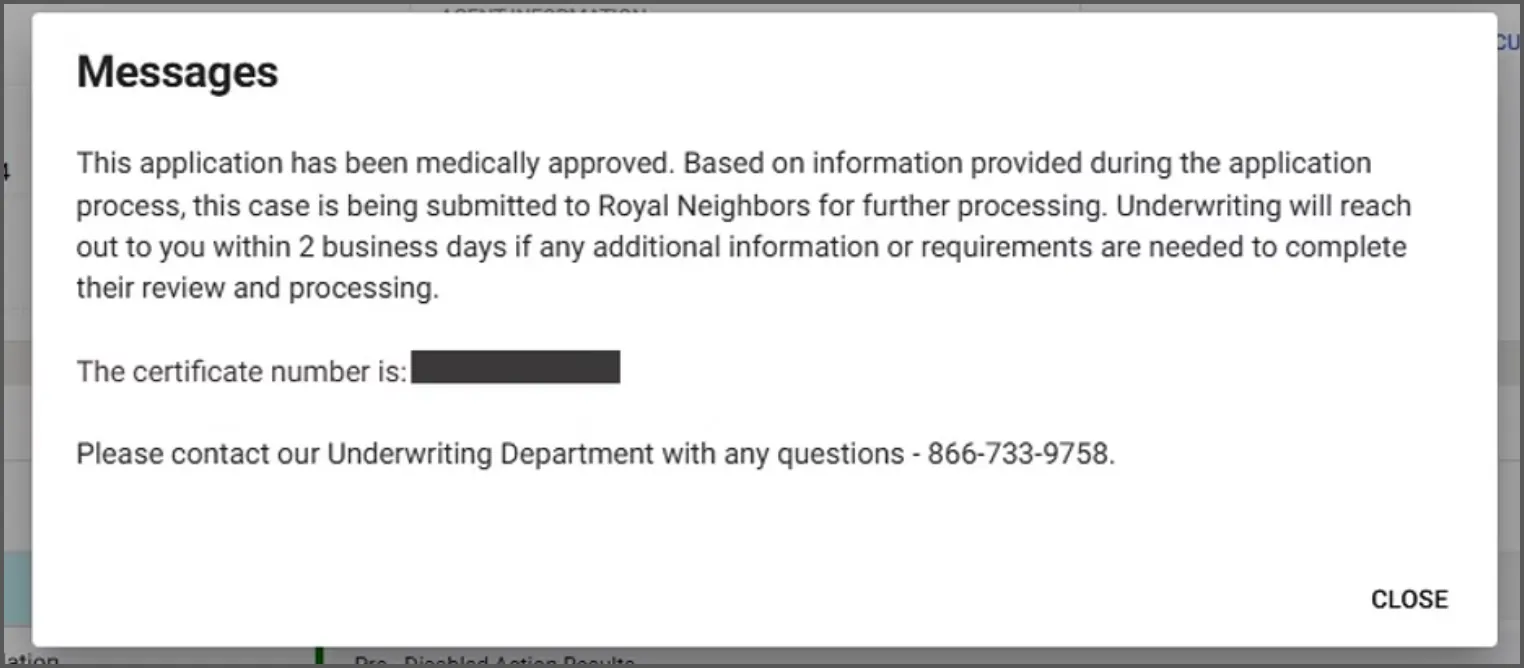
    you will now see the underwriting decision.
30
Step 30 screenshot
  1. 3
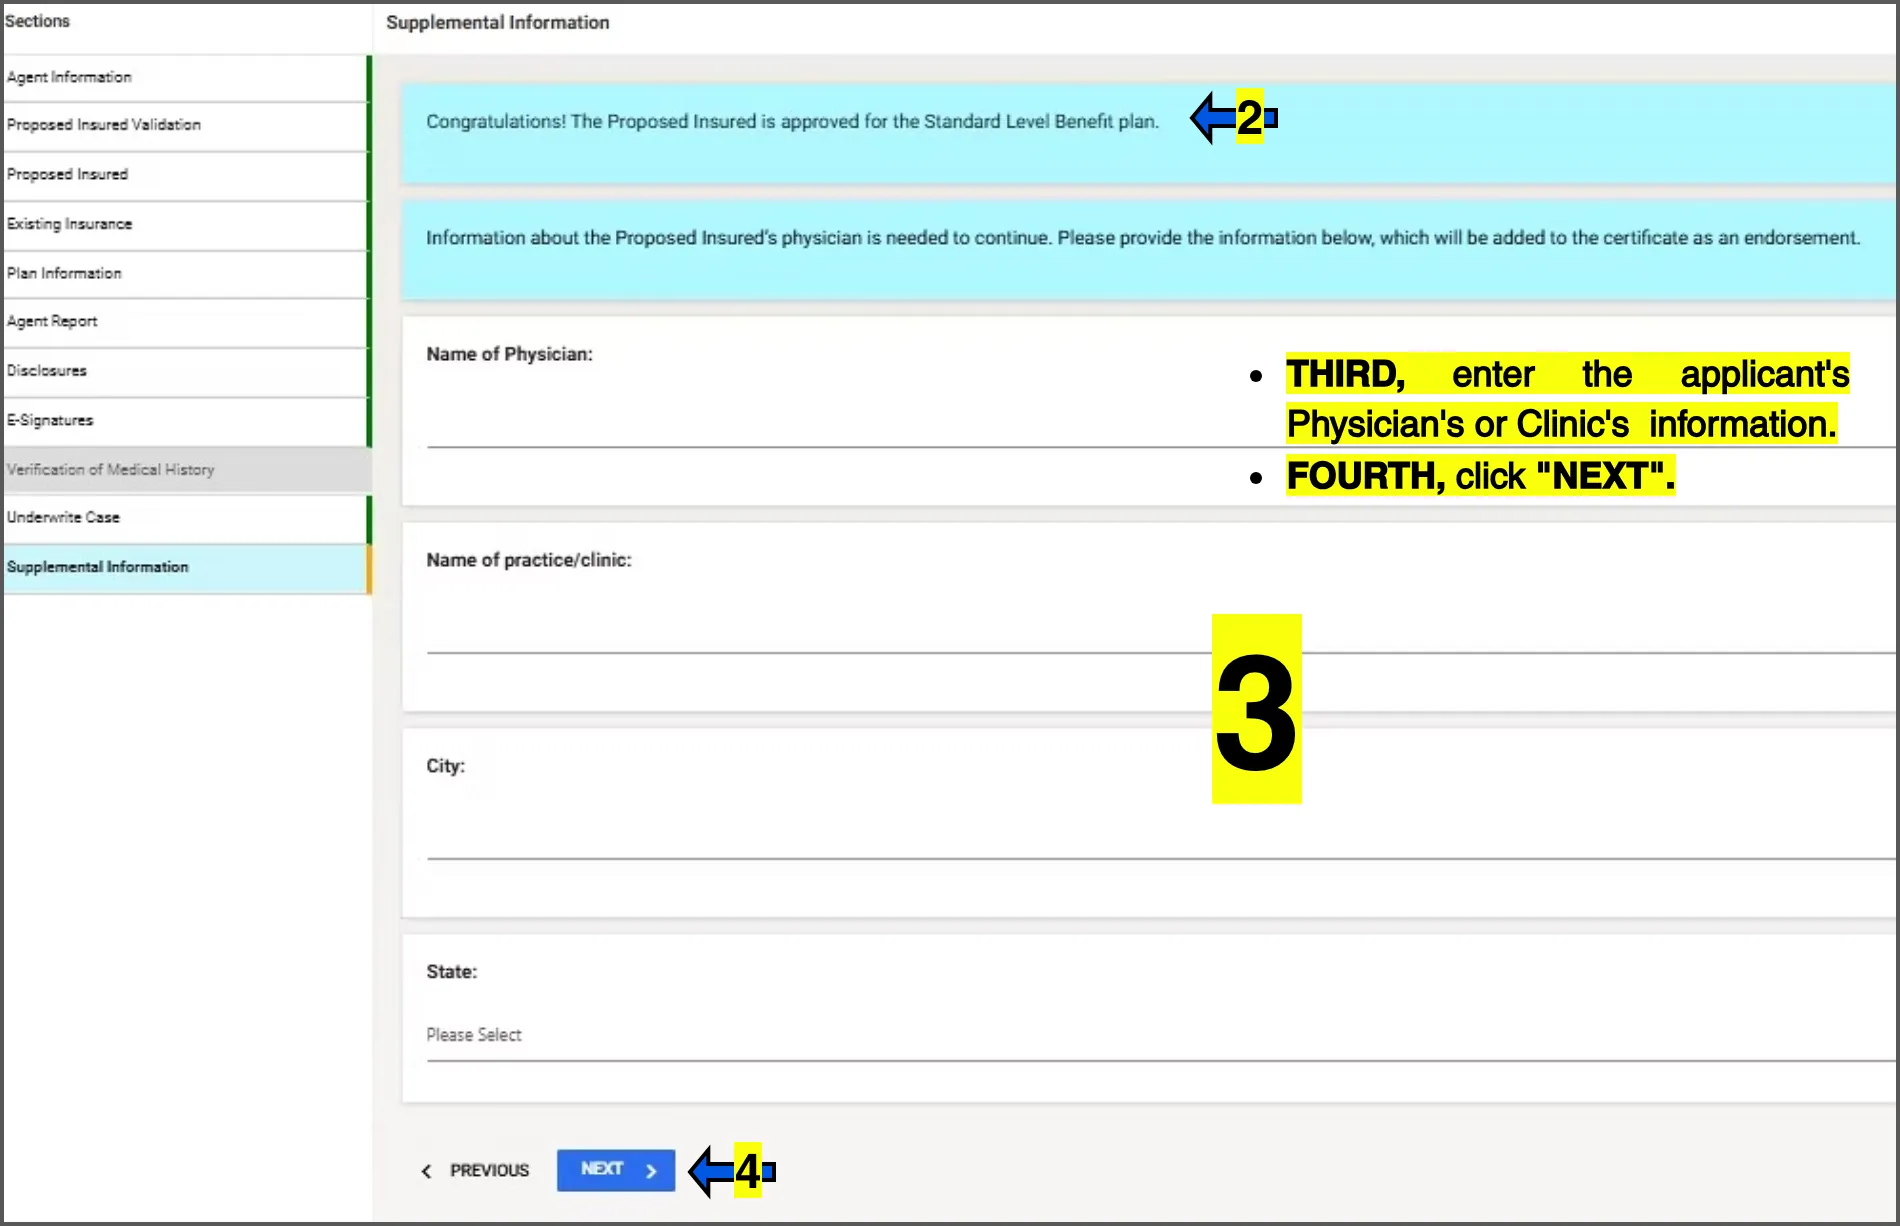
    enter the applicant's Physician's or Clinic's information.
  2. 4
    click NEXT.
31
Step 31 screenshot