DFG

DFG Agents Only

Enter your access code to view this page.

Incorrect PIN — try again.
Duse Financial Group · Agents Only
← All carriers
Transamerica — FE Express

Transamerica — FE Express e-App Guide

Final Expense Express Solution (needs Express Access — see Carrier Contacts) · 22 steps · 2 e-sign scripts
Where to startTransamerica → FE Express e-app
How the client signsThree text signatures — identity, mid-app review, final sign & pay
ScreenshotsTap any screenshot to enlarge it. Yellow numbers in the shot match the numbered sub-steps.
Agent

E-App Guide

1
Step 1 screenshot
  1. 1
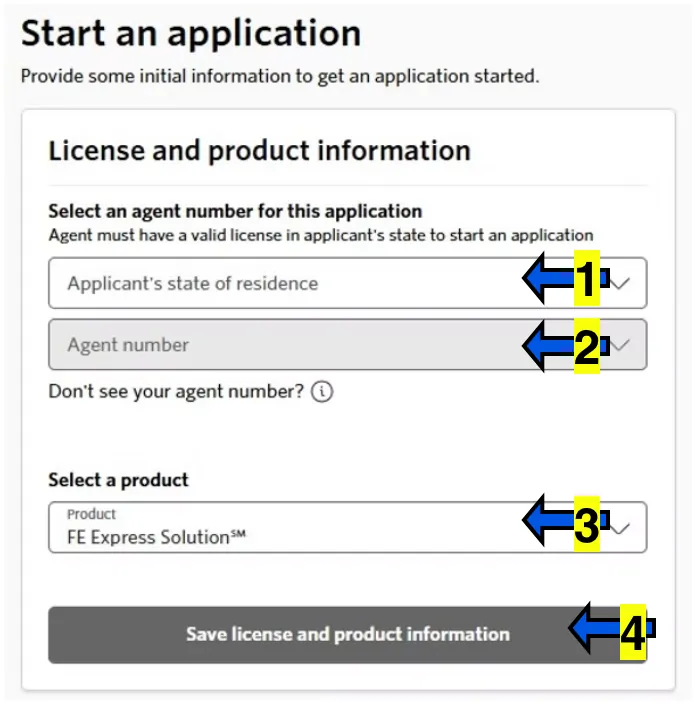
    make sure that you select the proper state for the APPLICANT. NOTE: If you are licensed in the applicant's state but do not see the state as an option, you will need to contact Transamerica to update your licensed states for the Express product. Many agents who are appointed to sell Immediate Solutions had to manually call to update their states for the Express Solutions. Pivot to Immediate Solutions.
  2. 2
    click on the "Agent Number" box and select your agent number from the drop down.
  3. 3
    on the "Select a Product" box, FE Express will be the only product to select.
  4. 4
    click on the SAVE LICENSE AND PRODUCT INFORMATION button.
2
Step 2 screenshot
Step 2 screenshot
  1. 1
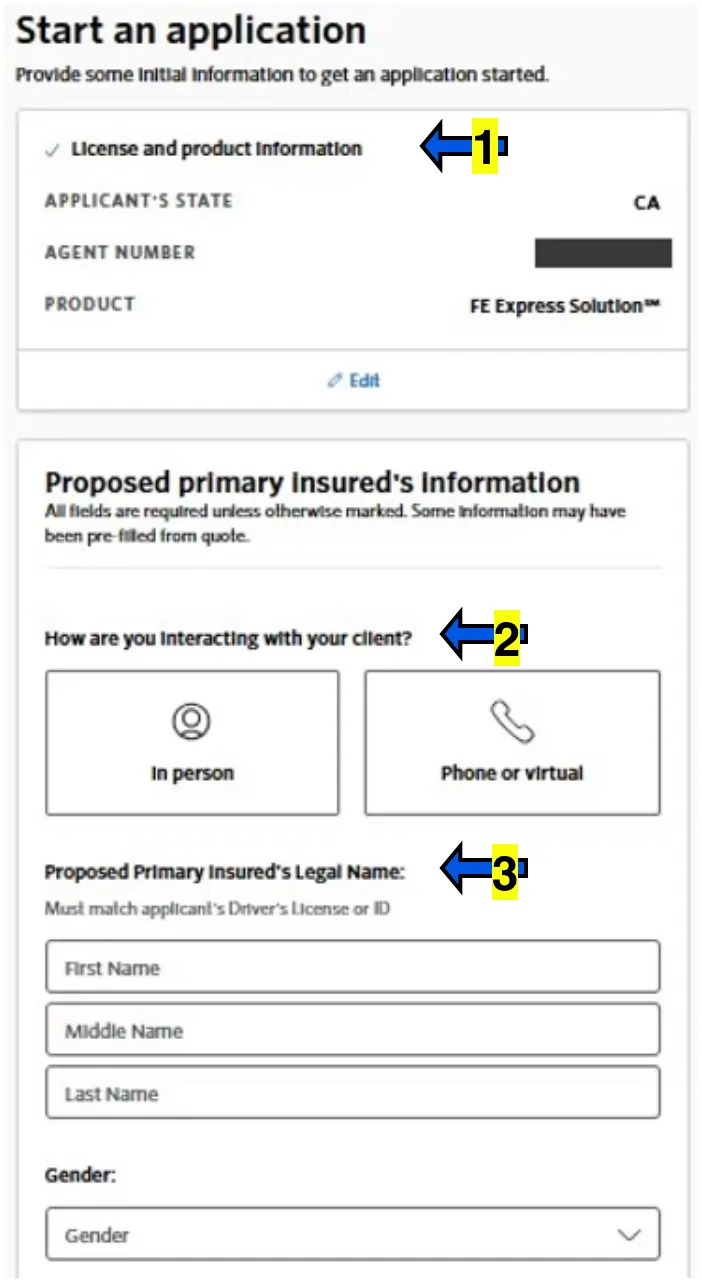
    confirm that all information is correct in the "License and product information" box. Click "Edit" if you need to make changes.
  2. 2
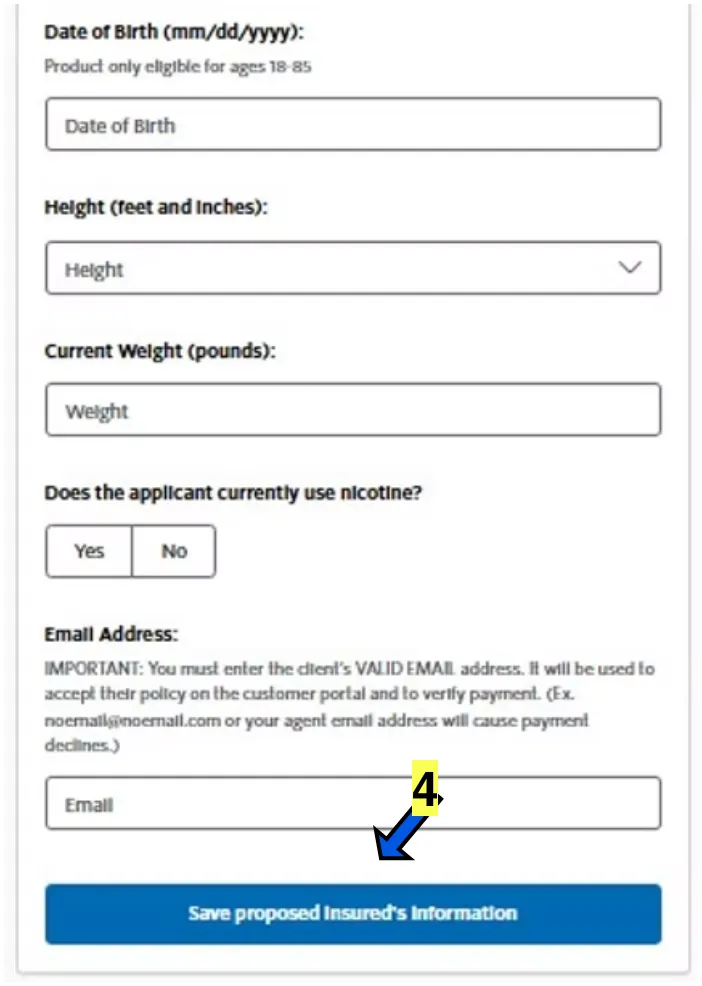
    in the "How are you interacting with your client?" box, choose if you are in-person physically with the client or if you are doing everything over the phone. Virtual would be ZOOM. NOTE: We will use PHONE for this tutorial.
  3. 3
    enter the applicant's general information. Name must match their driver's license or ID. A valid EMAIL will be needed.
  4. 4
    click on the SAVE PROPOSED INSURED'S INFORMATION button.
3
Step 3 screenshot
Step 3 screenshot
Step 3 screenshot
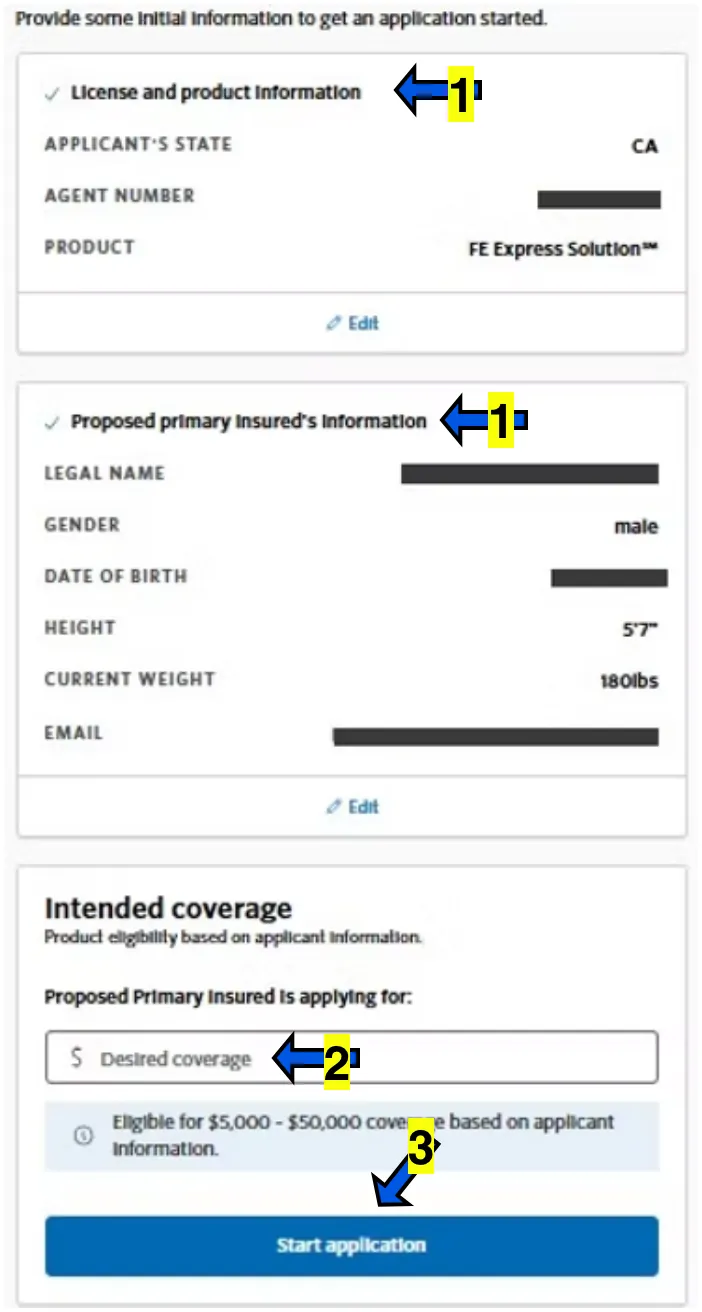
  1. 1
    confirm that all information is correct. Click "Edit" if you need to make changes.
  2. 2
    enter the coverage amount that the applicant is applying for.
  3. 3
    click on the START APPLICATION button.
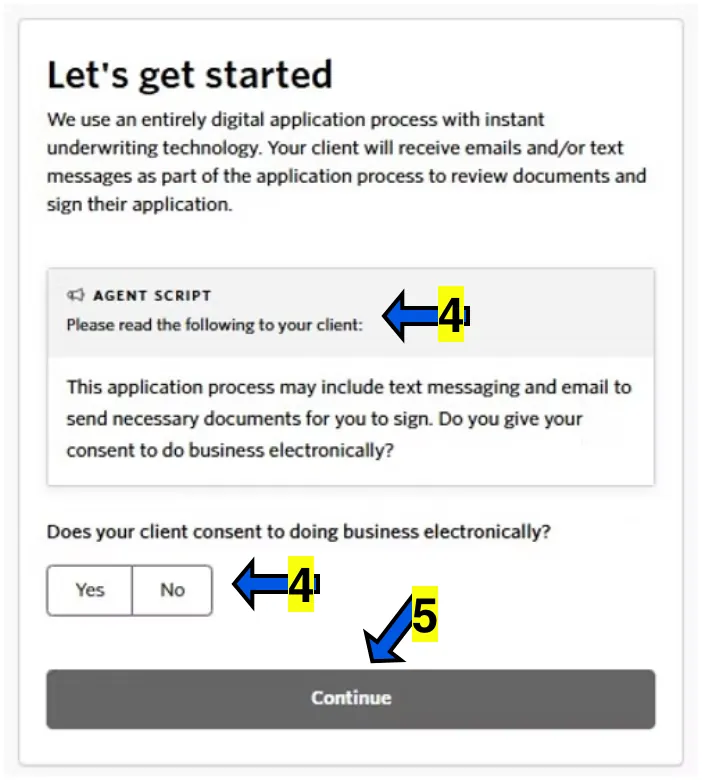
  4. 4
    on the next screen LETS GET STARTED, Ask the applicant if they consent to doing business electronically using the "Agent Script", then click YES to proceed. If NO, stop application.
  5. 5
    click the CONTINUE button.
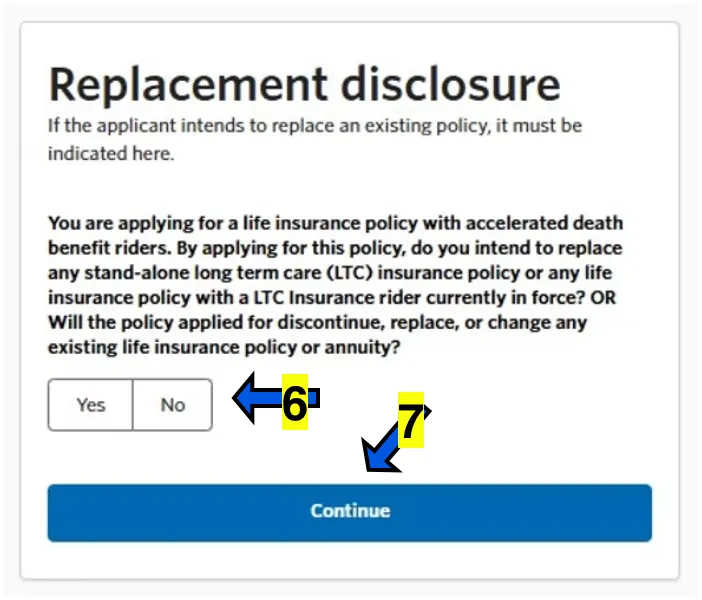
  6. 6
    on the next screen REPLACEMENT DISCLOSURE, the applicant is asked if they are intending to replace an existing policy. Answer accordingly. NOTE: If a client is simply adding coverage, this does not apply as a replacement.
  7. 7
    click the CONTINUE button.
4
Step 4 screenshot
Step 4 screenshot
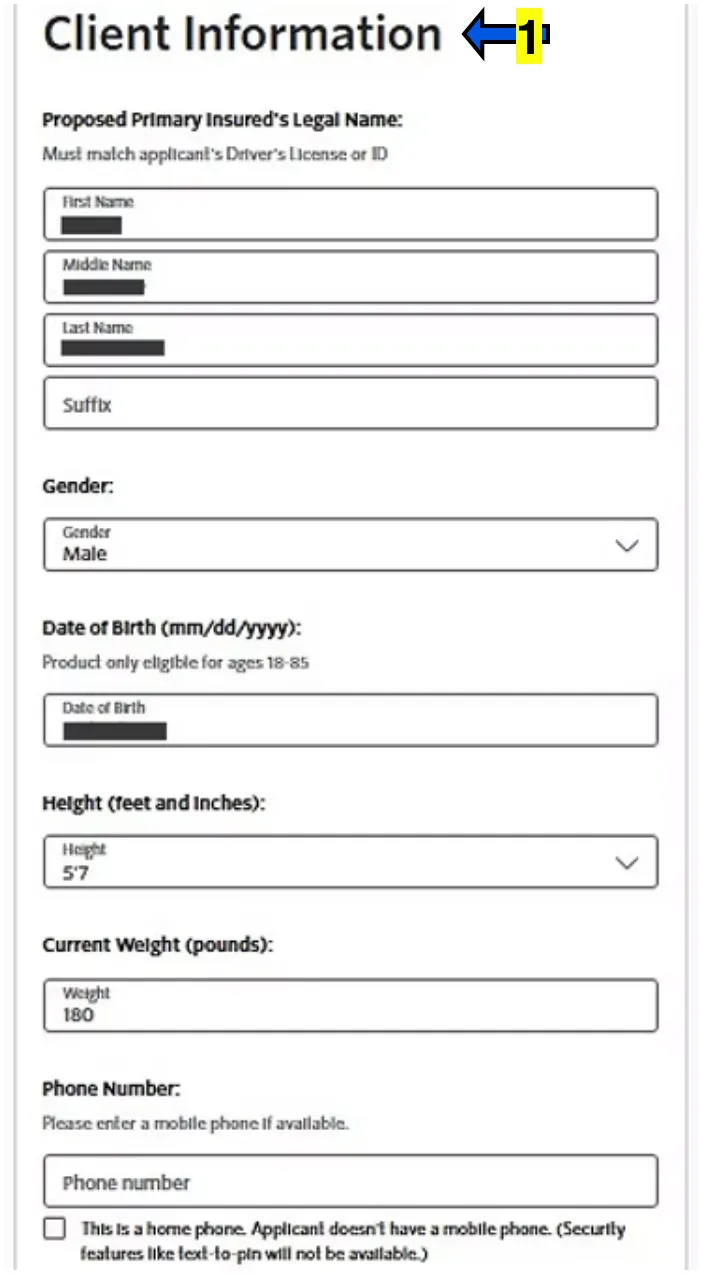
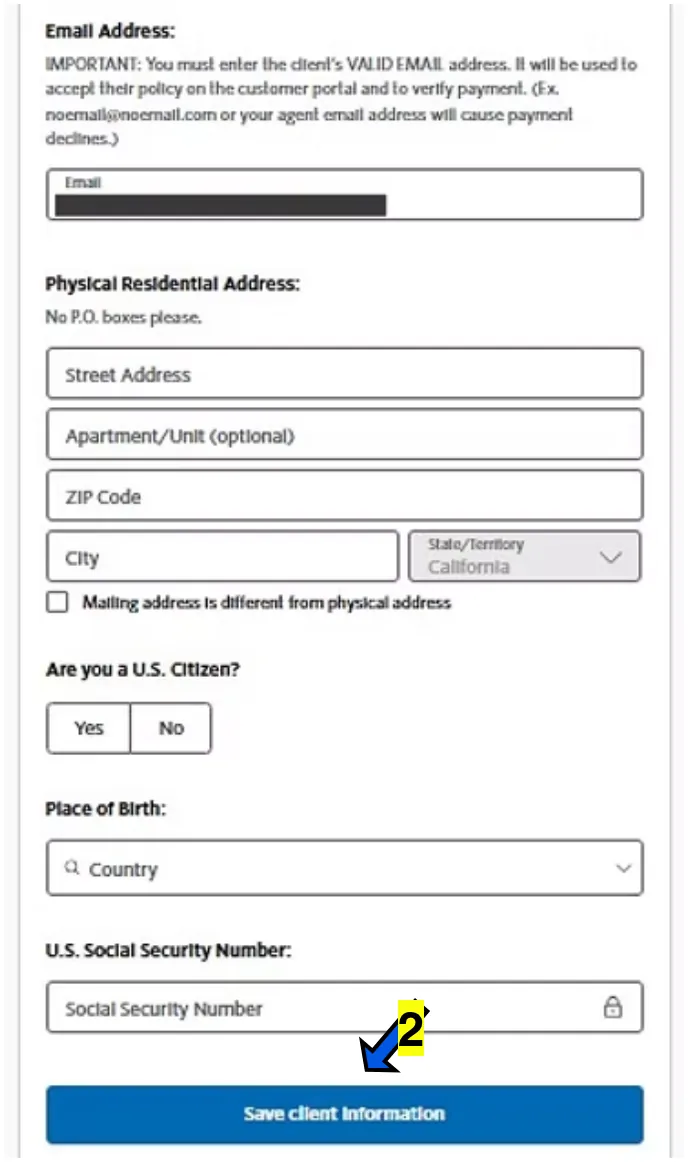
  1. 1
    confirm that all the previously entered information is correct, then fill in the rest of the general information.
  2. 2
    click on the SAVE CLIENT INFORMATION button.
5
Step 5 screenshot
Step 5 screenshot
Step 5 screenshot
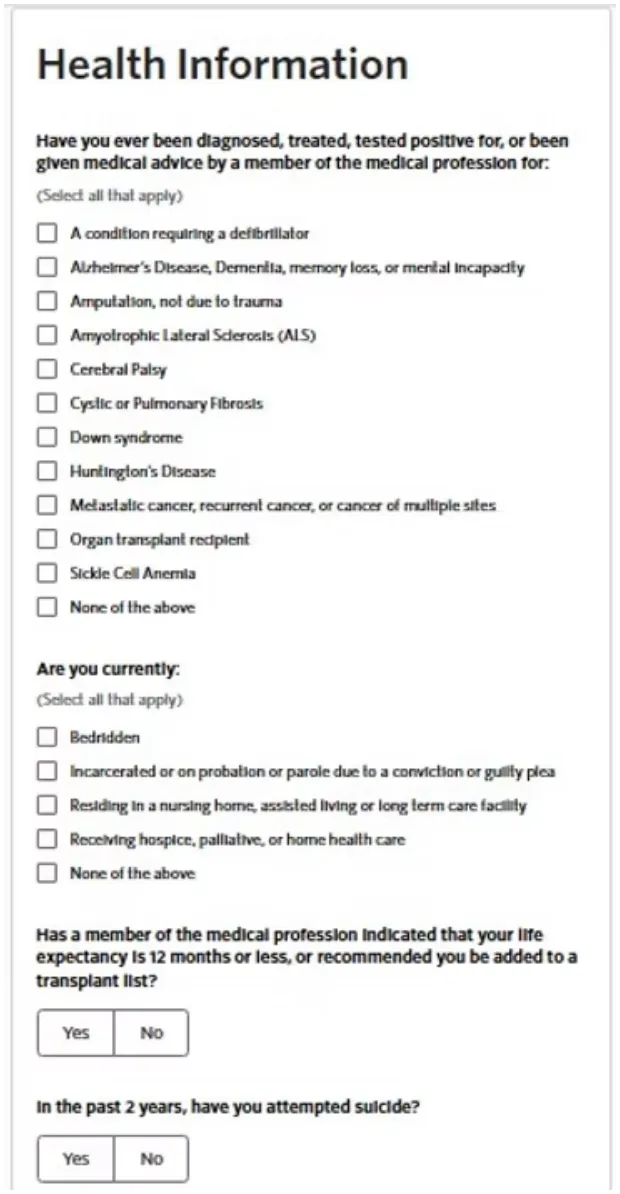
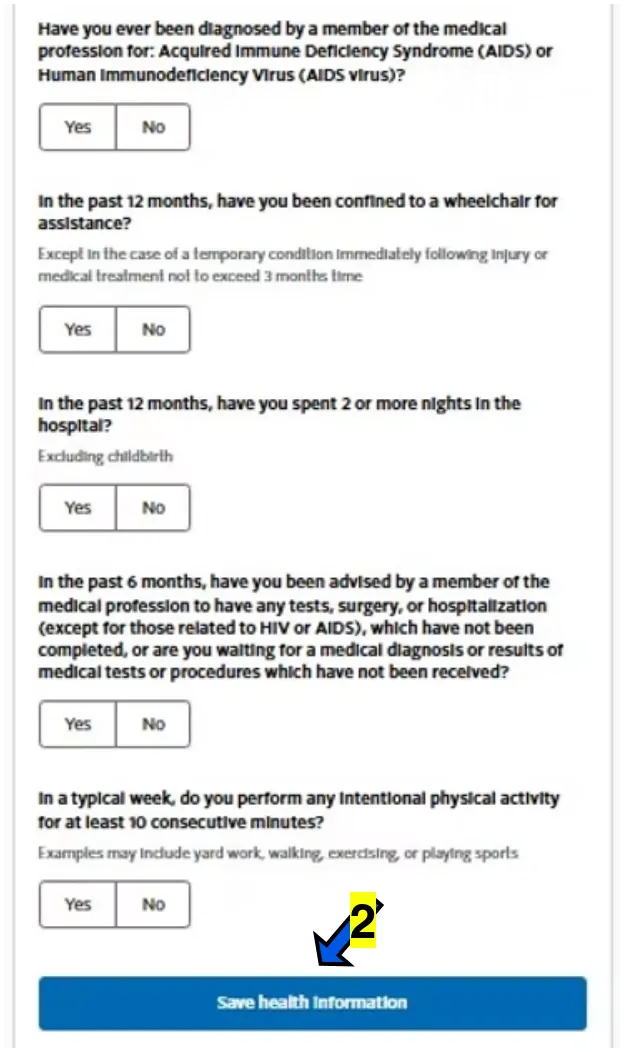
  1. 1
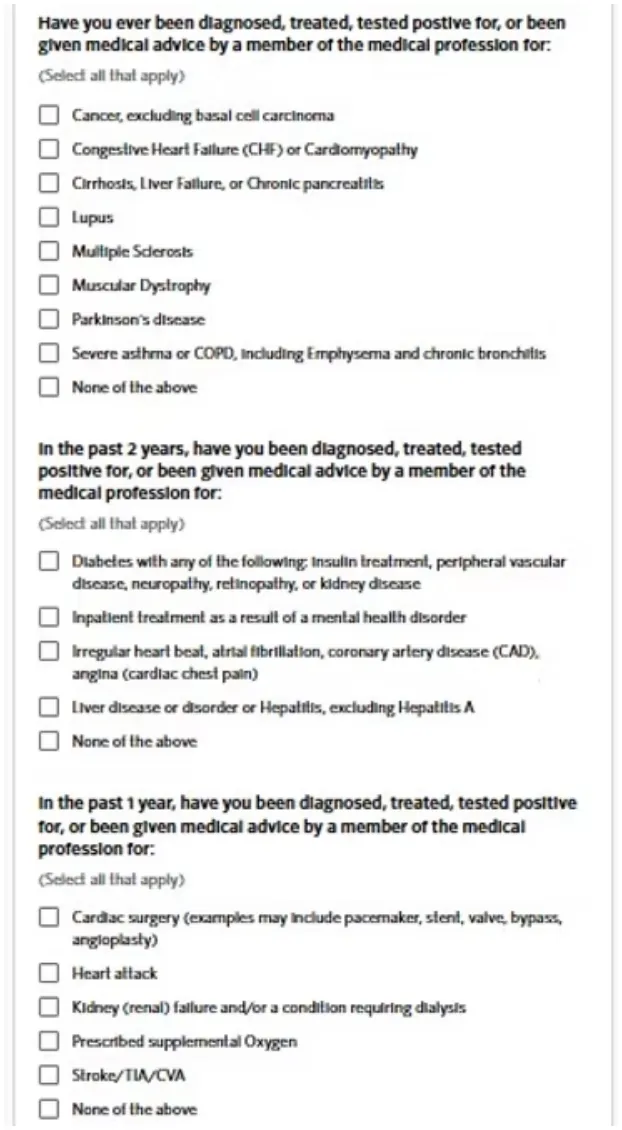
    answer the questions regarding the applicant's health.
  2. 2
    click the SAVE HEALTH INFORMATION button.
6
Step 6 screenshot
Step 6 screenshot
Step 6 screenshot
Step 6 screenshot
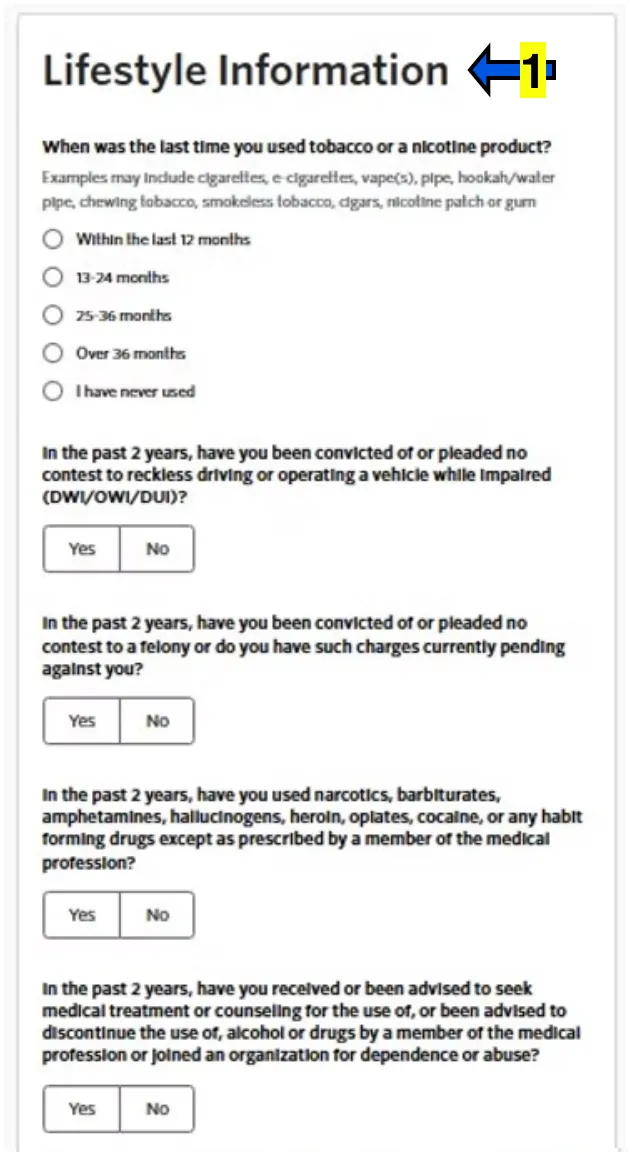
  1. 1
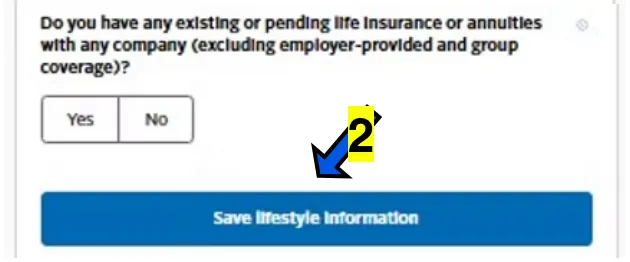
    answer the questions regarding the applicant's Lifestyle.
  2. 2
    click the SAVE LIFESTYLE INFORMATION button.
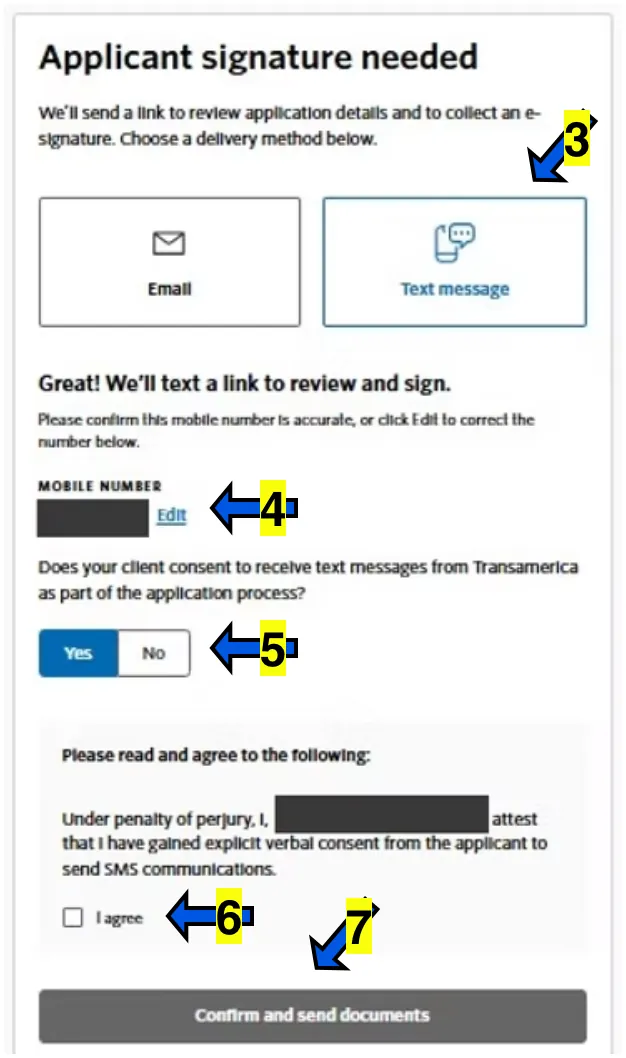
  3. 3
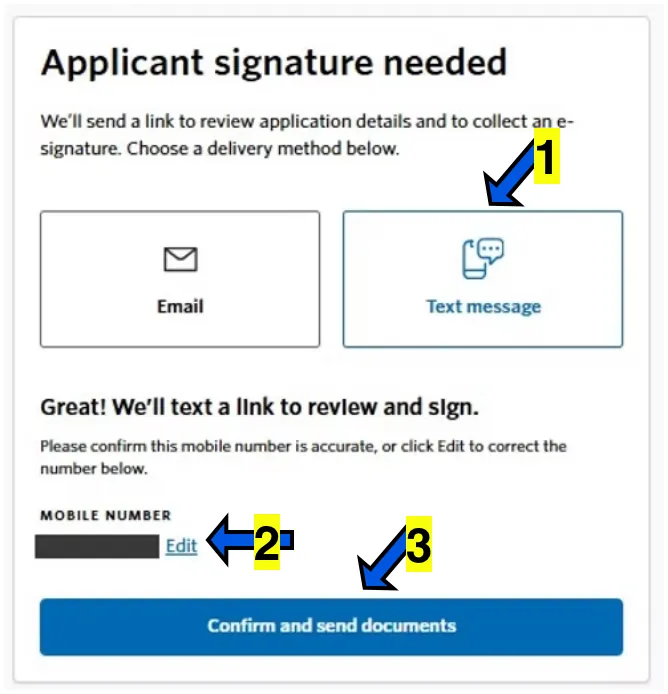
    on next screen APPLICANT SIGNATURE NEEDED, choose how you will send the signature link (TEXT recommended).
  4. 4
    verify the number is correct. Make edits if needed.
  5. 5
    click YES if client consents. If not, stop application or pivot to email.
  6. 6
    click the check box that reads I AGREE to agree that you have gained verbal consent from applicant to send signature via text message.
  7. 7
    click on the CONFIRM AND SEND DOCUMENTS button.
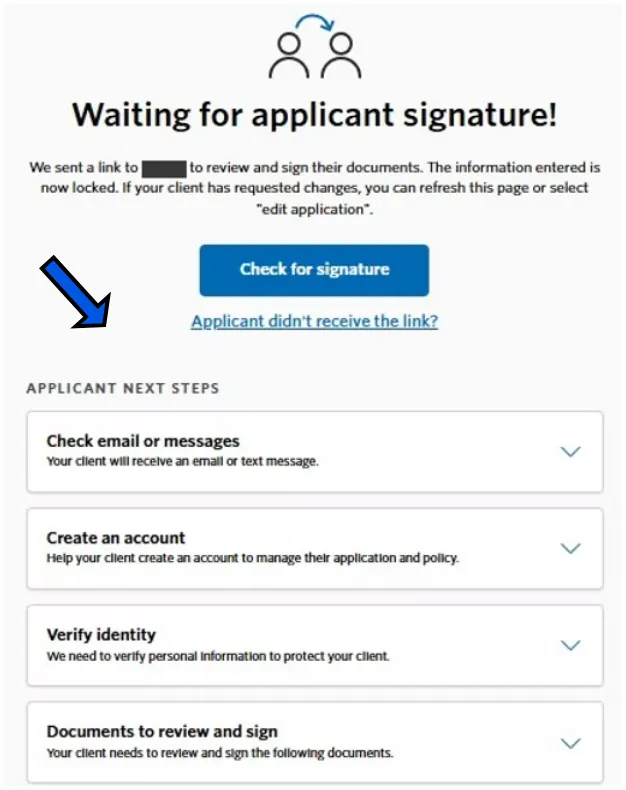
  8. 8
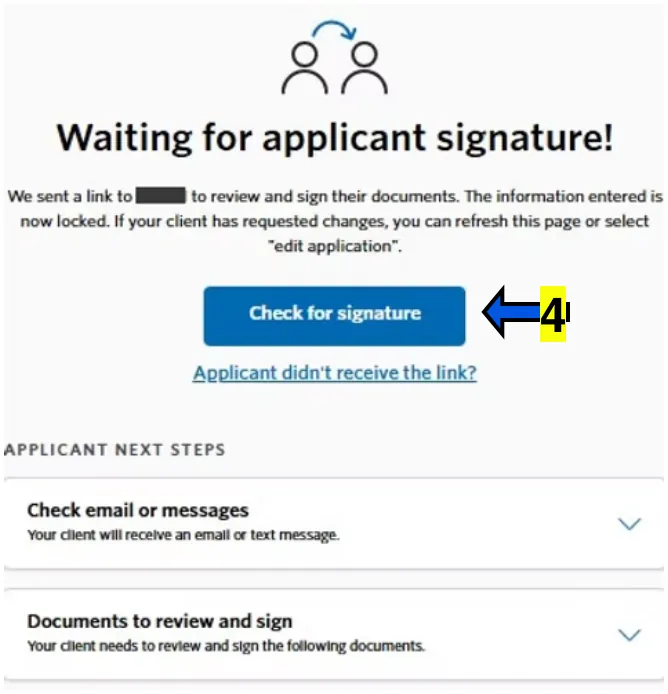
    on the next screen WAITING FOR APPLICANT SIGNATURE, you will be given instructions on each drop down tab below to help the client on their end. HOWEVER, you may use the following signature guide.
Client script

E-Signature Guide #1

Read the blue script lines to the client word for word. The screenshots are what the client sees on their phone.
7
Step 7 screenshot
Step 7 screenshot
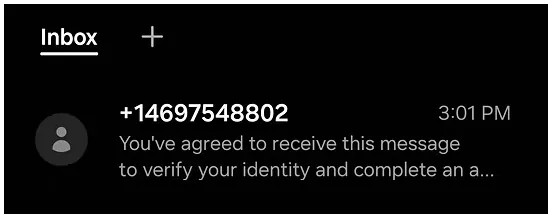
“Now [Client’s Name], I’m going to send you a text for signature allowing us to verify your identity and complete the application electronically.”

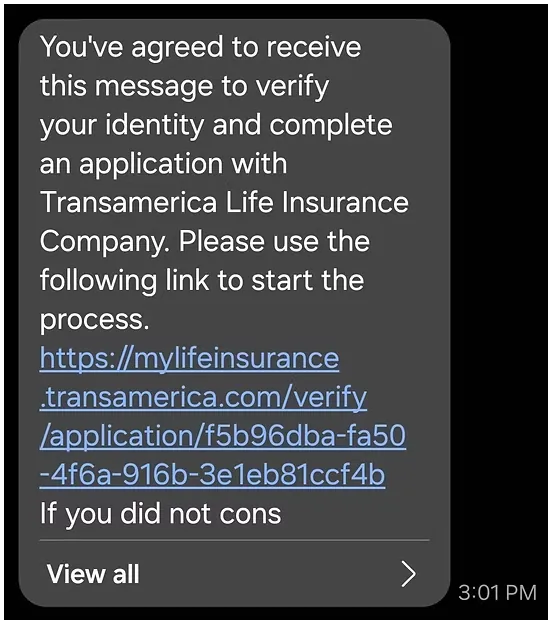
You should receive a text message that says, YOU'VE AGREED TO RECEIVE THIS MESSAGE TO VERIFY YOUR IDENTITY
“Go ahead and go down to the link that starts with HTTPS and click on that link.”
8
Step 8 screenshot
Step 8 screenshot
Step 8 screenshot
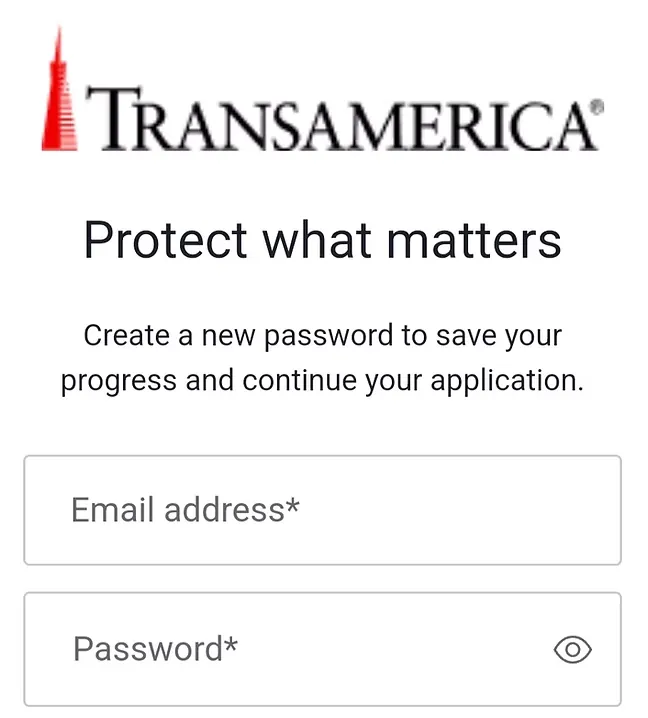
“When you click on the link, it should take you to the next screen where you’ll see TRANSAMERICA, PROTECT WHAT MATTERS at the top.”
“In the box that says email, go ahead and enter your email there.”
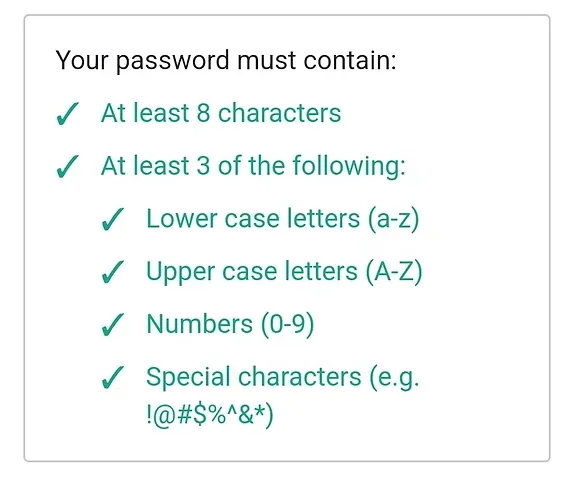
“On the box below that where it says PASSWORD, go ahead and create a password that’s at least 8 characters long using a mixture of upper case letters, lower case letters, and numbers or special characters like an exclamation point.”
“Once you create a password, go ahead and click on the blue button that says CONTINUE.”
9
Step 9 screenshot
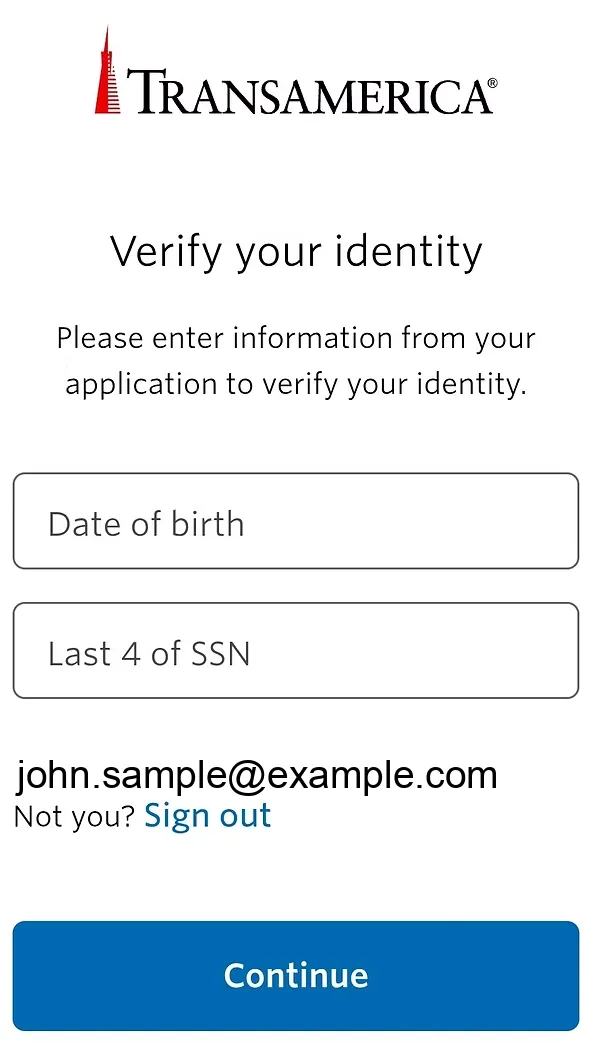
“On the next screen, you should see TRANSAMERICA, VERIFY YOUR IDENTITY on top.”
“Below that, you should see a box that says, DATE OF BIRTH. Go ahead and enter your date of birth in that box.”
“Now under that, you should see a box that says, LAST 4 OF SSN. Go ahead and enter the last four of your social in that box.”
“Once you have both boxes filled out, go ahead and click on the blue button below that says, CONTINUE.”
10
Step 10 screenshot
Step 10 screenshot
Step 10 screenshot
Step 10 screenshot
Step 10 screenshot
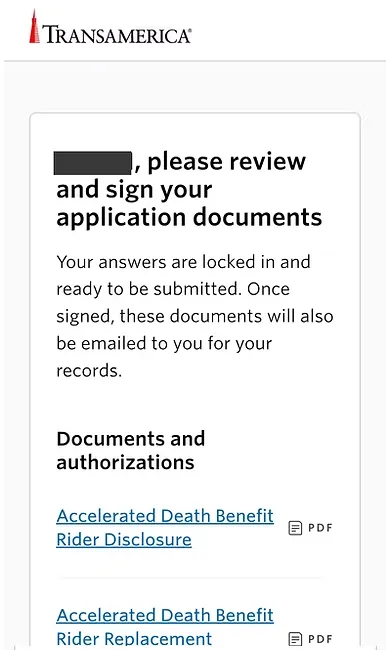
“Now on the next screen, you should see where it says, “[Client’s Name], PLEASE REVIEW AND SIGN” in bold letters.”
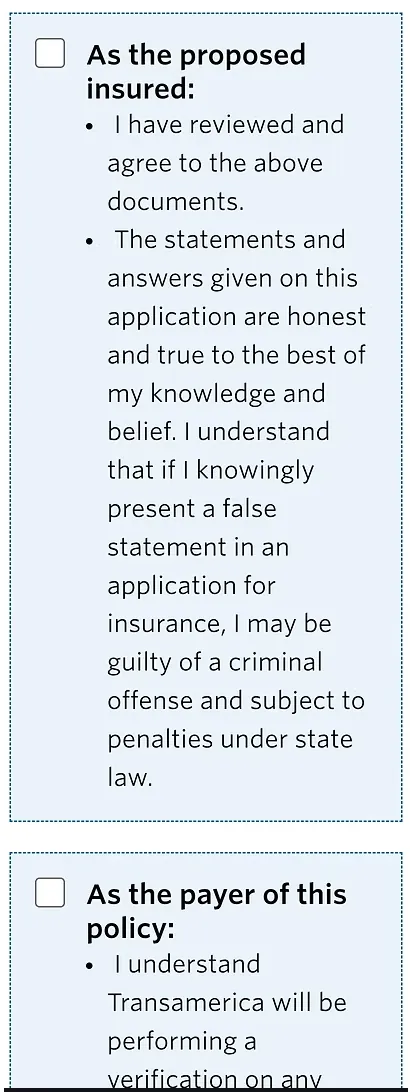
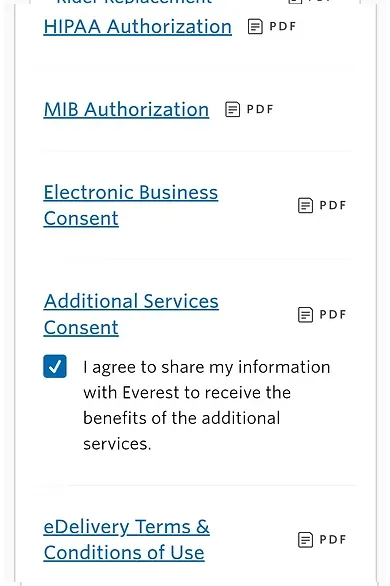
“Go ahead and scroll down to the first blue box that says, AS THE PROPOSED INSURED followed by a disclosure. Go ahead and click on that white check box.”
“Next, scroll down to the second box that says AS THE PAYOR OF THIS POLICY followed by a disclosure, and click on that white check box.”
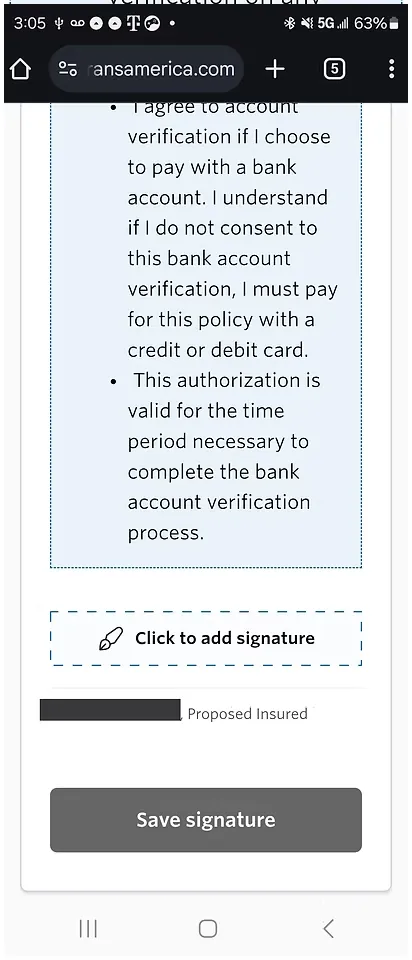
“Next, you should see a box that says CLICK TO ADD SIGNATURE. Go ahead and click inside that box and then you should see a fonted signature. From there, go ahead and click on the box below it that says, SAVE SIGNATURE.”
↩ back in the e-app
11
Step 11 screenshot
Step 11 screenshot
Step 11 screenshot
  1. 1
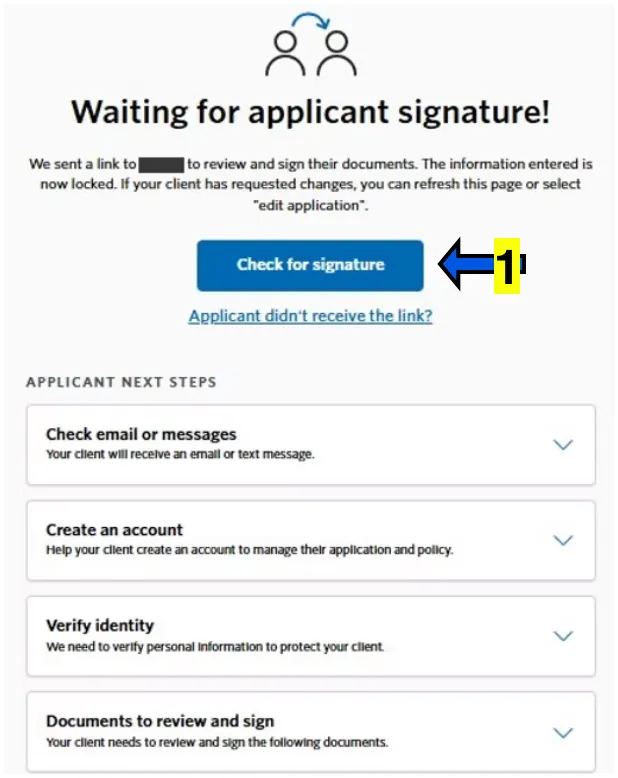
    once the applicant has signed, click on the CHECK FOR SIGNATURE button to be directed to the next section. (NOTE: It may not verify the signature was completed right away. Wait a few seconds between)
  2. 2
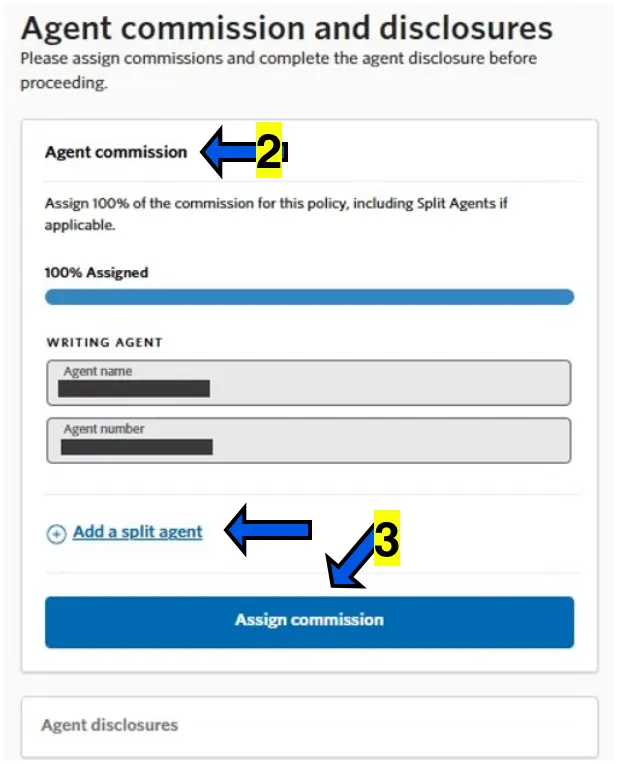
    on the next screen AGENT COMMISSION, confirm your details are correct. If there is a commission split between you and another agent, click ADD AGENT SPLIT. Both percentages must equal 100% combined (50/50, 75/25, 60/40).
  3. 3
    click the ASSIGN COMMISSION button.
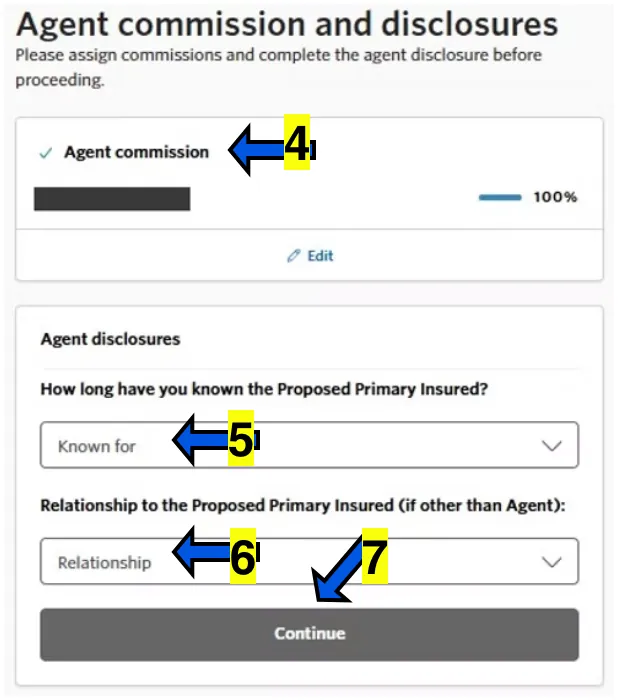
  4. 4
    on the next screen confirm the commission percentage is correct. Click EDIT if changes are needed.
  5. 5
    click the KNOWN FOR button to answer how long you've known the applicant.
  6. 6
    click the RELATIONSHIP button to answer what your relation to the client is. NONE can be entered if it isn't someone you know personally.
  7. 7
    click the CONTINUE button.
12
Step 12 screenshot
Step 12 screenshot
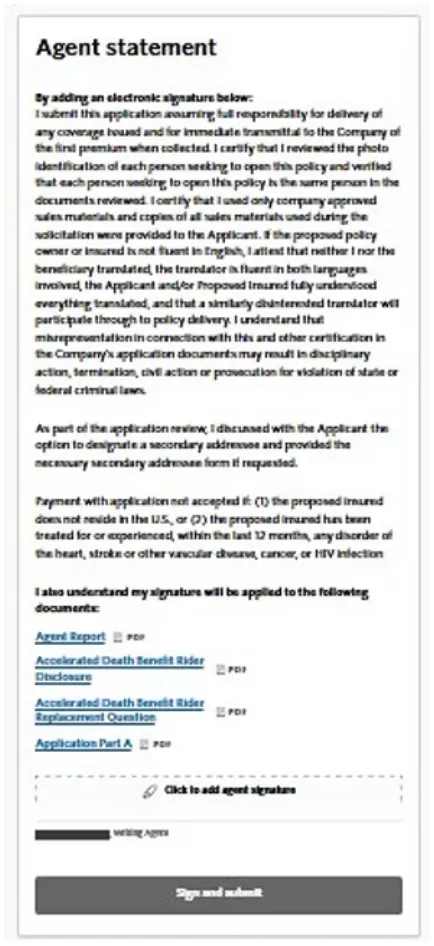
  1. 1
    in the AGENT STATEMENT section, review the agent statement and application IF NEEDED and then click in the box that says CLICK TO ADD AGENT SIGNATURES. This will populate a fonted signature.
  2. 2
    click the SIGN AND SUBMIT button.

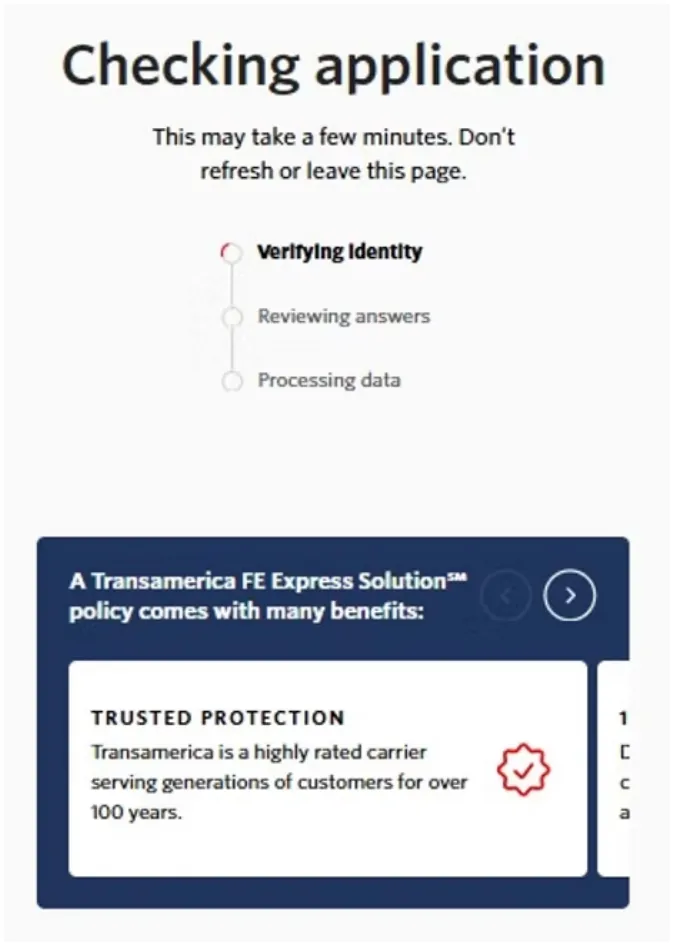
On the CHECKING APPLICATION section, the background and medical check will be done. If the applicant is approved, you may proceed. If the applicant is denied, the appication will stop here. NOTE: It is recommended that you do not tell the client they are approved until the payment informatin is collected and application is submitted. If they are declined, you may save the sale by collecting the payment information and then say, "So [Client's Name], it looks like the application was sent to underwriting for further review. I will contact you tomorrow regarding the status of the application." Then attempt to put them with a guaranteed issue product.
13
Step 13 screenshot
Step 13 screenshot
  1. 1
    in the APPLICATION SIGNATURE NEEDED section, choose the delivery method for second signature link. TEXT recommended.
  2. 2
    confirm that the number or email is correct. Click EDIT if any changes are needed.
  3. 3
    click the CONFIRM AND SEND DOCUMENTS button.

SIGNATURE GUIDE 2: At this point, say to the applicant,"Ok [Client's Name], I'm sending you another text with a link to review the application up to this point. Go ahead and click any check boxes that need to be checked and click on the box that says CLICK TO ADD SIGNATURE. Then I'll be able to add your beneficiaries and finish the application."
  1. 4
    once the applicant has signed, click on the CHECK FOR SIGNATURE button to be directed to the next section. (NOTE: It may not verify the signature was completed right away. Wait a few seconds between)
14
Step 14 screenshot
Step 14 screenshot
  1. 1
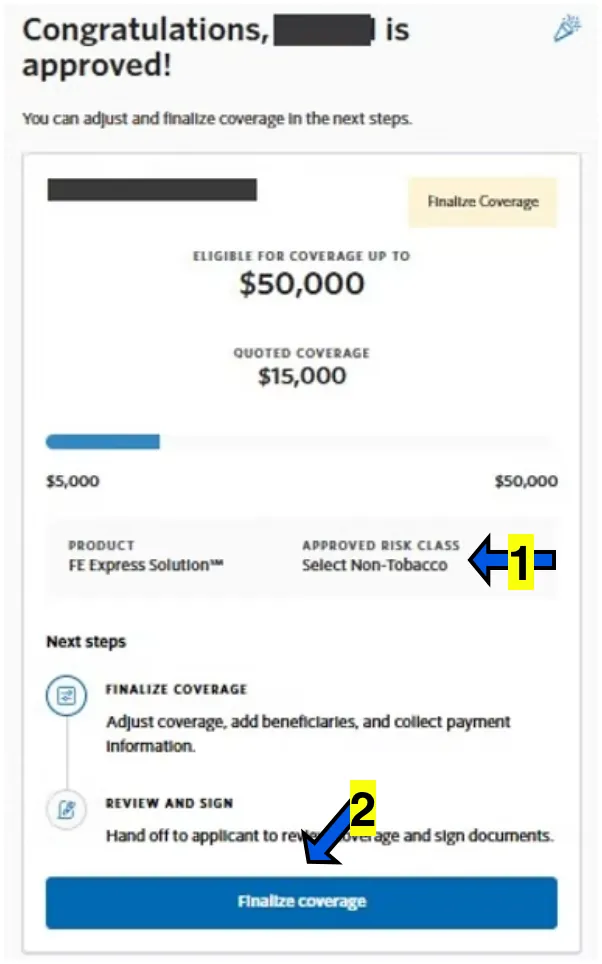
    verify that the risk class is the same as applied for. If you applied for level coverage, but the applicant was classed at GRADED due to health conditions found on the medical check. This will change the policy and the monthly premiums.
  2. 2
    click the FINALIZE COVERAGE button.
  3. 3
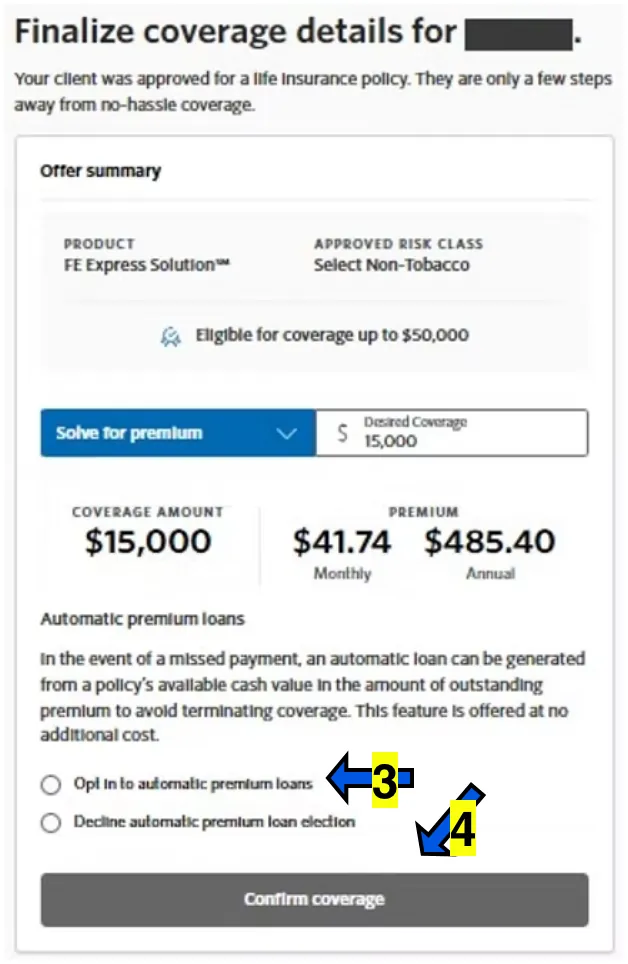
    on the next screen, click to select OPT IN TO AUTOMATIC PREMIUM LOANS. Description of the automatic premium loan will be found above.
  4. 4
    click the CONFIRM COVERAGE button.
15
Step 15 screenshot
Step 15 screenshot
  1. 1
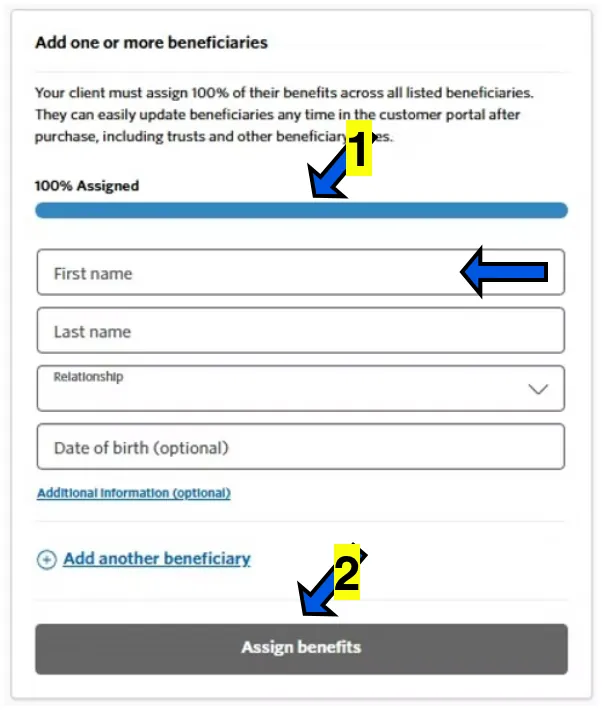
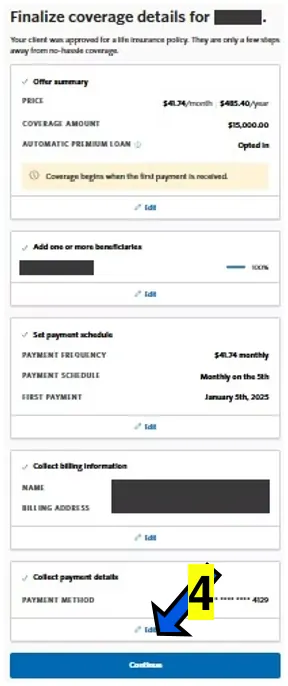
    fill in the Primary Beneficiary's information. If there are additional primary beneficiaries, you may add them by clicking on "Add Beneficiary". No Contingent (Back-up) Beneficiary is allowed on this application.

Benefit Percentage. If there is only one beneficiary, put 100 as the percentage. If more than one primary, each percentage must equal to 100% combined. For example, if two beneficiaries, the percentage split must be 50/50. If three beneficiaries, the percentage split must be 34/33/33.
  1. 2
    click the ASSIGN BENEFITS button.
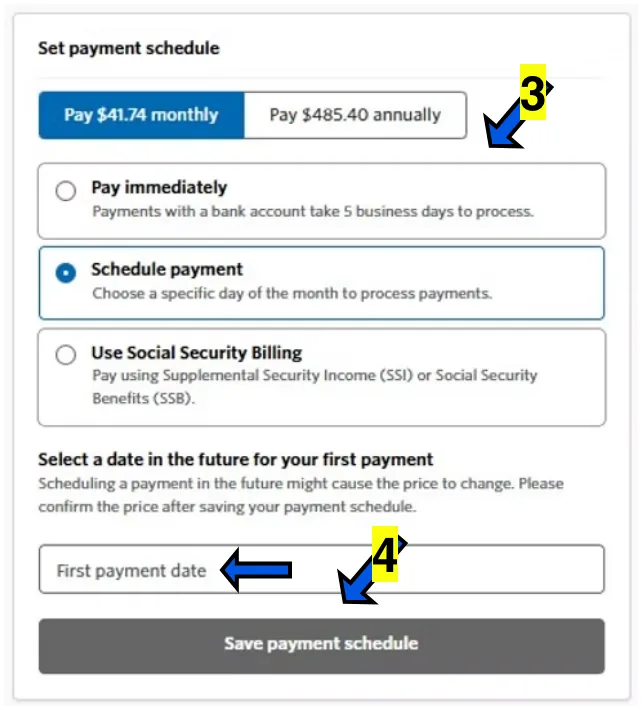
  2. 3
    in the next section, we will select a start date for the policy. Say to the applicant, “Now [Client’s Name], if you are approved for coverage, would want your coverage to begin immediately just in case?”. Choose PAY IMMEDIATELY or SCHEDULE PAYMENT based on their answer. If "Schedule Payment", enter the start date in the FIRST PAYMENT DATE box.
  3. 4
    click the SAVE PAYMENT SCHEDULE box.
16
Step 16 screenshot
Step 16 screenshot
Step 16 screenshot
Step 16 screenshot
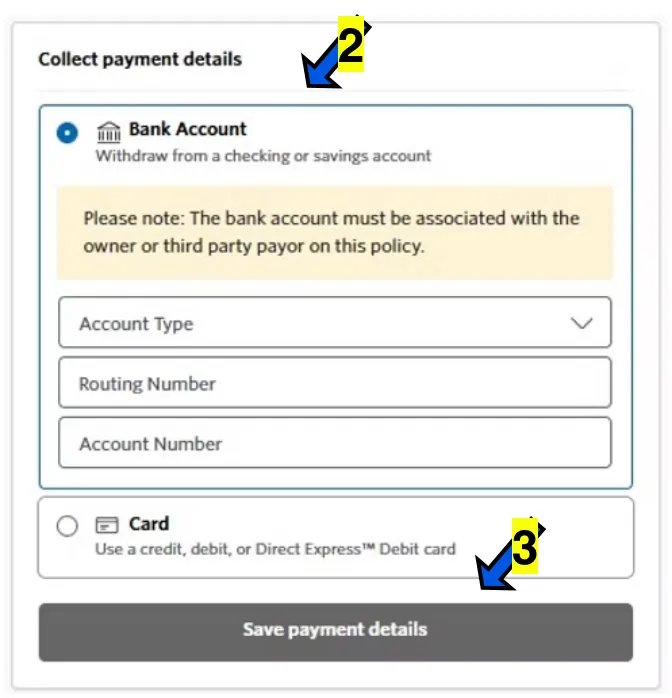
  1. 1
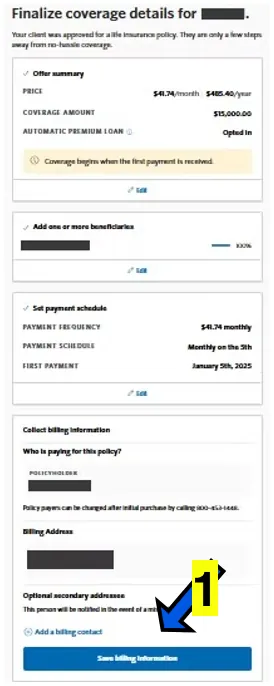
    confirm details, then click on the SAVE BILLING INFORMATION button.
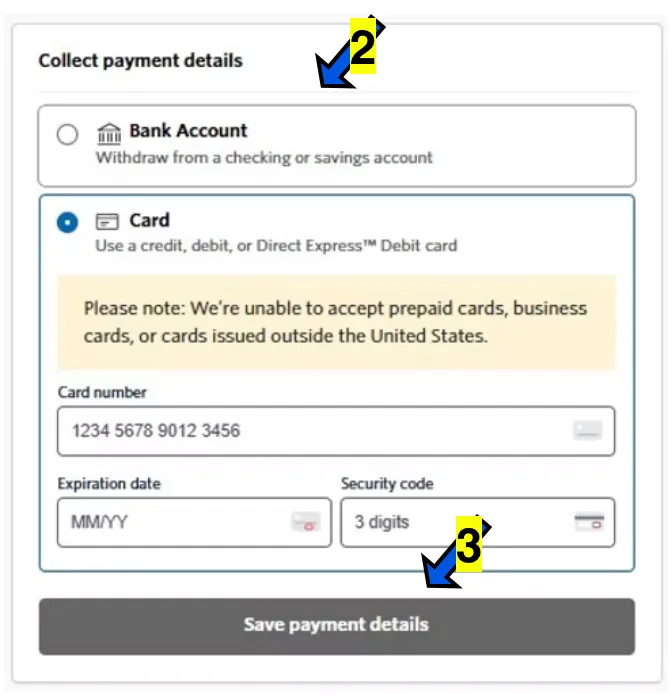
  2. 2
    click BANK ACCOUNT or CARD as the payment method and enter information accordingly.
  3. 3
    click the SAVE PAYMENT DETAILS button.
  4. 4
    on the next screen, confirm details then click on the CONTINUE button.
17
Step 17 screenshot
Step 17 screenshot
  1. 1
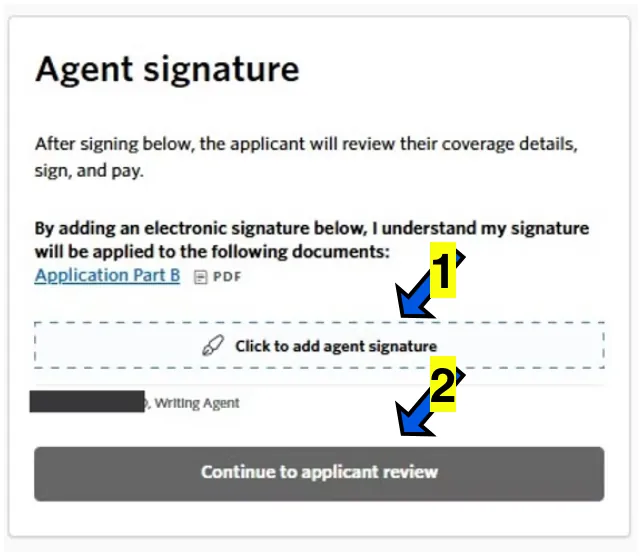
    in the AGENT SIGNATURE section, click the CLICK TO ADD AGENT SIGNATURE
  2. 2
    click the CONTINUE TO APPLICANT REVIEW button.
  3. 3
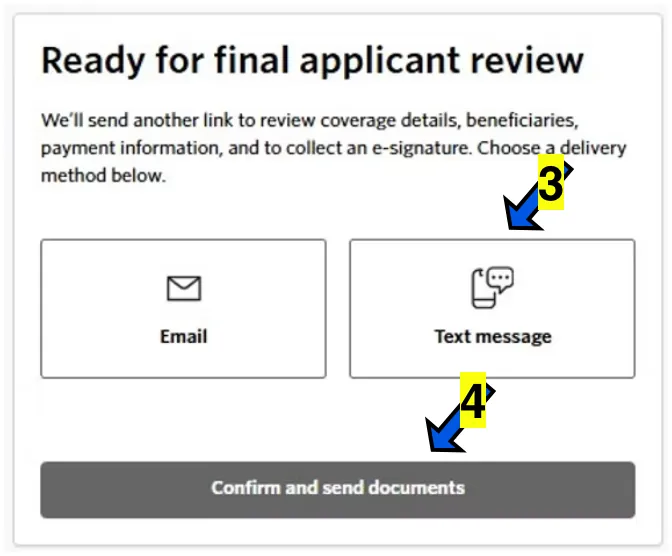
    click EMAIL or TEXT MESSAGE as the esignature delivery method. TEXT recommended.
  4. 4
    click the CONFIRM AND SEND DOCUMENTS button.
Client script

Final Signature Guide

Read the blue script lines to the client word for word. The screenshots are what the client sees on their phone.
18
Step 18 screenshot
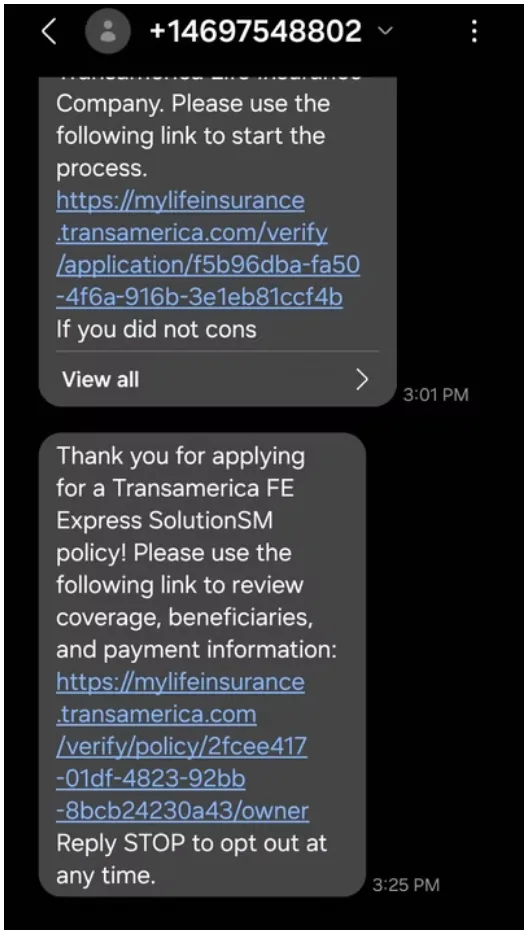
“Now [Client’s Name], I’m going to send you a one more text for the final signature.”
“You should receive a text message that says, “THANK YOU FOR APPLYING FOR TRANSAMERICA FE EXPRESS”
“Go ahead and go down to the link that starts with HTTPS and click on that link.”
19
Step 19 screenshot
Step 19 screenshot
Step 19 screenshot
Step 19 screenshot
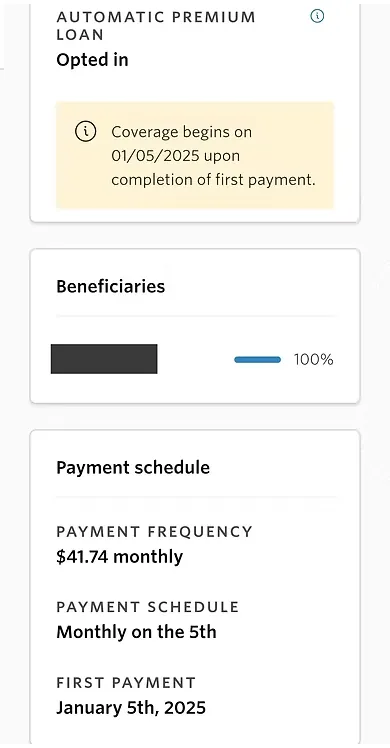
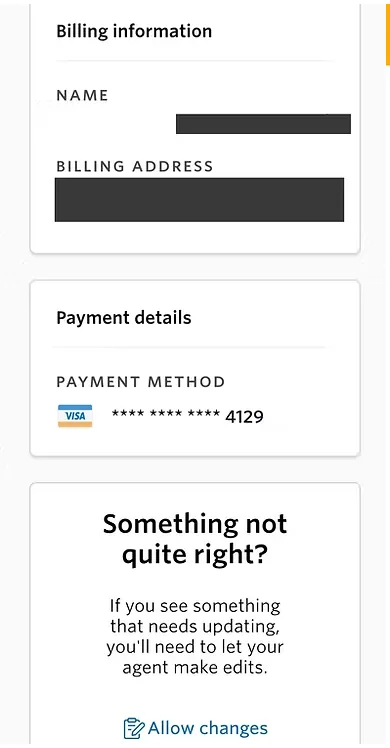
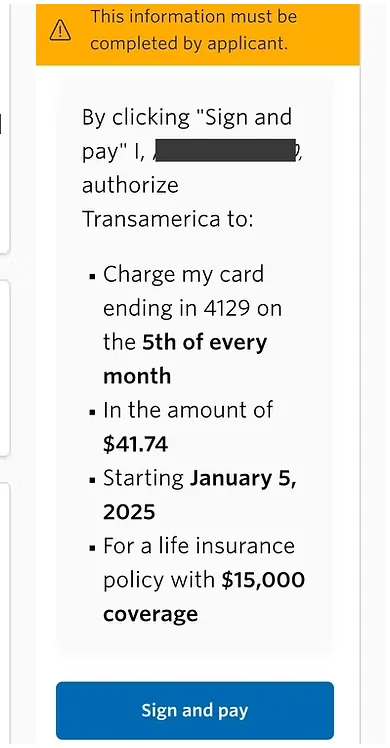
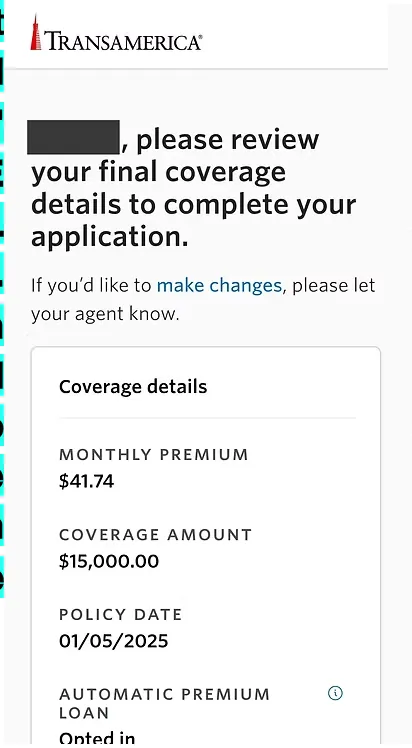
“Now on the next screen at the very top, you should see where it says "[Client's Name], PLEASE REVIEW YOUR FINAL COVERAGE DETAILS". Go ahead and scroll down and review the details, and at the very bottom, go ahead and click the blue SIGN AND PAY button to finalize the application.”
↩ back in the e-app
20
Step 20 screenshot

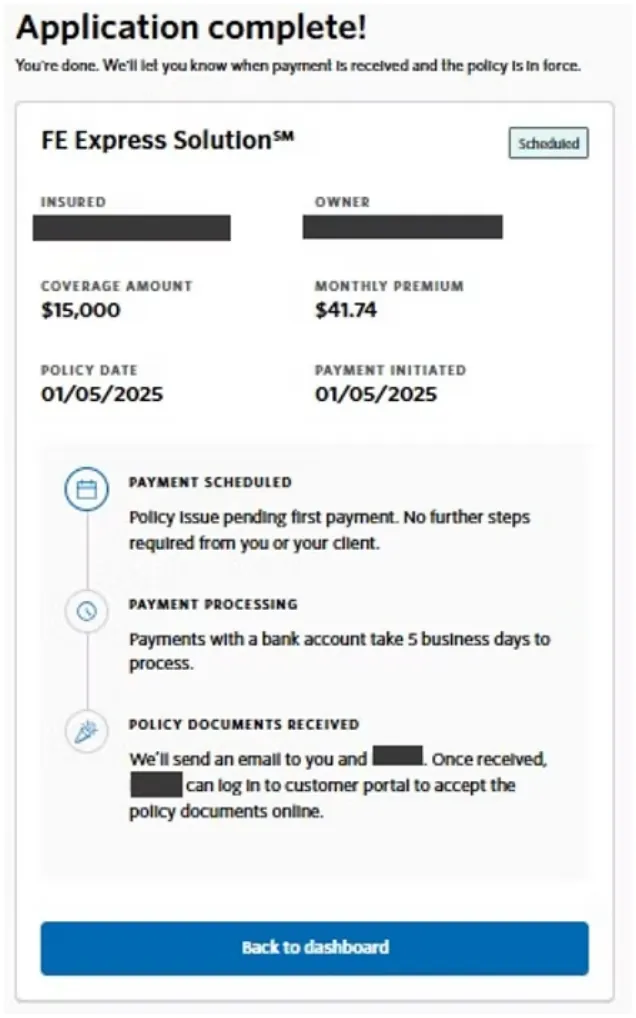
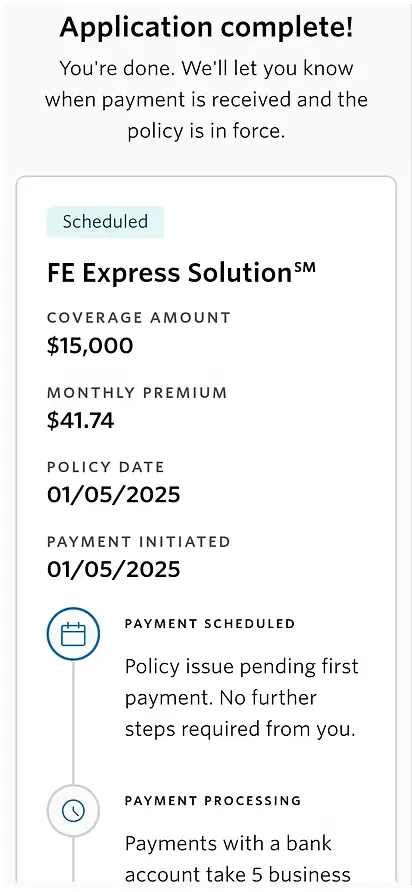
As the agent, you should now see this screen after the client has successfully signed.

Eapp Is Complete
Note BELOW IS A GUIDE TO HELP YOU GUIDE THE CLIENT THROUGH THEIR PORTAL IF YOU CHOOSE TO.
Optional

Client Portal Guide Script

Optional — walk the client through their portal after the app is complete.
21
Step 21 screenshot
Step 21 screenshot
Step 21 screenshot

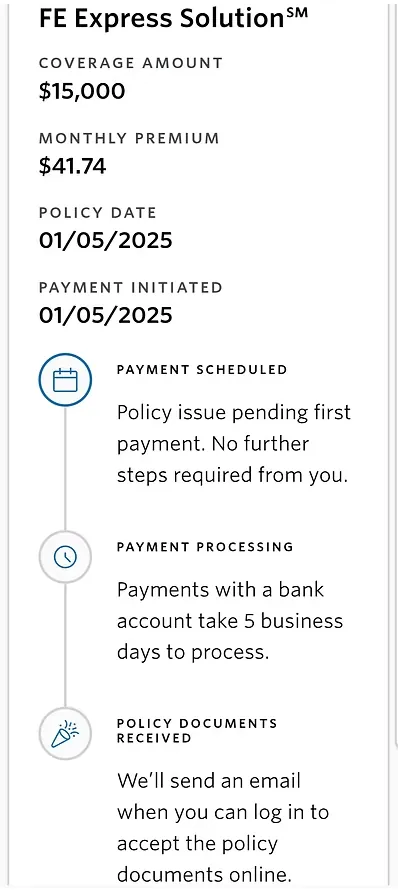
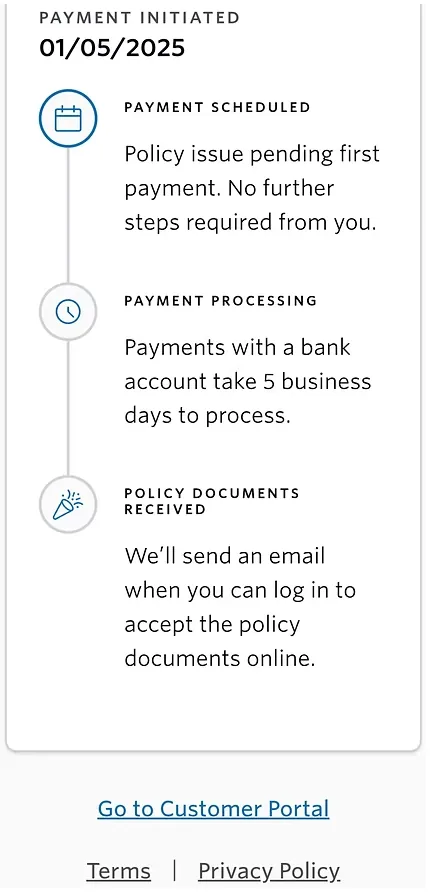
“Now on the next screen at the very top, you should see where it says APPLICATION COMPLETE. Go ahead and scroll all the way down to where it says GO TO CUSTOMER PORTAL in blue. Go ahead and click on that and I'll walk you through your portal real quick.
22
Step 22 screenshot
Step 22 screenshot
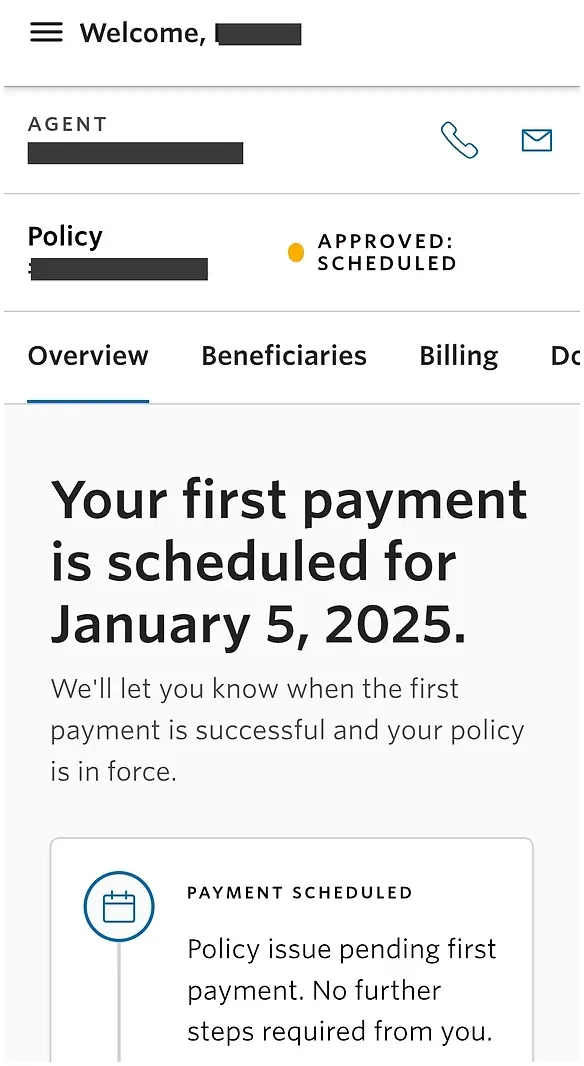
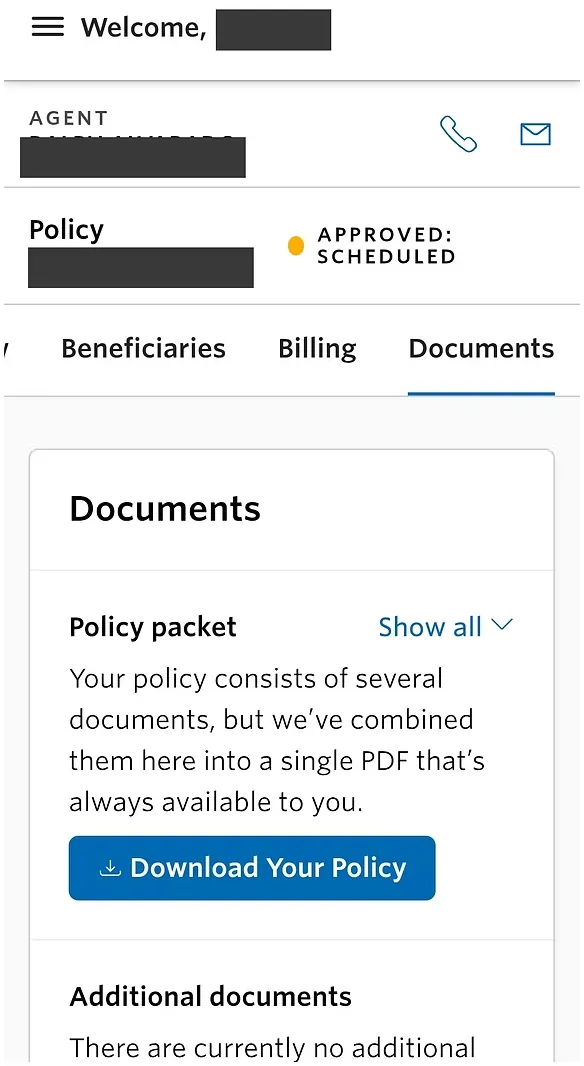
“Now in your portal at the top left, you should see where it says AGENT and it will have my name underneath. To the right of that, you'll see a phone and mail icon. If you click on the phone icon, it will pop my number up on your phone so you can call me. If you click on the mail icon, it will let you email me.”
“Below that section you'll see your policy number.”
“Now under that you'll see where it says "Overview, Beneficiaries, Billing, and Documents" You can always click on Beneficiaries or Billing to change beneficiaries or change billing information. Under the Documents tab, you'll have access to your application and policy packet at any time by clicking on the "Download Your Policy" button. Any questions for me [Client's Name]?”
↩ back in the e-app